-
Hi everyone,
As you all know, Coffee (Dean) passed away a couple of years ago. I am Dean's ex-wife's husband and happen to have spent my career in tech. Over the years, I occasionally helped Dean with various tech issues.
When he passed, I worked with his kids to gather the necessary credentials to keep this site running. Since then (and for however long they worked with Coffee), Woodschick and Dirtdame have been maintaining the site and covering the costs. Without their hard work and financial support, CafeHusky would have been lost.
Over the past couple of weeks, I’ve been working to migrate the site to a free cloud compute instance so that Woodschick and Dirtdame no longer have to fund it. At the same time, I’ve updated the site to a current version of XenForo (the discussion software it runs on). The previous version was outdated and no longer supported.
Unfortunately, the new software version doesn’t support importing the old site’s styles, so for now, you’ll see the XenForo default style. This may change over time.
Coffee didn’t document the work he did on the site, so I’ve been digging through the old setup to understand how everything was running. There may still be things I’ve missed. One known issue is that email functionality is not yet working on the new site, but I hope to resolve this over time.
Thanks for your patience and support!
- Husqvarna Motorcycles
- Husqvarna Motorcycles - Sweden
- Vintage/Left Kickers
- Vintage Restoration Projects
You are using an out of date browser. It may not display this or other websites correctly.
You should upgrade or use an alternative browser.
You should upgrade or use an alternative browser.
Magnificent 7
- Thread starter dartyppyt
- Start date

dartyppyt
Husqvarna
Pro Class
Like giving blood! Got more cuts on my hands than on them machined parts****************************************!!!
View: https://m.youtube.com/watch?v=Kh7rYN3kcQA
310huskyTE
Husqvarna
Pro Class
that's how much australia is like America. that singer off midnight oil became a politician!
Then he did a backflip on everything he stood for while he was with midnight Oil! Hypocrite!

Then he did a backflip on everything he stood for while he was with midnight Oil! Hypocrite!
ajcmbrown
Husqvarna
Pro Class
dartyppyt
Husqvarna
Pro Class
Hi there. Could you please outline how you painted your fuel tank, like stage by stage? I am interested in how many coats you applied to get such a great finnish, decals under the clear top coat, just one top/clear coat? Many Thanks.
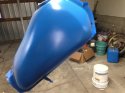
Depending on what metal you are using, steel, aluminum, etc.....
This is what I use:
New chrome plated tank. I cover the area to be chromed with duct tape. I blast outside of tank cause paint will chip and come off on the chrome.
Aluminum I sand tank to 150 grit for good bite. The panel areas I start at 220 grit.
Clean whole tank plus your hands with grease and wax remover.
Then mask off your panel areas.
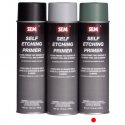
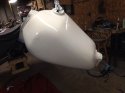
I first use SEM self etch primer then scuff sand.
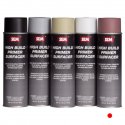
I then use SEM high build primer. I sand with 220 grit between coats. High build means it fills scratches, pin holes, etc.....
When I get all that done. I use a can of black lacquer paint to spray mist all over main areas.
I use 220 grit paper wrapped around a good level paint stirring stick. I sand tank to remove the black.
Any black left is a low spot. I keep using high build primer in area or some times use glazing putty to fill low spots in.
I do not use many decals. All paint work. The eurethane likes to lift decals and that's whole nother tricky process.
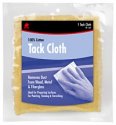
I retape my side panels use grease and wax remover on tank and my hands. I hang tank and use a tack rag, air gun, etc... To make sure no loose dust. Your compressor has to have attachments on it to trap water and I use oil trap filter. If not paint fish eyes.
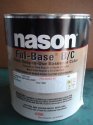
Then I use Nason 2K epoxy primer sealer. Shoot whole tank.
Once cured, I scuff the epoxy with 320-400 grit paper and wet sand.
I retape my side panels, rehang tank and wipe down with grease wax remover.
I tag rag and use air gun.
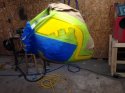
So if I want a gold husky logo and gold pinstripe. I spray those areas of tank.
Later after base coat cures, I place my vinyl logo and apply my vinyl pin stripe. On pin stripe, I stick it to my shirt so tape is less sticky. I retape my side panels. I use air gun and tack rag on whole tank but make sure you clean your hands with lacquer thinner.
I spray my main base coat and let paint flash. I apply another coat and let flash.
Later using exacto knife. I sneak under the vinyl decals to remove them. When remove pinstripe, I pull straight back on tape. Keep paint from peeling and gives nice clean edge. The epoxy primer is what makes the paint stick as well.
I re tape my side panels then tack rag whole tank. Again, your hands have to be oil free.
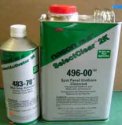
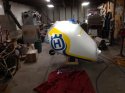
Then I mix my eurethane clear up an I use a spot panel touch up gun. I spray eurethane at suggested air pressure and coat based on eurethane directions. Eurethane has to flash. On my next coat. I crank my air pressure up at gun to 55 psi.
This eliminates orange peel. I look into the paint as it hits the surface to watch how I apply it. Not heavy just a good, get it wet, even coat. Lighting is important and what ever you paint needs surrounded with fluorescent lighting.
There is an art to the whole process and took me years to learn. If I get a run, I have a technique to remove it while paint still wet using panty hose and thinner.
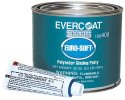
#1 use good automotive Refinish products(DuPont, Ditzler, Nason, etc..... Duplicolor over counter stuff is junk. As soon as you spill gas on it. Paint or clear comes right off.
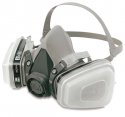
#2 use a good respirator. The stuff in this paint, if inhaled can poison you or make your lungs stick together.
#3 Area dust free and well ventilated
#4 Must be no traces of any oil or water in equipment or on your hands.
#5 any coats have to flash. Means dry with any chemicals needing to evaporate. Or your next coat will lift.
#6 patience. Takes me about 4-8 hours just to paint a tank.
#7 it is expensive. Average paint and materials run me about $300 just for tank.
#8 when spraying edges along chrome side panels. Ease off on paint and clear. Because when you remove tape. Looks like it is 1/4 thick. Your pants are going to those areas and wear you paint and clear off. Or peel it.
Attachments


dartyppyt
Husqvarna
Pro Class
Guys,
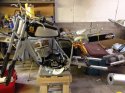
Slow going! I will fill you in later after I pull something off!
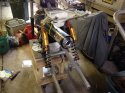
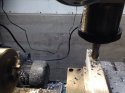
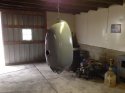
But here is my 390 silencer that I am making so far. I will finish milling the mount for it this weekend but not putting it on till I build my pipe.
However, I am going to make silencers for all my bikes except 500.
That emblem was cut out and filed all by hand out of round tubing.
I may do one with tubing anodized gold and another blue.
I still have to take emblem back off and blast the gold paint area so paint sticks good.
It is a show piece....... And will look good sticking out of side panels by rear fender.
I designed it so I can also remove rear cap to insert a spark arrestor screen.
Also, you can run over the silencer with your truck and the tubing is not going to bend.
I'm not sure if rear bracket will be pop riveted on or I thread it? Pop rivets tell me that in crash, something will give with rubber bushing mount.
The tubing, I had it anodized black.
I chose to pop rivet emblem on so kinda gives it an old school look.
Slow going! I will fill you in later after I pull something off!
But here is my 390 silencer that I am making so far. I will finish milling the mount for it this weekend but not putting it on till I build my pipe.
However, I am going to make silencers for all my bikes except 500.
That emblem was cut out and filed all by hand out of round tubing.
I may do one with tubing anodized gold and another blue.
I still have to take emblem back off and blast the gold paint area so paint sticks good.
It is a show piece....... And will look good sticking out of side panels by rear fender.
I designed it so I can also remove rear cap to insert a spark arrestor screen.
Also, you can run over the silencer with your truck and the tubing is not going to bend.
I'm not sure if rear bracket will be pop riveted on or I thread it? Pop rivets tell me that in crash, something will give with rubber bushing mount.
The tubing, I had it anodized black.
I chose to pop rivet emblem on so kinda gives it an old school look.