I wish I had never seen one. Now I've just got to have one and I can't find one!!!
Good luck and have fun with the resto.

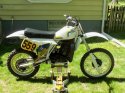
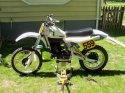
I've got a 84 500CR, with 83 tank ..for sale...
Husky John
As you all know, Coffee (Dean) passed away a couple of years ago. I am Dean's ex-wife's husband and happen to have spent my career in tech. Over the years, I occasionally helped Dean with various tech issues.
When he passed, I worked with his kids to gather the necessary credentials to keep this site running. Since then (and for however long they worked with Coffee), Woodschick and Dirtdame have been maintaining the site and covering the costs. Without their hard work and financial support, CafeHusky would have been lost.
Over the past couple of weeks, I’ve been working to migrate the site to a free cloud compute instance so that Woodschick and Dirtdame no longer have to fund it. At the same time, I’ve updated the site to a current version of XenForo (the discussion software it runs on). The previous version was outdated and no longer supported.
Unfortunately, the new software version doesn’t support importing the old site’s styles, so for now, you’ll see the XenForo default style. This may change over time.
Coffee didn’t document the work he did on the site, so I’ve been digging through the old setup to understand how everything was running. There may still be things I’ve missed. One known issue is that email functionality is not yet working on the new site, but I hope to resolve this over time.
Thanks for your patience and support!
I wish I had never seen one. Now I've just got to have one and I can't find one!!!
Good luck and have fun with the resto.


Sorry, had'nt been on the site for a while. Good looking machine. Overall condition and price?I've got a 84 500CR, with 83 tank ..for sale...
Husky John
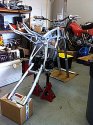
My experience with the 500 motor was that it had so much power it put added stress at the frame holes where the swingarm bolt went through in a jerking motion and oblonged the regular round holes on both sides. The frame section at that location is a single width piece of steel and needed to be beefed up. It's welded with hardened steel washers on both sides to provide support so in theory the swingarm remains in line and the rear wheel tracks straight. The 500 has enough power that it oblongs the hole in the frame that even if you beef it up so you keep an eye on it. Welding washers at this location was common practice/fix in those days. My 83 Maico has the same treatment at this location. Regular maintenance on the swingarm bearing assembly is key. The factory went with a larger size swingarm bolt in later years and I think that helped to resolve the problem.
The 83 and 84 use the two bolts on the right, newer models use the wider one on the left. I also have one of the original bolts somewhere in my garage that shows where it was worn down (narrowed, allows for more movement causing more wear and tear) at the frame junction.
I'm trying the compression release as this size motor can be a bear to start when your in the middle or end of a two hour hare scramble, fifteen miles from the start, and your a tired older rider. The compression release works well for the 490 Maico so it should work on this Husqvarna. Should be easier to start at the beginning of the race as we (Florida Trail Riders - Hare Scramble Series) use a Lemans type start where you run to your bike, start it up and take off. Not everyone's bike starts right away and this cuts down on the number of bikes at that first turn or when you have a line of bikes and only a single track trail 40" wide into the tight woods sections with no alternate lines available.