-
Hi everyone,
As you all know, Coffee (Dean) passed away a couple of years ago. I am Dean's ex-wife's husband and happen to have spent my career in tech. Over the years, I occasionally helped Dean with various tech issues.
When he passed, I worked with his kids to gather the necessary credentials to keep this site running. Since then (and for however long they worked with Coffee), Woodschick and Dirtdame have been maintaining the site and covering the costs. Without their hard work and financial support, CafeHusky would have been lost.
Over the past couple of weeks, I’ve been working to migrate the site to a free cloud compute instance so that Woodschick and Dirtdame no longer have to fund it. At the same time, I’ve updated the site to a current version of XenForo (the discussion software it runs on). The previous version was outdated and no longer supported.
Unfortunately, the new software version doesn’t support importing the old site’s styles, so for now, you’ll see the XenForo default style. This may change over time.
Coffee didn’t document the work he did on the site, so I’ve been digging through the old setup to understand how everything was running. There may still be things I’ve missed. One known issue is that email functionality is not yet working on the new site, but I hope to resolve this over time.
Thanks for your patience and support!
You should upgrade or use an alternative browser.
TE/TC 17 TE 150
- Thread starter dartyppyt
- Start date
Notdoneyet
Husqvarna
A Class
I contacted Hammerhead and they won't have a lever available until the end of May at the earliest and I couldn't get a feeling for the length with my brief email discussion.
I think I need 1 inch shorter minimum and more likely 1.5 inch to get the tip where I want it to hit my boot.
I looked at the shifter on a '16 125 sitting on the show room floor at the dealer and the shift lever is just the perfect length. There is probably too much difference in the '16 125 and '17 150 motors for a direct swap I'm guessing?
A member on another forum said he had the same problem (even with size 11 boots) on his new TE250 and ended up putting a shift lever from a 2012 250 SX on it that was laying around his shop.
I know the 150 and 250 don't share much motor wise so I'm asking if anybody knows of a shorter shift lever that might fit from a 125 or smaller bike or any other Husky or KTM motor that would be a direct swap?
cullenking
Husqvarna
I've read this thread from the first page and I don't recall this issue coming up in discussion. I have size 9 feet and this TE150 is the first bike I've ever owned that has such a long shift lever. So long that when I'm standing the tip is even or past the end of my boot so I have to move my foot forward to make a shift which isn't helping keep pace.
I contacted Hammerhead and they won't have a lever available until the end of May at the earliest and I couldn't get a feeling for the length with my brief email discussion.
I think I need 1 inch shorter minimum and more likely 1.5 inch to get the tip where I want it to hit my boot.
I looked at the shifter on a '16 125 sitting on the show room floor at the dealer and the shift lever is just the perfect length. There is probably too much difference in the '16 125 and '17 150 motors for a direct swap I'm guessing?
A member on another forum said he had the same problem (even with size 11 boots) on his new TE250 and ended up putting a shift lever from a 2012 250 SX on it that was laying around his shop.
I know the 150 and 250 don't share much motor wise so I'm asking if anybody knows of a shorter shift lever that might fit from a 125 or smaller bike or any other Husky or KTM motor that would be a direct swap?
I just picked up a hammerhead from my local KTM dealer, busted my stock shift lever toe thingy, $80 to replace, or $35 for a KTM orange hammerhead shifter. Not sure what part number off the top of my head, but it was just hanging on the wall in the KTM dealer. They should be able to sort you out.
Notdoneyet
Husqvarna
A Class
Unfortunately my local dealer hasn't been very helpful.
dartyppyt
Husqvarna
Pro Class
Darty any ride reports on how bike is performing?
Bike is awesome!
I have not had time yet, to get two more things to try. In order to even get more out of her.
I'm working on getting the front forks dialed right now.
.42 stock are too soft. Have a .46 spring in one side but seems like it is lil too harsh bottoming. My oil height might need dropped too.
I might try putting in the Dal Saggio X P one kit?
Also, I may contemplate changing my gearing. Maybe going up a tooth front or dropping tooth on rear.
Bike has a lot of grunt on bottom and first gear is almost useless. It is pulling out of turns in 2-3rd gear with out the clutch.
I'm between a 500-510 main jet but still want to stick a 520 in to try.
I just need more ride time on it.
I've let couple guys try the bike and they cannot believe it's a 150.
dartyppyt
Husqvarna
Pro Class
New jetting for TC 125's / 250's
http://press.husqvarna-motorcycles.com/News_Detail.aspx?id=49729&menueid=7442&l=english
dartyppyt
Husqvarna
Pro Class
http://press.husqvarna-motorcycles.com/News_Detail.aspx?id=50102&menueid=7442&l=english
dartyppyt
Husqvarna
Pro Class
I read it as Husky plans to ship injected bikes worldwide, including us here in Merica. This will be interesting to see it all unfold.
Pretty sure dealer gets 1 250 and 1 300 for 2018.
If I was lil younger, I snag a 250 as well.
dartyppyt
Husqvarna
Pro Class
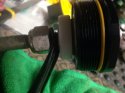
While taking my Xplor fork caps off, then taking out 10cc of fork oil out of each leg.
I put the caps back on and notice that my left compression clicker would not work. It was like the clicker was just spinning in the cap. I messed with the darn thing with no luck. Hmmmm came apart as normal, then went back together normal?????? But clicker now doesn't work****************************************!! Well, that cap does not totally come apart. So, I said heck with it and ordered a new one. So, with discount it is $135 bux. Got the new cap and installed it and it is fine. I hate taking things apart with out a manual. Come to find out from fooling with the old cap. If the clicker runs out, meaning the brass part that pushes on the internal rod, that works valving. You can strip the threads, pretty easy. So if this happens to you. You take the cap back off, take pair of needle nose pliers, and reach up under the cap. Turn the brass piece, I believe clockwise till the clicker grabs it. Then watching the brass piece. Run your clicker till it fully bottoms out up in the cap. If you run into my issue and keep turning the clicker on the bike. It can mess the threads up and there is no way to un assemble it, to fix. So with that being said. Here is an approach I'm using to take fork cap off, then installing it.
Before removing the top cap. Make sure your clicker is in the middle of adjustment. Not full and not soft. About 15 clicks midway. Then remove your air bleeders if you have them. Same goes on the rebound side. If you don't the preload adjusters hit your air bleeders and can bend them or pull the threads out.
Then slide your wrench up under cap, to hold nut on spring guide, between the spring.
Using bigger wrench on your cap remove it.
When you go back to install the cap. Hold your threads with your fingers and run the spring guide nut, down towards the bottom of fork. Just enough to get between the spring guide nut and cap with a pair of needle nose pliers.
When you screw the fork cap back on. It has to bottom out on the thread, before putting a wrench between the spring and spring guide nut, in order to pull it up then to tighten it against the cap.
If you do not do this. The cap can drag on the threads and not be seated properly. Then when you move the clicker, it will never bottom. When it never bottoms, you have the grand opportunity, for the clicker to come apart. When it cone apart internally and you move it a lot, trying to figure out what happened, you can damage the internal threads of the clicker.
Every time I've takin the caps off in past, never had an issue. So this one baffled me till I figured it out.
Two things I'm up to try in these forks to improve them more. I might try the Dal Saggio XP one kit. Also, Mx Tech has a new complete insert for approx $900 bux. Good news is! They have a new insert for the 4CS forks, as well. Yep, it's $900 bux too.
Had lil accident at work last week and my knee was dislocated and bruised from my knee to my toes. Plus, it got my ankle as well. So, while I cannot ride now. I guess I'm going to move the bar forward more on the bike.
Notdoneyet
Husqvarna
A Class
dartyppyt
Husqvarna
Pro Class
But you see in front pic of vid above.....
Screw your spring guides down some just to sneak a pair of needle nose pliers in there to hold threads, when threading your fork cap back on. It has to bottom on the threads first. Then you keep rotating cap with wrench after that to bring your spring guide up to tighten against your fork cap.
If you don't thread your cap on the rod first and there is resistance. It leaves a gap in between brass adjuster under cap and threads/ rod that adjusts the compression and rebound to valving. That makes your adjuster or shall say clicker, become unthreaded inside of cap. I assume that it came unthreaded in mine and damaged the threads inside my cap. Makes the adjuster just spin either way (soft or hard) without stopping. I prob did it enough that the adjuster threads won't bite in the brass piece that moves in and out under cap. $135 lesson learned.
I will try to post pics using my old cap later.
dartyppyt
Husqvarna
Pro Class
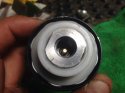
If it does. Then on the opposite end. Your clicker will become unthreaded. If you spin it enough. Then the threads do not want to bite. I got this one working again with a lil brute finesse.
If it does come all the way out. Push it in and turn counter clockwise till it stops. Them move your clicker and draw it all the way in. Like the last pic.
Attachments


dartyppyt
Husqvarna
Pro Class
Make sure cap is hand tightened good on rod first or clickers won't work.
Then proceed turning cap to bring spring guide and nut up to tighten against bottom of cap.
There is just a bolt and nut I stuck in here to illustrate where you slide the pliers in.