-
Hi everyone,
As you all know, Coffee (Dean) passed away a couple of years ago. I am Dean's ex-wife's husband and happen to have spent my career in tech. Over the years, I occasionally helped Dean with various tech issues.
When he passed, I worked with his kids to gather the necessary credentials to keep this site running. Since then (and for however long they worked with Coffee), Woodschick and Dirtdame have been maintaining the site and covering the costs. Without their hard work and financial support, CafeHusky would have been lost.
Over the past couple of weeks, I’ve been working to migrate the site to a free cloud compute instance so that Woodschick and Dirtdame no longer have to fund it. At the same time, I’ve updated the site to a current version of XenForo (the discussion software it runs on). The previous version was outdated and no longer supported.
Unfortunately, the new software version doesn’t support importing the old site’s styles, so for now, you’ll see the XenForo default style. This may change over time.
Coffee didn’t document the work he did on the site, so I’ve been digging through the old setup to understand how everything was running. There may still be things I’ve missed. One known issue is that email functionality is not yet working on the new site, but I hope to resolve this over time.
Thanks for your patience and support!
You should upgrade or use an alternative browser.
125-200cc 06 Wr125 Redo - Done
- Thread starter dartyppyt
- Start date
dartyppyt
Husqvarna
Pro Class
Attachments


dartyppyt
Husqvarna
Pro Class
Attachments

dartyppyt
Husqvarna
Pro Class
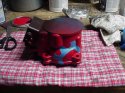
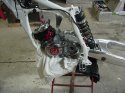
Damn Darin, this is just going to look like it is going mach 3 sitting on the kick stand.
Glad you like it Walt. Didn't seem like it, but have been busy behind the scenes.
Bench Racer 117
Husqvarna
A Class
dartyppyt
Husqvarna
Pro Class
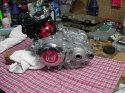
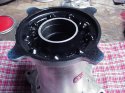
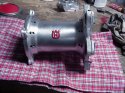
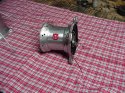
Those hubs look dope. That's what I should have done. And the black on the outer is a great idea. Very cool. The front wheel will look good since you took the lower brown stuff off. It should look pretty trick.
Thanx, Bench Racer! I tested the center area on the rear hub, polishing it smooth. I held it up against the swingarm and the shine wasn't identical. I then tested the front hub with the brushed look and thought it looked good. I then decided to clear coat the hub. I also shot the recessed area in red on the front hub and didn't like it. That's why I went the black route. By the way! I could not find a set of black rims. Hall's sold out of them. I talked to a guy up in Wisconsin, he has been anodizing and powder coating rims for 5 years. I shared my concern about the coating coming off. He assured me that the way he preps his rims, the powder coating will not chip off. Hey for $80 bucks, I'll try it!
Thanx!
Darin

LawnDartMike
Husqvarna
AA Class
dartyppyt
Husqvarna
Pro Class
Thanx!
Darin