• Husqvarna Motorcycles Made In Sweden - About 1988 and older

  • Hi everyone,

    As you all know, Coffee (Dean) passed away a couple of years ago. I am Dean's ex-wife's husband and happen to have spent my career in tech. Over the years, I occasionally helped Dean with various tech issues.

    When he passed, I worked with his kids to gather the necessary credentials to keep this site running. Since then (and for however long they worked with Coffee), Woodschick and Dirtdame have been maintaining the site and covering the costs. Without their hard work and financial support, CafeHusky would have been lost.

    Over the past couple of weeks, I’ve been working to migrate the site to a free cloud compute instance so that Woodschick and Dirtdame no longer have to fund it. At the same time, I’ve updated the site to a current version of XenForo (the discussion software it runs on). The previous version was outdated and no longer supported.

    Unfortunately, the new software version doesn’t support importing the old site’s styles, so for now, you’ll see the XenForo default style. This may change over time.

    Coffee didn’t document the work he did on the site, so I’ve been digging through the old setup to understand how everything was running. There may still be things I’ve missed. One known issue is that email functionality is not yet working on the new site, but I hope to resolve this over time.

    Thanks for your patience and support!

Twin Shock Piggyback Ohlins Rebuild

schimmelaw

Husqvarna
AA Class
Are these shocks rebuildable in the garage w/ basic hand tools and a rebuild kit from Phillip? Not real concerned w/ valving updates/changes just wanted to freshen up the seals, oil and nitrogen.

Has anyone done it themselves? If so, given a "do over" what would/could/should you have done differently? What were the results?. Any pitfalls? Any special tools? Instruction guide?

Addressing this shock issue is one of 2 or 3 big things I have left to do and would like to do it out in the garage vs sending them out to someone.
 

Attachments

  • chain guide - supplement 082.jpg
    chain guide - supplement 082.jpg
    93.4 KB · Views: 372
I've done those in the past as well as modern shocks. I only drawback is one can never fully remove the air from the unit unless you have a specialized tool for that.
I send mine out to Javier of TrailTricks Engine and Suspension, he's a well known KTM wrench in CA. but knows Ohlins, Marzocchi, WP, KYB and Showa.
A genius in the suspension dept!
 
I did mine, fabricated a spring compressor and the rest was just handtools. I would recommend buying the seal heads assembled as the inner seals are a pain, not much more to buy them that way and its worth it. The best tip I got was of course keep eveything in order, esp dampening discs. Next was to heat the oil up to 150-180 deg. before filling shock. That reduces the viscosity and helps keep air bubble entrapment when filling . I have everything to refill the nitrogen already because I do hydraulic work and use it in accumalators. I believe Rick Lago @ Motocentre in Yakima Wash. only charges $125-$150 labor for a pair plus parts. :thumbsup:
 
Thanks boys,
I guess I got to get a assembly manual. Never tore into a shock before - don't know how/where to start BUT I ain't scared.
 
Husq.fleet;74446 said:
I did mine, fabricated a spring compressor and the rest was just handtools. I would recommend buying the seal heads assembled as the inner seals are a pain, not much more to buy them that way and its worth it. The best tip I got was of course keep eveything in order, esp dampening discs. Next was to heat the oil up to 150-180 deg. before filling shock. That reduces the viscosity and helps keep air bubble entrapment when filling . I have everything to refill the nitrogen already because I do hydraulic work and use it in accumalators. I believe Rick Lago @ Motocentre in Yakima Wash. only charges $125-$150 labor for a pair plus parts. :thumbsup:

Will Rick sandblast and repaint the bodies? So that you have a rebuilt " new " looking shock. I would be interested in having him do my 1980 Remote Reservoir Shocks.

Also has anyone heard if Phillips new replacement braided hoses actually are threaded specifically to mate with the older stock body? I have read in a couple of places with people having problems with the new hoses not threading correctly.

Phillip - if you are reading this can you please clarify?

T
 
As for cleaning and painting the shocks I'm pretty sure he offers hat service. He is a great guy, easy to talk to and very involved with the PNW vintage racing, Hammer and Tongs. I believe his website is www.motocentre-maico.com, if not, that will get you close. He has a list of services and prices on the site. Scott


Checked website and it is correct. Dont let the Maico thing scare you off-he's a Husky guy too!
 
Ohlins manual

schimmelaw;74455 said:
Thanks boys,
I guess I got to get a assembly manual. Never tore into a shock before - don't know how/where to start BUT I ain't scared.

I believe there is a article on shock rebuilding on this site under tech references. I bought the service manual and its vague on the models. I think the old article was better. Doing all the work you have done on the bike, the shocks will be a "relaxing" project. But then again I ride like my ten year old daughter so who knows if I did them right!
 
Shocking update. Damn the torpdos - full speed ahead. Disassembled, cleaned, new seals, tefllon bands, bushings, bump stop and reassembled up to this point. Really need help now:
(1) How do I add oil?
(2) How much?
(3) Where?
Thanks in advance to those in the know.
Rick
 

Attachments

  • Husky Shock Rebuild 011.jpg
    Husky Shock Rebuild 011.jpg
    93.9 KB · Views: 488
  • Husky Shock Rebuild 006.jpg
    Husky Shock Rebuild 006.jpg
    86.1 KB · Views: 411
The translation !!!
Ohlins shock Grand prix refection
Dismantling : been meeting problems while dismantling these shocks, I describe here the dismantling for the beginners. There’s also a PDF in English (http://pureenduro.free.fr/Div/OhlinsJPC/OhlinsOverhaul.pdf) where refection is explained in details.
1)Remove springs , spring retainers, and take off gas in order to take off oil shock.
2)Press reservoir end down 1 or 2 centimeters in order to see the circlip. You can push softly with a plastic hammer if it resists.
3)Remove circlip and be careful not to damage the inside.
4) Remove reservoir end.
5) Remove the reservoir piston.
If the piston is locked in the the reservoir, you can screw a long M3 screw on it.
These operations can allow you to control the good shape of pistons and seals.
This allow you to take off all the oil. In my case all was good.
6)Remove scraper retainer ( Cap). It is not screwed but only pulled down.
You can use a screwdriver and a hammer. Be careful. Push gently all around the scraper retainer (Cap).
7)Push down the internal part ( see picture) until you see the first circlip.( There are three on these shocks).
Then remove the circlip.
8) Then you can remove this part ( see picture)
9) Do the same with the next part to remove the circlip.
10)Then, normally you can remove the part. But it is here I’ve got a big difficulty. Impossibility to remove this part.
This part moves up and down on several centimeters, but it don’t want to go out easily. And nothing on it to pick it up. I had the same problem on the two shocks. I tried to use a steel wire to get it out, but it didn’t work.
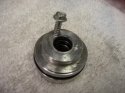
I sacrified this part, but no problems because the three parts piled up are now replaced by ohlins by one part (ASSY).
I made a hole in this part with a DREMEL , screwed a screw for wood and pull on it ( see picture).
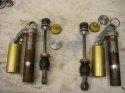
11) Remove the 3rd circlip and the next part. Then you can pull the piston shaft and all the parts on it.
12)All you’ve got to do now, is to unscrew the nut and pull all the parts. Note the order of the parts or keep them together with a plastic wire ( Serflex = see picture) .
All the parts:
Painting: The painting has been made by a professional because I couldn’t find myself the originals colors.
Reservoirs are painted In gold and have been also varnished. Springs have been painted in black and marine blue.
They are not always blue.
Ohlins parts:
Before assembling, you must find spare parts to change: They are available at French ohlins importer.
PFP Racing
2 r Marc Seguin
ZA Mamou
15130 Arpajon sur Cère Téléphone 33.(0)4.71.48.15.34
Fax 33.(0)4.71.64.25.93

With that PDF, you can find the numbers of the parts wanted.
http://pureenduro.free.fr/Div/OhlinsJPC/ohlins.pdf
It costed me 250 € for the parts. It is not easy to find the right number for the parts because several numbers are possible. Better to phone to the importer to have help.
The “kit”:


In this KIT, there’s a new part which remplaces the three parts ( right), so you need to put back only two circlips.
Stickers:
I took these sold by PLAN PLAN ( French stickers maker)
http://membres.lycos.fr/bpiimprimeur/

Assembling:
all the parts
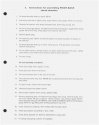
Instructions for assembling.
(then you can translate the whole page of the ohlins workshop manual .Between N° 6 and N°7 it is added :order of parts on the shaft).
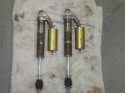
In the end , I’ve got that !!!
It makes me a beautiful pair of öhlins shock for 450 €.
Jean-Philippe.
 
Michel,
Mostly followed your guide up to #12 for disassembly. Putting a screw in the upper bushing/bearing for removal is genius!! Thats how I got mine out.

HJ,
You are the man. This my friend has been printed off, plastic sleeved and in the Husky binder. Parts in the article are different than mine but the principal/procedure is the same.
Answers all my reassembly and oil refilling questions and even a few tid bits of info I would have never known about (theory of washer action, placement and orientation of "BIG" washers and nitrogen amount).

On ward thru the fog.
 
Husq.fleet,
May take you up on the offer when I get to that point - shipping be damned. I know a fellow CHr would take care of me.
Odering up some oil and misc. from Phillip on Monday.
Rick
 
ruwfo;74701 said:
Guys,
Here's a shock rebuild how to :thumbsup:

l've got one for resevoir ones too :D

Husky John


Hi.
Is there any chance I can take a peek at the remote resevoir rebuild manual? It's one of the last hold ups for me.... Thanks
 
Ohlins reservoir shock manual

Site, says i can't upload, Ohlins reservoir shock manual as it's too large

Maybe Husky T can help out & i'll email it to him & he can post it in tech
section, What you think T


Husky John
 
ruwfo;74886 said:
Site, says i can't upload, Ohlins reservoir shock manual as it's too large

Maybe Husky T can help out & i'll email it to him & he can post it in tech
section, What you think T


Husky John

I found a article on this site from MXA 82-83? Great two-three page easy to understand on rebuilds, cant find it again. I printed it but I dont have a scanner, I'll see what I can do about getting it posted. Schimm. do you have a John Deere, Cat shop or a Hydraulic service nearby? They will fill those shocks also, just tell them the pressure. If you want to ship them that would be OK also! Scott
 
Scott,
Thanks for the heads up. There is a huge DARR facility in Irving. I would have to check yellow pages for others. Thanks again though,
Rick
 
Back
Top