-
Hi everyone,
As you all know, Coffee (Dean) passed away a couple of years ago. I am Dean's ex-wife's husband and happen to have spent my career in tech. Over the years, I occasionally helped Dean with various tech issues.
When he passed, I worked with his kids to gather the necessary credentials to keep this site running. Since then (and for however long they worked with Coffee), Woodschick and Dirtdame have been maintaining the site and covering the costs. Without their hard work and financial support, CafeHusky would have been lost.
Over the past couple of weeks, I’ve been working to migrate the site to a free cloud compute instance so that Woodschick and Dirtdame no longer have to fund it. At the same time, I’ve updated the site to a current version of XenForo (the discussion software it runs on). The previous version was outdated and no longer supported.
Unfortunately, the new software version doesn’t support importing the old site’s styles, so for now, you’ll see the XenForo default style. This may change over time.
Coffee didn’t document the work he did on the site, so I’ve been digging through the old setup to understand how everything was running. There may still be things I’ve missed. One known issue is that email functionality is not yet working on the new site, but I hope to resolve this over time.
Thanks for your patience and support!
You should upgrade or use an alternative browser.
Size of tool needed for steering head nut?
- Thread starter gandalf
- Start date
glangston
Husqvarna
Pro Class
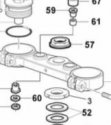
This is from the owner's manual. I have them all written down somewhere from measuring them with a micrometer but I'm on vacation. Some old bicycle wrenches I have actually fit them pretty well. If you need a thin wrench to adjust this you might check out the bicycle shop.
I did not take the handle bars off to confirm. Let me know if you want me to do that.
I cannot find my digital calipers at the moment

Keep in mind that when getting to the larger metric sizes the usa equivalents can be used often, use a calculator.
gandalf;6207 said:Thanks fellas for the info. I didn't look in the manual,!
I just got my steering dampener in the mail from Kelly and want to do some installing
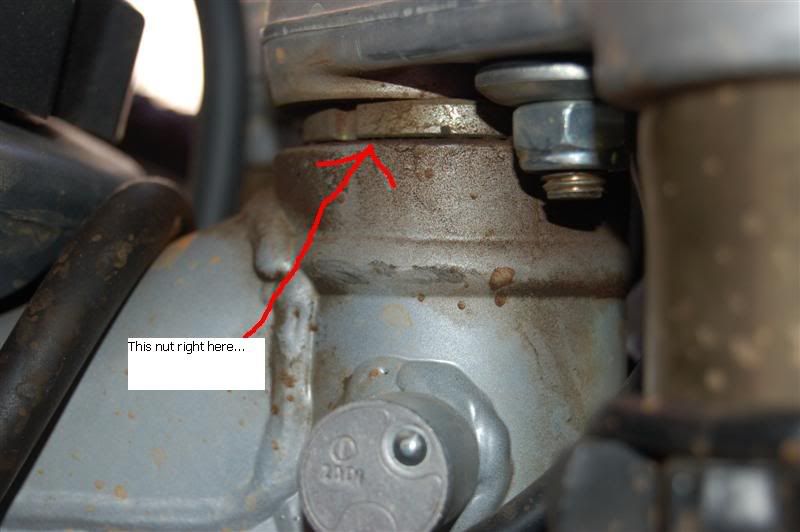
It is under "steering wheel ball play adjustment" page 122 in my 2006 TE manual, not in the torque specs, and I cannot find where the nut size is specified.
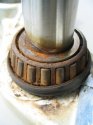
Seahorse;6224 said:Make sure you lubricate your steering head bearings whilst you have the opportunity, otherwise they will end up looking like this...
Your living up to your CH handle Sea Horse

Seahorse
Husqvarna
AA Class
Coffee;6226 said:Your living up to your CH handle Sea Horse
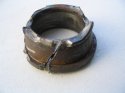
Unfortunately if your Steering Head bearings get to this stage they are almost impossible to remove. My son took the unit to his workshop for me (He repairs Locomotives) and tried heating the bearing... with no luck.When they get this corroded, there is only one answer to the problem. Hammer & Chisel :foul:. If you approach it carefully, you will get the inner race off without damaging the shaft..
I have fully documented the Steering Head Bearing overhaul on my bike, just waiting for an opportunity to formalise it for posting here on the forum.
As a further word of warning of the dangers of lack or regular lubrication, I will post up a pic of what the inner race looked like after it finally met its match....
")
Note: No damage whatsoever was done to the shaft whilst removing the race...
Attachments
gandalf
Husqvarna
AA Class
Seahorse;6224 said:Nut size is 30mm
Make sure you lubricate your steering head bearings whilst you have the opportunity, otherwise they will end up looking like this...
I'm glad you mentioned lubricating the steering head bearings; thanks
 . I took care of both the upper and lower while I was in there. I now have my Motosportz steering dampener installed
 I can't wait to go for a ride, but it'll probably be a couple weeks
 before my shoulder is feeling ready again.
PALMER84ONE
Husqvarna
AA Class
gandalf;6254 said:I'm glad you mentioned lubricating the steering head bearings; thanks
You must be running the original tank. Did you never get the IMS tank to fit right. I have the damper too but I have the IMS tank and no fitment pin for the damper.
I just might have to put the peanut tank on again if Kelly takes much longer. I am like chomping at the bit now. 
PALMER84ONE;6267 said:You must be running the original tank. Did you never get the IMS tank to fit right. I have the damper too but I have the IMS tank and no fitment pin for the damper.
That is what I would do if the damper was important to me, and carry extra fuel.
gandalf
Husqvarna
AA Class
PALMER84ONE;6267 said:You must be running the original tank. Did you never get the IMS tank to fit right. I have the damper too but I have the IMS tank and no fitment pin for the damper.
I gave up on that tank. I'm sure most fit well and Jeff is going to try and fit it to one of his bikes to see for sure. I took a lot of time trying to get it to fit and it just wouldn't fit well. I tried everything short of modifying the tank with warm water and it just wouldn't sit right. I could get it close, but I'd have to force the seat on in a way that would probably destroy the seat after a few rides. I really don't need the range here in SJ, but wanted to get a tank because who knows when I will do more traveling and want to ride longer than these enduros. Jeff@Halls was very helpful btw trying to help me get it to fit and making sure I was happy
PALMER84ONE
Husqvarna
AA Class
Coffee;6269 said:That is what I would do if the damper was important to me, and carry extra fuel.
Oh, thanks Dean! put a sword through my heart
 Kelly must be having one heck of a time trying to make it work with the IMS tank. Thing is is that I wanted my "cup cake" and eat it too. Don't think I would have spent the money on it just yet if all I get to do is look at it on the bench waiting to be installed. I was hoping, (like Kelly said) it would be ready to go in a couple of weeks. So,
  hopefully soon or I will be with a $$ part, I am not getting to use. I can wait, the Lord has taught me patience. Was just hoping sooooooon.
reveille
Husqvarna
Pro Class
Micfasto
Husqvarna
AA Class
reveille
Husqvarna
Pro Class
Yes, I could have bought a Scotts dampener and used the BRP setup but I chose to support a company that supports us.