-
Hi everyone,
As you all know, Coffee (Dean) passed away a couple of years ago. I am Dean's ex-wife's husband and happen to have spent my career in tech. Over the years, I occasionally helped Dean with various tech issues.
When he passed, I worked with his kids to gather the necessary credentials to keep this site running. Since then (and for however long they worked with Coffee), Woodschick and Dirtdame have been maintaining the site and covering the costs. Without their hard work and financial support, CafeHusky would have been lost.
Over the past couple of weeks, I’ve been working to migrate the site to a free cloud compute instance so that Woodschick and Dirtdame no longer have to fund it. At the same time, I’ve updated the site to a current version of XenForo (the discussion software it runs on). The previous version was outdated and no longer supported.
Unfortunately, the new software version doesn’t support importing the old site’s styles, so for now, you’ll see the XenForo default style. This may change over time.
Coffee didn’t document the work he did on the site, so I’ve been digging through the old setup to understand how everything was running. There may still be things I’ve missed. One known issue is that email functionality is not yet working on the new site, but I hope to resolve this over time.
Thanks for your patience and support!
You should upgrade or use an alternative browser.
Plating ?
- Thread starter dartyppyt
- Start date
This would be required if you are planning for a plating process with a thicker plating thickness over what was originally applied. When you deal with platers, you need to know the thickness of the film they apply. One restorer here used a lot of nickel plating. Schimmelaw comes to mind. I considered his supermoto build thread almost textbook for restoration process.
Gord
Husqvarna
AA Class
What you need:
1 gallon of vinegar ($2.50 at any market)
½ Cup Magnesium Sulphate (Epsom Salt, get it any pharmacy)
½ Cup Sugar (Yup, the stuff you put in your coffee)
About 8” of 3” wide zinc flashing or any chunk of zinc like a boat anode. If you should be able to find zinc flashing at the hardware store, but if not you can get it online.
An aerator from a fish tank, Petco or other pet store.
Empty plastic jug with sturdy sides, like a detergent container something that isn’t too flimsy
A few old metal coat hangers
A manual battery charger.
2 test lead’s with an alligator clip on each end of each.
How to do it:
Cut the top off the empty jug and wash it out good inside.
Pour the vinegar, sugar and Epsom salt into the jug and stir it up well so it mixes in good.
If you are using zinc flashing, bend one side over the side of the jug and have the rest of it hanging on the inside of the jug. If your using an anode, suspend it so that it is mostly submerged in the solution with a little sticking out the top.
Run the hose from your aerator into the solution and start the aerator.
Let everything sit overnight, this will allow some of the zinc to dissolve into the solution.
Prep your parts:
Glass bead or wire brush all your parts really well, removing any rust or paint, then wash them very well in soap and water to remove any grease an oils that may be on them.
Next day;
Cut the coat hanger into pieces, making one to bridge the top of the jug and a few other pieces to use as hangers to hang your pieces into the solution. Clean the pieces of hanger down to bare metal with steel wool or sandpaper.
Next, with the battery charger UNPLUGED, run a test lead from the positive lead on the battery charger to the anode or flashing.
Now starting with your heaviest pieces to coat first, hang them one piece at a time into the solution from the bridge so they are completely submerged in the solution.
Run a test lead from the negative lead on the battery charger to the bridge your part is hung from.
Plug in charger. After a few seconds you will notice what looks like smoke coming off you part. It is actually zinc attaching to your part. Leave it in there between 5 and 10 minutes. Then UNPLUG the charger and remove the piece. Be careful when you grab the hangers, sometimes they get hot.
Next, using steel wool or a soft copper wire brush polish up the pieces removing all the gray haze. It takes a little while to do this but it works. I usually give my pieces 3 baths in the solution cleaning them up after each dip. Also if you want to you can polish the pieces with a rope wheel when you are done and they will almost look like chrome. If you have a small buffing machine, that is even better and faster.


schimmelaw
Husqvarna
AA Class
Jimspac - thanks for the comps. Still piddling w/ it.
Gord - Now that is some very very cool results for a home grown plating method**************************************** I'm impressed. It would scare the he** out of me to try it but im thrilled to know its doable. (Me, electricity and chemicals sounds like an accident waiting to happen. "....uhhhh Beth, can you take me to the hospital.... I had an accident and can't see......I think I burnt my hands but I can't see....oh! and I smell smoke.....is the shop on fire.....?")
Gord
Husqvarna
AA Class

dartyppyt
Husqvarna
Pro Class
A friend of mine and I made our own zinc plater and it works great. Here is a break down of what we did. All non toxic to boot. I'll try to add some before and after pics.
What you need:
1 gallon of vinegar ($2.50 at any market)
½ Cup Magnesium Sulphate (Epsom Salt, get it any pharmacy)
½ Cup Sugar (Yup, the stuff you put in your coffee)
About 8” of 3” wide zinc flashing or any chunk of zinc like a boat anode. If you should be able to find zinc flashing at the hardware store, but if not you can get it online.
An aerator from a fish tank, Petco or other pet store.
Empty plastic jug with sturdy sides, like a detergent container something that isn’t too flimsy
A few old metal coat hangers
A manual battery charger.
2 test lead’s with an alligator clip on each end of each.
How to do it:
Cut the top off the empty jug and wash it out good inside.
Pour the vinegar, sugar and Epsom salt into the jug and stir it up well so it mixes in good.
If you are using zinc flashing, bend one side over the side of the jug and have the rest of it hanging on the inside of the jug. If your using an anode, suspend it so that it is mostly submerged in the solution with a little sticking out the top.
Run the hose from your aerator into the solution and start the aerator.
Let everything sit overnight, this will allow some of the zinc to dissolve into the solution.
Prep your parts:
Glass bead or wire brush all your parts really well, removing any rust or paint, then wash them very well in soap and water to remove any grease an oils that may be on them.
Next day;
Cut the coat hanger into pieces, making one to bridge the top of the jug and a few other pieces to use as hangers to hang your pieces into the solution. Clean the pieces of hanger down to bare metal with steel wool or sandpaper.
Next, with the battery charger UNPLUGED, run a test lead from the positive lead on the battery charger to the anode or flashing.
Now starting with your heaviest pieces to coat first, hang them one piece at a time into the solution from the bridge so they are completely submerged in the solution.
Run a test lead from the negative lead on the battery charger to the bridge your part is hung from.
Plug in charger. After a few seconds you will notice what looks like smoke coming off you part. It is actually zinc attaching to your part. Leave it in there between 5 and 10 minutes. Then UNPLUG the charger and remove the piece. Be careful when you grab the hangers, sometimes they get hot.
Next, using steel wool or a soft copper wire brush polish up the pieces removing all the gray haze. It takes a little while to do this but it works. I usually give my pieces 3 baths in the solution cleaning them up after each dip. Also if you want to you can polish the pieces with a rope wheel when you are done and they will almost look like chrome. If you have a small buffing machine, that is even better and faster.
Gord?
On your home brew. Can you make a double/triple batch of the mix? When you mix everything together, to sit overnight. Are you running the aerator as well? Can the mix sit till next time you use it or what is the shelf life?
Thnx
Darin
Gord
Husqvarna
AA Class
A buddy of mine did the experimenting with our plater. Above is his answer to your question. Also, if you have even a bench grinder and can put a 5" or 6 " sisal wheel on it, that works great. It removes the haze and leaves a bright finish very quickly with some inexpensive compounds.
dartyppyt
Husqvarna
Pro Class
I imagine you could make double or triple batches and I do leave the aerator running when I have it sitting overnight. The longest I have let the mix sit is 3 weeks between plating and it worked fine.
A buddy of mine did the experimenting with our plater. Above is his answer to your question. Also, if you have even a bench grinder and can put a 5" or 6 " sisal wheel on it, that works great. It removes the haze and leaves a bright finish very quickly with some inexpensive compounds.
I'll Be Darn. Sure looks like it works!
With my battery charger, seems like it goes faster if I put it on boost.
Here are pics of first couple parts I did as a test. Wire wheel/clean/degrease. 10mins/polish/degrease, 10mins/polish/degrease, 10mins polish/degrease.

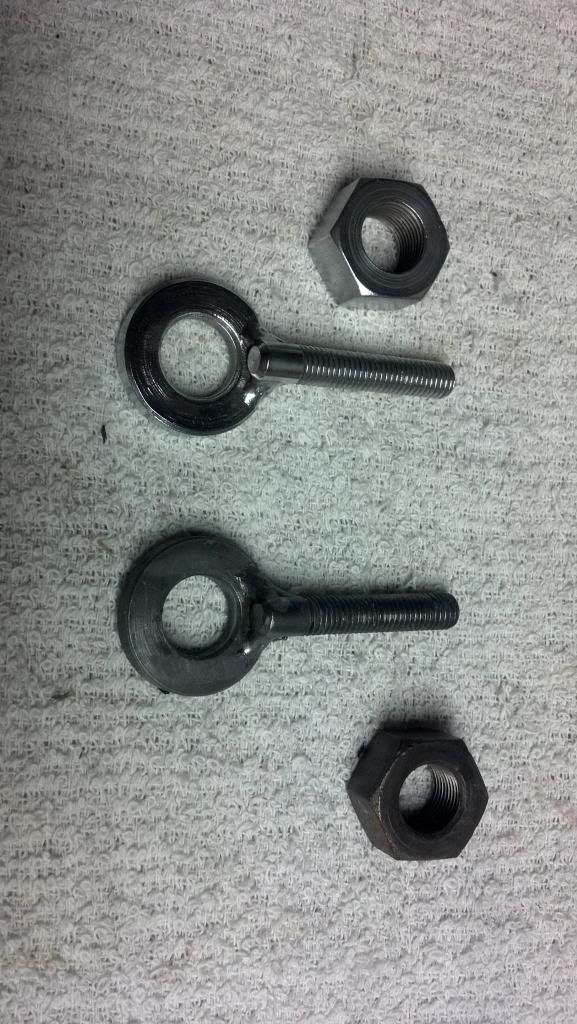
Top ones were plated/polished. Bottom ones are degreased awaiting wire wheel.
Gord
Husqvarna
AA Class
dartyppyt
Husqvarna
Pro Class
Looks great dartyppyt! If you plan to do a lot of these small pieces, pick up an inexpensive syphon feed blast cabinet. It saves a lot of time and energy for cleaning and removing rust on any of the parts before plating. You will find yourself using it for all kinds of other projects as well.
Thanx Gord!
Yes, I have a blast cabinet and will use it like you say.
Thanks again
dartyppyt
Husqvarna
Pro Class
I made a mix of 1/3 muratic acid and 2/3 water. Water goes in first before acid. Definately an outdoor job because of toxic fumes. I let parts soak till bubbling stopped and those areas turned black. I wire wheeled them, bead blasted, cleaned, replated. Works great.
Gord, be neat for you to do a whole thread on this, step x step.
oldbikedude
Husqvarna
Pro Class
Gord
Husqvarna
AA Class
I have been following this thread & have been wanting to do my own zinc plating for years. Can you tell me a little more about the charger you are using (volts / amps) & what can I buy at Home Depot or Lowes for the zinc?
You can't use an automatic charger. Some of the new chargers are. The first one we tried didn't work do to that. Once we switched to my older 6 amp 12/6 volt charger it worked great and we knew instantly it was working.
Ask for some zinc flashing.
dartyppyt
Husqvarna
Pro Class
http://www.tractorsupply.com/en/sto...-charger-with-engine-start-6-12v?cm_vc=-10005
As a bridge to hold parts, I use an 1/8 in piece of steel round stock, clean real good with sand paper. Then like gord says, use like coat hanger thickness wire to hang parts in bath.
I also found that using a soft brass wire wheel (for bench grinder) takes the gray coating off real easy (easier than doing it with steel wool/or scotch brite pad), without removing the zinc. I just do this between 3 coats, then last coat, I polish the piece.