-
Hi everyone,
As you all know, Coffee (Dean) passed away a couple of years ago. I am Dean's ex-wife's husband and happen to have spent my career in tech. Over the years, I occasionally helped Dean with various tech issues.
When he passed, I worked with his kids to gather the necessary credentials to keep this site running. Since then (and for however long they worked with Coffee), Woodschick and Dirtdame have been maintaining the site and covering the costs. Without their hard work and financial support, CafeHusky would have been lost.
Over the past couple of weeks, I’ve been working to migrate the site to a free cloud compute instance so that Woodschick and Dirtdame no longer have to fund it. At the same time, I’ve updated the site to a current version of XenForo (the discussion software it runs on). The previous version was outdated and no longer supported.
Unfortunately, the new software version doesn’t support importing the old site’s styles, so for now, you’ll see the XenForo default style. This may change over time.
Coffee didn’t document the work he did on the site, so I’ve been digging through the old setup to understand how everything was running. There may still be things I’ve missed. One known issue is that email functionality is not yet working on the new site, but I hope to resolve this over time.
Thanks for your patience and support!
You should upgrade or use an alternative browser.
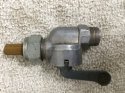
petcock for mid 70s gas tank
- Thread starter dumpbear
- Start date
Ron
Husqvarna
AA Class
justintendo
klotz super techniplate junkie
dumpbear
Husqvarna
AA Class
Tom

justintendo
klotz super techniplate junkie
dumpbear
Husqvarna
AA Class
the petcock rebuild kit # is 16 121 233 000Z
i don't know if the rebuild kit is for our huskys but for 10.95 you ain't out much let me know if it work's LOL I googled Karcoma petcock there were alot of places that sold rebuild kits i don't what they fit cause i was lookin for the barb and Capital Cycle was the only place i found them.Now i should go back and look up the rebuild kits i know i have at least one that weeps pretty bad.Good luck .Hey don't buy to many they will think they got a hot item and jack the price up

Tom
justintendo
klotz super techniplate junkie
Cliff Anderson
Husqvarna
i think 2 or 3 would good for awhile...nice find
Cliff Anderson
Husqvarna
Appreciate any help you might be able to offer.
Attachments
Crashaholic
Husqvarna
Pro Class
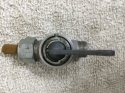
This picture is what I bought from Bing Power Systems. Looks similar to the kit from Capital City.
Attachments
vintagecs
Husqvarna
AA Class


Bill502
Husqvarna
AA Class
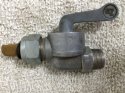
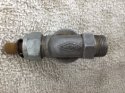
The first picture shows a socket where I cut a slot with a hacksaw for the lever to fit through. Works perfect. 1/2" I think. The second picture shows the kit I got from the Bing Agency in Kansas City; about $23 so the Capitol City kit sounds much better. You can see how much thicker the new gasket is, and when installed the lever is so hard to turn I think it might break. Bill, will oiling alone help this? Crash, how in the world did you sand it down? I bought some rubber coated gasket material to make my own, but I don't have a punch to knock out the holes. Maybe I can find one on eBay.
View attachment 47403 View attachment 47404
I have the same rebuild kits from Bing also,I haven't rebuilt mine yet as they are still working but I always use some type of oil on new assemblys of rubber to metal.
I wonder about the thickness of the rubber washer.
Keep us posted how that works..
Good idea on the socket.
dartyppyt
Husqvarna
Pro Class
Originally, I was going to buy just some, same thickness gas/chemical resistant rubber, then punch out holes with leather punch. Then use gas resistant washers/orings for thread joints. Then I saw these kits so ordered one to try.
Guess we will all get it figured out.
Crashaholic
Husqvarna
Pro Class
I sanded the rubber valve seat by pushing it back and forth over 320 wet and dry, it took half an hour. The process tore micro chunks of rubber from the holes making them somewhat like a crater, but enough area between the holes remained level. Bottom line was the valve didn't leak.
I called Charlie at the Bing Agency and ask about the excessive thickness and he told me I just needed to make a jig to squeeze the valve assembly together. I made the same tool as you did and used a bench vise as you did but without success. It wouldn't go together. Its apparent that no one at the Bing Agency uses this product.
I have two more kits and was considering making another valve seat thinner by sliding it around on a hot plate. I've melted the rough edges of rubber hose before using a soldering iron and had pretty good results. I'm still pondering this idea.

In regards to the liquid rubber, is it thin enough to just pour into the valve body to the required depth?
dartyppyt
Husqvarna
Pro Class
Get a washer with center hole same size as the outer rubber size. Washer should be thickness of what you want to make it.
Then outer washer will be your height to guide you. Use a new razor blade and using washer as guide to be level, you should be able to slice excess off like slicing bread with a guide. Put lil Wd40 on razor blade.