-
Hi everyone,
As you all know, Coffee (Dean) passed away a couple of years ago. I am Dean's ex-wife's husband and happen to have spent my career in tech. Over the years, I occasionally helped Dean with various tech issues.
When he passed, I worked with his kids to gather the necessary credentials to keep this site running. Since then (and for however long they worked with Coffee), Woodschick and Dirtdame have been maintaining the site and covering the costs. Without their hard work and financial support, CafeHusky would have been lost.
Over the past couple of weeks, I’ve been working to migrate the site to a free cloud compute instance so that Woodschick and Dirtdame no longer have to fund it. At the same time, I’ve updated the site to a current version of XenForo (the discussion software it runs on). The previous version was outdated and no longer supported.
Unfortunately, the new software version doesn’t support importing the old site’s styles, so for now, you’ll see the XenForo default style. This may change over time.
Coffee didn’t document the work he did on the site, so I’ve been digging through the old setup to understand how everything was running. There may still be things I’ve missed. One known issue is that email functionality is not yet working on the new site, but I hope to resolve this over time.
Thanks for your patience and support!
- Husqvarna Motorcycles
- Husqvarna Motorcycles - Sweden
- Vintage/Left Kickers
- Vintage Restoration Projects
You should upgrade or use an alternative browser.
methods of removing aluminum fuel tank dents.
- Thread starter bower100
- Start date


bower100
Husqvarna
AA Class

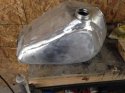
So that's 2 dents on right side, both up high, (I can actually just touch the big one with my finger thru filler hole). Then there's the three little ones on the left side. Two way up front very close to each other and finally the third is small but different from others in that whatever cause dent was bluntly pointed.(Could be a bugger to work out).
")
dartyppyt
Husqvarna
Pro Class
The bulls eye one? That real tough! Because it is in so far and the metal is stretched real bad.
My advice? The tank might as well be cut and dents driven out with body hammers and even a beater bag.
The bulls eye one as it comes out. Have to use a shrinking hammer on it.
Maybe I can help you out in the fall and do it, but right now, work is crazy and can't keep up with farm and even touch my bikes. Other option is to find one better?
Body filler is no good to use over 1/4 for depth. It will just pop out sometime especially on aluminum.
Only way is to get them real close to surface flush. Then file surface even and sand file marks out.
Desmoducky
Husqvarna
AA Class
The information contained in this series of paragraphs is intended for educational purposes only. It does not constitute fabrication or remedial repair advice. If you need remedial repair advice, you should consult a qualified aluminum fabricator licensed to practice in the country, state, province, town, city, hamlet, borough or village where you live. Unless otherwise noted, the information provided in this posting does not represent any official aluminum manufacturer/fabricator fabrication techniques from Kaiser or US Aluminum. The author has not made ANY efforts to ensure that the information contained in this posting is accurate, sound or safe. In fact, portions or the whole darn posting may be totally inaccurate. Neither the author of this posting or his dog, Buster assumes any liability for any inaccuracies, errors, or omissions contained in this posting.
As a courtesy to you, the readers, this posting presents information that was gathered from wild LSD users. The author did not evaluate, endorse or guarantee the accuracy of the remedial repair technique being presented or whether it is foolproof or safe, nor does Café Husky. The author does not assume any responsibility whatsoever for the content or the use of this content. The use or reliance upon the information presented here is entirely at the users own risk.... scary, huh?! DON'T BE STUPID AND BLOW YOURSELF UP or you'll have every neighbor calling Homeland Defense to raht you out.
O.K., here's the theoretical, hypothetical , spurious, ersatz methodology only ever done as a computer model... but first inspect the tank for ratty seams or other areas of concern:
1. Fill the tank tunnel with Plaster of Paris to keep the tunnel from collapsing;
2. Stop off the petcock hole with a threaded cover - make one if you have to by welding a blank over the top of a nut. When you install it, use Teflon tape to seal it up good;
3. If your tank has connecting undertubes, connect them together with a thick walled connecting hose and two stout band clamps;
4. Make a self sealing gas cap out of two pieces of 1/8" aluminum - one a simple rectangular length, which can fit down inside the tank and the other, a round piece with a matching piece of neoprene. Drill two hole in this one; one hole off-center so you can install a threaded air fill valve (off-center)and another centered hole so you can have a connecting bolt that will go thru to the center to the rectangular piece. Lower the rectangular piece into the tank so it can be drawn up to brace against the inside of the tank against the opening. This piece is aluminum for a reason; so you can shape it ever so slightly so you don't add any more dents to the tank from that rectangular piece - shape it to soften the corners and sharp edges. The neoprene will serve as the gasket so it will be air tight.
5. Now dab-nabbit you guys, don't go getting all reckless here! It doesn't take a lot of air, maybe five to seven pounds****************************************! And remember, as you heat the tank, the air will expand and built up even more pressure. I solved this problem by installing another bung hole in the air fill cap equipped with a length of hose and a pressure gauge so I can watch the pressure as it builds.
WARNING! WARNING! WARNING!
If you get inpatient and start putting in too much air, it is quite possible to "Plump Out" your tank or blow out a seam! And that can really suck! I know this first hand!
6. Take your mapp gas torch and started drawing concentric circles around the dent working from the exterior to the interior of the dent. Use a high temp thermometer as a guide to let you know if you are getting the aluminum anywhere close to it's melting point (1218 degrees Fahrenheit and 659 degrees Celsius for you Euro-bubbies). Keep the circles going... wax on, wax off, grasshopper, wax on, wax off! The dent will slowly become shallower and shallower... IF you work from outside to inside. Don't be tempted to blast the whole bloody dent with eat all at one time. You're asking for it. The center of the dent will serve as a temporary heat sink while you work your way to that point. Keep your hand on the cooler side of the tank so you can feel whether it is getting horridly hot or incrementally expanding. Thump on it with a rubber hose once in a while and you'll hear that the harmonic response will change pitch. Careful now! Don't want to draw back a stump due to carelessness.
Like magic, the dent will oh so slowly begin to disappear except for that nasty little point indentation where you best friend hit the tank with his beer bottle. If that little dent won't come out, it's time to make your other best friend who is a TIG welding superstar, fill in that teeny-weeny dent with his molten metal magic. Then when it cools down, you can take your die grinder with various grits of sand paper and some 3-M pads and make short work of the aluminum weld. If I learned one thing it is this: GRIND THE WELD AND NOT THE FIVE INCHES AROUND THE TANK!!! My pop would smack me up side the head if he caught me grinding the entire damned surface. Don't do that. You're smarter than that! Now polish that bad boy to match the desired look you're after.
7. Slowly chip away the Plaster of Paris and here too, don't get all impatient and reckless here. Forchrissakes, you don't need another dent.
8. Prepare tank to receive your finish of choice.
9. Mail $29.99 US CASH to Desmo for me if it works. If it doesn't, mail Desmo $29.99 US CASH for me anyway.
10. Sit back with a smug look on your face as your friends (mates if you're across the pond) ask how you did it and reply, "If I tell you, then you'd be as smart as me.
signed:
The Author who commandeered Desmo's computer
Crashaholic
Husqvarna
Pro Class
Desmoducky
Husqvarna
AA Class
I used this method to remove the dents out of the steel tank for the 1976 360 WR I rebuilt and used no filler whatsoever. It worked slicker than heck. Just make sure you fill the tunnel! I plumped the tunnel on one steel tank already...
I don't think I have to mention the danger of gasoline vapors when using a mapp gas torch...
Desmo

dartyppyt
Husqvarna
Pro Class
Aluminum, you put soot all over aluminum with acetylene torch.
Then add your normal blue flame with oxygen. By the time the soot burns off, the aluminum is almost to melting point.
So as your air is added in tank, you will shall say, blow a melted hole out.Aluminum is an odd duck. Very complicated to work with. When you weld it. The area around weld can shrink or kinda like fall in if your temp is lil too hot. Plus the aluminum has to be clean!
The only way to do an aluminum tank is to 1, clamp the dent out if you can reach it. 2, cut tank and use body hammers, beater bags and English wheel. Then reweld up tank with Tig, grind welds flush and pressure check for leaks.
When you remove dents, you also have file and sand to make dents level.
On steel tanks. Yes you can pressurize them, heat them and very few come out perfect.
I used to use PVC, wood shims, etc... To block tunnels. Now, I line the tunnel with wet news paper, wetted with diesel fuel and motor oil mix. Then fill tunnel with cement. You do all this all while cement is still green.Then you strap the outside of tank. When I am done, I just use and air chisel to bust out the green cement. Don't let it cure fully or good luck. I can add air pressure through a fitting I made at half psi at time. You heat dent outward working in but you better be fast with a wet rag in ice water to cool. Most time you are going to blow the dent outwards. Guys, there are tons of steel tanks out there that are rusted inside. They aren't worth one dollar! I will warn you that you could have a rust area almost rust through and you could blow your hand off! If have had these areas pop open and scare me to death. I won't mess with rusted tank. How would you like to spend 20 hours on tank removing dent, then find out there is a lil speck, size of pin. That lil speck was rust hole from inside rusting out. Then you try to weld it and the rust is so bad that when you weld it the metal falls apart.
So let's get back to dents that everyone usually has. The stretched and creased ones.
I just cut the tanks, use body hammers, shrinking hammers, beater bags, English wheel, files and sanding blocks.
Not as easy as it is. That's why you don't pay big money on ebay for dented tank.
It takes good auto body experience to work these out. If you can't do it, the expense for someone to perform it is more than tank is worth.
Not being negative just telling you the facts of what is involved. Or the expense you will have in all the tools, welders and experience. I got mine from years of cutting rust panels out of muscle cars and making a new section out of piece of sheet metal. Watch Jesse James and these guys make a tank from scratch. That's how you also remove dents.
But most of all! It's called being safe! There is nothing more valuable than an eye, finger, hand etc.....
Throw an aerosol can in a fire and watch it explode. That's what can happen. I have no problem blowing pipe dents out cause most are two stroke that had oil in them. But I always safety wire the ends, so the plugs don't blow out and hit you in the eye, etc....
Attachments

Crashaholic
Husqvarna
Pro Class
Good looking 360WR by the way.
Crashaholic
Husqvarna
Pro Class
Your topic on working on a rusted tank was excellent. I've seen those pin holes before and you're right, the area around them are thinner than paper.
I have zero body work experience so I consider myself a beginner if I would ever tackle a tank dent removal. What I have gathered from reading many posts regarding tank dent removal is that several factors are involved in obtaining a successful job. I think they include the operators ability, the type and thickness of material involved, the location of the dent, and the characteristics of the dent e.g. small, large, long and narrow, round, and deep or shallow.
Thanks again for the info.
dartyppyt
Husqvarna
Pro Class
Maybe in the future I can do a thread on a couple of toughy's.
Both steel and aluminum. That includes painting.
I'd like to show you how to take a tank to chromer. Show you how he copper plates it. Then I pick it back up and fill stuff in with solder. Then file and sand to feather. Then tank goes back for chrome plating.
It an enormous amount of work.
If have done all that stuff on scrap tanks, including freezing them.
One of these days when I have time. I have an idea on a set of pinch clamps that one could make.
But I will have to do it when I have a tank cut apart to fabricate it.