• Husqvarna Motorcycles Made In Sweden - About 1988 and older

  • Hi everyone,

    As you all know, Coffee (Dean) passed away a couple of years ago. I am Dean's ex-wife's husband and happen to have spent my career in tech. Over the years, I occasionally helped Dean with various tech issues.

    When he passed, I worked with his kids to gather the necessary credentials to keep this site running. Since then (and for however long they worked with Coffee), Woodschick and Dirtdame have been maintaining the site and covering the costs. Without their hard work and financial support, CafeHusky would have been lost.

    Over the past couple of weeks, I’ve been working to migrate the site to a free cloud compute instance so that Woodschick and Dirtdame no longer have to fund it. At the same time, I’ve updated the site to a current version of XenForo (the discussion software it runs on). The previous version was outdated and no longer supported.

    Unfortunately, the new software version doesn’t support importing the old site’s styles, so for now, you’ll see the XenForo default style. This may change over time.

    Coffee didn’t document the work he did on the site, so I’ve been digging through the old setup to understand how everything was running. There may still be things I’ve missed. One known issue is that email functionality is not yet working on the new site, but I hope to resolve this over time.

    Thanks for your patience and support!

Magnificent 7

Here is your long term solution to the older ohlins shock eyes:

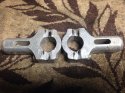
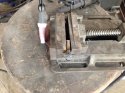
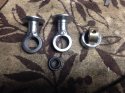
Go get you a 3/4 inch shaft collar at any farm store. Oh it is expensive at like $3 each. You know the ones with the set bolt.
This shaft collar which is real popular measures about 14mm width.
Bore whole to 22mm. Machinist did all of them for all my shocks @ $20 bux.
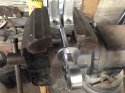
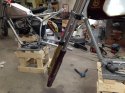
Carefully, cut and grind your old eyelet of keeping it's oval shaped end to eyelet.
In my case I just tig welded it on after squaring up in vice.
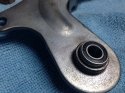
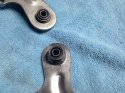
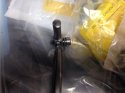
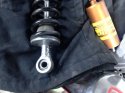
Accepts the same bearing as top or same as all four ITC's.
Bingo, no more rubber bushings and these bearings will always be easy to get and always available.
Got mine from motion industries for like $5 bux each. Yes, you do have to press them in and center them, but you can do it in your vise with a socket.
Bearing is GE12E
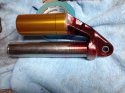
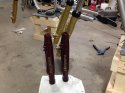
Yep, even on the reservoir shocks. Here is pic of pair done and bearing pressed in.
 

Attachments

  • image.jpg
    image.jpg
    182.6 KB · Views: 79
  • image.jpg
    image.jpg
    130.7 KB · Views: 82
you gonna zinc that stuff yourself? :thinking: time consuming!

Yeah, waiting on an old Mag tank from chromer, for guy. Then got to get that shot for him and hand pinstripe it.
Thinking about just having him do all my parts, just to save on time. If not, I will not be doing any posting till like spring, cause I would be plating. Thank gosh for bead blaster and wire wheel, cause I sure see a lot of dings in this stuff to take out from hammer asses!
 
Also, how many guys have pair of old 7/8 aluminum bark buster mounts? Grind them into a v at seams and they make great shaft holding v blocks in your vise with out messing up the shafts. Also, I use the ends to place them in vice with shock and works great till I get vise tightened.
 

Attachments

  • image.jpg
    image.jpg
    185.3 KB · Views: 46
Here is the brake pedals with bearings pressed in instead of those bushings.
Also, makes the pedal more solid instead of bushing.
Bearings have to be pressed in. On the foot side I am going to peen the end. Then don't have to worry bout bearing working its way out.
I posted the bearing numbers earlier then I am using an 8 mm id spacer 10 mm long from McMaster Carr, in between bearings. You can see in the pic, these just don't fall in and you have to press.

Update: I have total of 5 brake levers. The welded on bushing on one is 20 mm width.
Another one is 17mm width and the rest are 18mm width. So your center spacer between the bearings may need trimmed down 2-3 mm. So if it is 18mm minus two bearings 5mm thick = 10 mm. Then your spacer has to be trimmed down to 8mm.
 

Attachments

  • image.jpg
    image.jpg
    163.6 KB · Views: 50
  • image.jpg
    image.jpg
    240 KB · Views: 48
This weekend is time to get everything filled, welded up for platers.
Here I ground those shifter rivets out and welded holes shut on bottoms to be tapped M6 to accept a new shoulder bolt. Will cut excess off some day and peen the stainless thread ends. Had to drill top of shifter tip and shifter hole from 6 MM to 8MM. This is end result and head of bolt is shade taller but should be ok.
 

Attachments

  • image.jpg
    image.jpg
    171.4 KB · Views: 57
  • image.jpg
    image.jpg
    86.7 KB · Views: 55
Yep , gonna keep the fork legs and do the rear shock bodies on four Purty the same color as tank. I took this lower fork leg out in sun and boy did it look good. Looks dark in pic but colors really come out in the light.
 

Attachments

  • image.jpg
    image.jpg
    178.6 KB · Views: 29
Here is them in comparison.

Thoughts?

Dang these look good in the sun!
 

Attachments

  • image.jpg
    image.jpg
    127.9 KB · Views: 63
  • image.jpg
    image.jpg
    151.8 KB · Views: 64
Real nice attention to the detail work. Looks good.
How come that isn't a Husqvarna chainsaw in the background though? A "Poulan" must feel a bit out of place.
 
I meant the one in the black case there on the floor. Just thought it might be lonely with all the Husqvarna iron in the garage. Its all good.
 
Yes that is Poulan. I just cut lil stuff but I've had that thing for years. Homelite needs to go in scrap pile. Thing has too much stuff wrong with it. I am at toss up on them fork legs?
 
Back
Top