• 4 Stroke Husqvarna Motorcycles Made In Italy - About 1989 to 2014
    TE = 4st Enduro & TC = 4st Cross

  • Hi everyone,

    As you all know, Coffee (Dean) passed away a couple of years ago. I am Dean's ex-wife's husband and happen to have spent my career in tech. Over the years, I occasionally helped Dean with various tech issues.

    When he passed, I worked with his kids to gather the necessary credentials to keep this site running. Since then (and for however long they worked with Coffee), Woodschick and Dirtdame have been maintaining the site and covering the costs. Without their hard work and financial support, CafeHusky would have been lost.

    Over the past couple of weeks, I’ve been working to migrate the site to a free cloud compute instance so that Woodschick and Dirtdame no longer have to fund it. At the same time, I’ve updated the site to a current version of XenForo (the discussion software it runs on). The previous version was outdated and no longer supported.

    Unfortunately, the new software version doesn’t support importing the old site’s styles, so for now, you’ll see the XenForo default style. This may change over time.

    Coffee didn’t document the work he did on the site, so I’ve been digging through the old setup to understand how everything was running. There may still be things I’ve missed. One known issue is that email functionality is not yet working on the new site, but I hope to resolve this over time.

    Thanks for your patience and support!

Installation of Oversize Water Pump - 2009 TXC 450

Phoenix

Husqvarna
AA Class
In the process of doing a piston/rings/cam chain job on the umpteen-zillion hour TXC 450, we noticed some wear on the edges of the water pump impeller. Looking closer, there was also wear on the inside of the pump cover. As we went to reinstall the head, my friend and I asked each other...do you remember a nut holding the impeller on the shaft??? My friend took it off, but I remember seeing it just fall apart in his hand.

We came to the conclusion that the impeller was not secured to the shaft and was probably wobbling its way around. The center of the impeller is keyed for the water pump shaft and that flat surface had long since worn away, leaving a nice round hole. So where the heck did the nut go? Was it ever on there at all? I'm kind of leaning towards the latter...there was never actually a nut in holding the impeller on.

Anyway, the impeller needed to be replaced. An impeller was about $20 from halls and the oversized kit was $45. What the heck...let's spring for the good stuff while we're freshening up the bike.

Here's the install...

The kit comes with a new water pump cover. Nothing blingy, but it is slightly different than the stock one.

_MG_5319.jpg

Front view...

_MG_5320.jpg

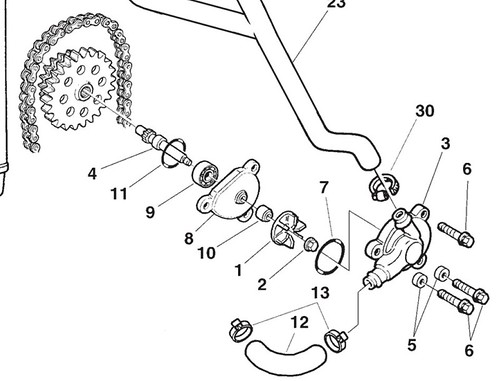
Fortunately, this water pump cover is a lot easier to remove than my '10 TXC 250. No gaskets, just a seal. Unbolt the cover and remove.

Here is a comparison of the two impellers side-by-side. The new one makes the old one look like a 98 pound weakling! I know what you're thinking...liar...there's the nut! We just put it back on as a placeholder with an Ace Hardware nut until the new kit came in.

_MG_5321.jpg

Side view...

_MG_5323.jpg

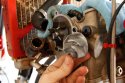
Carefully remove the old impeller. The cams are not in this bike right now to hold everything in place, so I took a firm grip of the impeller and the chain wheel with one hand and removed the bold with the other. With the cams in, you should have nothing to worry about.

New impeller installed. This one has the keyed flat surface in the hole, so it fits on nicely and doesn't make contact with the flat surface behind.

_MG_5324.jpg

Install the new cover with the O-ring from the old cover (or buy a new one like we did).

_MG_5325.jpg

Here's a look at the old impeller and the wear marks on the edges of the fins and the interior of the cover.

_MG_5327.jpg
 

Attachments

  • _MG_5322.jpg
    _MG_5322.jpg
    697.1 KB · Views: 38
How many hrs you got on that bad boy?

You might want to do a full coolant system flush to get thoes metal shavings out so they dont continue to put wear the system.
 
is that an aftermarket pump or an RR version ??/ any idea about how much more flow ?? i have heard 30 % but have never seen it in print... thank you for the pics... jeff
 
I put one on my 250 and it helped alot on the cooling ... I'd say add one if you have over-heating problems ...

The one issue I had with installing was the size of the hole in the new pump .. It fit very loose on the shaft ...

And, with the cams in place, it is possible to pull that plate that holds the water pump seal and timing gear shaft out ... That will cause you to loose the timing of the engine AND without being very creative and adding your own marks, you will have to pull the cams to re-time the engine ... So be careful on removing the pump if the cams are still in place..

And nice write-up and pics for this bike improvement :) ...
 
Hi all, I was off to the races this weekend (2nd place), so am just now getting to this thread.

@Olderhuskyrider....Its hard to tell. The bike had several things going on all at once that made the bike sound much like a tractor. The cam chain was a bit loose and an intake cam bearing was about to let loose. I can't help but think it contributed to the symphony of noises coming from the bike, though. Of course, its difficult to hear anything over the deafening rattle of the rear brake rotor. lol.

@Jasonfrommn...I'm not sure about hours, as we didn't have an hour meter on it (we're putting one on it now). It has been ridden nearly every weekend for over 3 years and has been on about 5 or 6 dual sport rides, so I'm guessing the hours are way up there. And we will definitely be flushing the system. The cooling system had oil in it.

@huskyfrk and nousdefions...the set is from the page 15 of the Husky special parts catalog. Halls actually had it in stock. P/N 8000H2449. The catalog says a decrease in water temp of 5 degrees Celsius and decrease in oil temp of 7 degrees Celsius.
https://www.halls-cycles.com/2011_Husqvarna_Special_Parts.pdf
 
Good information Phoenix.

I'm in the process of replacing the seal on my 2010 TE510 and upgrading to the hi-flow impeller. I am wondering if you considered installing a spacer between the impeller (1) and the seal/flange (10/8)? I don't have everything in front of me, but when I was dry fitting everything a few days back, it seemed that the impeller had the potential to rub the seal, or is this even an issue?

7768499174_b20f1eb812.jpg
 
Not sure on adding that spacer ... Are you sure you have the seal inserted far enough on the flange piece (item #8) ?

My issue was that the propeller did not fit the shaft well because it was hole was too larger ... I think I added some loc-tite to ensure it did not spin on the shaft ...


Good information Phoenix.

I'm in the process of replacing the seal on my 2010 TE510 and upgrading to the hi-flow impeller. I am wondering if you considered installing a spacer between the impeller (1) and the seal/flange (10/8)? I don't have everything in front of me, but when I was dry fitting everything a few days back, it seemed that the impeller had the potential to rub the seal, or is this even an issue?
 
Not sure on adding that spacer ... Are you sure you have the seal inserted far enough on the flange piece (item #8) ?

My issue was that the propeller did not fit the shaft well because it was hole was too larger ... I think I added some loc-tite to ensure it did not spin on the shaft ...

You're probably right ray_ray. I've only done a dry fit, to check how things were lining up. I was a little concerned about how loose the impeller was feeling on the shaft, and thought I had seen where someone was looking to add a spacer. I only found one reference to it, and have since lost the link, so, I figured that I'd put it out there.
 
There's not a lot of clearance between the impeller and the housing. Not sure if a spacer would help or cause more trouble.
 
I just thought I'd post a little update on this mod.

Since the oversized pump/housing was installed, the bike has never boiled over again. Pretty amazing because it can get pretty hot here in Oklahoma and we like to ride some taxing stuff. If you're having boil-over issues on your earlier gen 250/450/510, then this mod should be on your to-do list. Its only $45 from the special parts catalog so as far as mods go, its pretty cheap.
 
It's a smart mod and basically an update. I did the same on my 08 TXC450 I believe it was just the 2010 OEM part (right). For me I did it after the oem 08 had the nut fall off the impellar and trash the impellar, PS I never found the impeller nut even after my full rebuild, it must have wedged itself somewhere in the water jacket never to be found again.
 
For me I did it after the oem 08 had the nut fall off the impellar and trash the impellar, PS I never found the impeller nut even after my full rebuild, it must have wedged itself somewhere in the water jacket never to be found again.

Same thing happened to ours. Poof! Nut gone. I wondered if it was ever there to start with. On ours, the impeller looked fine, though, but it let the impeller spin on the shaft and round the hole out. Strange stuff.
 
Ok I messed up....I accidentally pulled out the shaft out....so do I need to pull the cams out and follow the instruction for the fool proof cam timing on it now?


I put one on my 250 and it helped alot on the cooling ... I'd say add one if you have over-heating problems ...

The one issue I had with installing was the size of the hole in the new pump .. It fit very loose on the shaft ...

And, with the cams in place, it is possible to pull that plate that holds the water pump seal and timing gear shaft out ... That will cause you to loose the timing of the engine AND without being very creative and adding your own marks, you will have to pull the cams to re-time the engine ... So be careful on removing the pump if the cams are still in place..

And nice write-up and pics for this bike improvement :) ...
 
Ok I messed up....I accidentally pulled out the shaft out....so do I need to pull the cams out and follow the instruction for the fool proof cam timing on it now?

If the gear dropped down and dis-engaged from either of the 2 cam gears, and either of the cams spun downward (99% sure it happened), then yes.

There is also a way to do it without removing the cam caps and the cams.
 
Any fool proof way already documented here let me know...

I wrote the thread below so people could change the shaft or seal without losing the timing, but there are a couple a pics in here that will help you. Go and read this thread and post up in that thread your questions on how to get your timing back without removing the cams. Also, it all depends on the chain not having jumped any teeth down below on the crankshaft.

http://www.cafehusky.com/threads/ho...-seal-shaft-and-retain-your-cam-timing.22699/
 
Back
Top