• 4 Stroke Husqvarna Motorcycles Made In Italy - About 1989 to 2014
    TE = 4st Enduro & TC = 4st Cross

  • Hi everyone,

    As you all know, Coffee (Dean) passed away a couple of years ago. I am Dean's ex-wife's husband and happen to have spent my career in tech. Over the years, I occasionally helped Dean with various tech issues.

    When he passed, I worked with his kids to gather the necessary credentials to keep this site running. Since then (and for however long they worked with Coffee), Woodschick and Dirtdame have been maintaining the site and covering the costs. Without their hard work and financial support, CafeHusky would have been lost.

    Over the past couple of weeks, I’ve been working to migrate the site to a free cloud compute instance so that Woodschick and Dirtdame no longer have to fund it. At the same time, I’ve updated the site to a current version of XenForo (the discussion software it runs on). The previous version was outdated and no longer supported.

    Unfortunately, the new software version doesn’t support importing the old site’s styles, so for now, you’ll see the XenForo default style. This may change over time.

    Coffee didn’t document the work he did on the site, so I’ve been digging through the old setup to understand how everything was running. There may still be things I’ve missed. One known issue is that email functionality is not yet working on the new site, but I hope to resolve this over time.

    Thanks for your patience and support!
Indicator & Light switch block upgrade

Burgo

Husqvarna
A Class
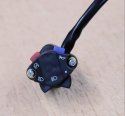
Has anyone changed the ugly, bulky, street style switch block on their Husky TE (mine is 2013 TE 310) with one of these little numbers? (2014 onwards ktm/husky switch block)

It's unlikely to be plug and play, but just wondering if it's a total hassle, or relatively easy?

Thanks in advance for any suggestionsCombination switch.jpg
 
can you find the factory wiring diagrams and just splice into it, it would be worth a look, mine is all ill fitting now after the the years
 
Hi teDean, yep, I could definitely do that, but auto electrics do my freakin brain in, so I'd probably break shit. Haha

I've been looking it over and it looks like the 2013 TE switch block wiring runs all the way to the rear of the bike before any joiner, so the harness would definitely need some mods to take the ktm style block in the image I posted.

I have the factory workshop manual, so I'll look into the wiring diagram, but no promises! hahahaha :banghead:
 
Finally had the time to do it :)

Notes:
  • In the case of direct replacement (as I did), the ktm's switch only allows to switch between low beam and high beam. All the other buttons are not used. However, there is a ktm switch that includes the turning indicator buttons, which can be used if wired accordingly.
  • You should use a multimeter to check that the KTM's switch wiring is the same as mine. Chinese wiring are not reliable as the colours may be different...
  • Due to the short length of the ktm switch wiring, I had to make extensions to it. I used what I had at home, so be aware that the wires in the new connector have different colours that the rest of the harness...
  • The switch's connector is hidden under the fuel tank. You need to get the tank off to access it...

The wiring diagrams of the TE310 and of the KTM are attached. All the important stuff are highlighted in yellow...
  • In the husky's diagram, the important parts are the #13 (Husky Switch) and the #35 (Headlight).
  • In the ktm's diagram, the important parts are the #S6 (KTM Switch), the #H11 (Headlight). #H7 (Parking light) is not used...

How to wire (see photos below, I numbered the KTM switch from 1 to 6 to make it easier):

Husky switch ---- KTM switch ---- Function
G-Bk --------------- White (#3) ------ Equivalent to Gnd
Bk ------------------ Green (#4) ----- Low Beam
W ------------------ Blue (#6) -------- High Beam
 

Attachments

Photos...
 

Attachments

  • IMG_4241.JPG
    IMG_4241.JPG
    97.8 KB · Views: 15
  • IMG_4242.JPG
    IMG_4242.JPG
    80.3 KB · Views: 14
  • IMG_4243.JPG
    IMG_4243.JPG
    71.3 KB · Views: 14
  • IMG_4244.JPG
    IMG_4244.JPG
    96 KB · Views: 14
More photos...
 

Attachments

  • IMG_4246.JPG
    IMG_4246.JPG
    77 KB · Views: 19
  • IMG_4239.JPG
    IMG_4239.JPG
    111.2 KB · Views: 19
  • IMG_4249.JPG
    IMG_4249.JPG
    87.3 KB · Views: 19
  • IMG_4240.JPG
    IMG_4240.JPG
    103.8 KB · Views: 18
Bravo bfalco! Excellent work sir! :applause::applause::applause:

I will look over this with interest and see if I can do the same.

Thanks for such a comprehensive post!

:thumbsup:
 
Hey Bfalco, before I go pulling the tank off and all that stuff, can you tell me.....

What happens if I just remove the Light/Indicator/Horn switch block altogether?

Does the headlight still operate at low beam? (That's all I really need)

Thanks in advance!
 
There is another version of that switch for a ktm that also includes turn signals on the bottom bracket made by CEV. I was thinking about trying one those so I could keep my turn signals and they are supposed to be fairly durable and water resistant and smaller than the stock switches but a little weird/awkward to use. I also have a sicass headlight switch on my Husaberg and it's nice and narrow but some people have significant issues when they get wet. Nobody seems to make anything that checks all the boxes so you have to pick the one that has the least evils for what you do the most. I need room for an LHRB so my huge stock switch has to go - it also can't ever turn off the headlight. cev switch.JPG
 
Hey Bfalco, before I go pulling the tank off and all that stuff, can you tell me.....

What happens if I just remove the Light/Indicator/Horn switch block altogether?

Does the headlight still operate at low beam? (That's all I really need)

Thanks in advance!


If you disconnect the switch the headlight becomes in "high beam mode". You can force the low beam by shunting the G-Bk wire with the Bk one in the connector.
 
There is another version of that switch for a ktm that also includes turn signals on the bottom bracket made by CEV. I was thinking about trying one those so I could keep my turn signals and they are supposed to be fairly durable and water resistant and smaller than the stock switches but a little weird/awkward to use. I also have a sicass headlight switch on my Husaberg and it's nice and narrow but some people have significant issues when they get wet. Nobody seems to make anything that checks all the boxes so you have to pick the one that has the least evils for what you do the most. I need room for an LHRB so my huge stock switch has to go - it also can't ever turn off the headlight. View attachment 89266


The electrics in the husky is weird. The headlight switch is wired to the CDI unit rather than to the headlight, turning lights, etc. This limits a lot the functions of other switches, as the ktm one (CEV), and that is why you cannot turn off the headlights using the switch. The only option to use most of the features of the ktm switch (no light, low beam, high beam, horn) is to redo the wirings at the front, and connect the ktm switch directly to the harness. It is possible but requires more work and is not a plug and play solution ;)
 
The electrics in the husky is weird. The headlight switch is wired to the CDI unit rather than to the headlight, turning lights, etc...

yep.

...and the electrics on the keyless xlite redheads is even weirder. The regulator (!) turns on (actually "grounds") the power relay when it detects revolutions (power relay: ecu/cdi, FI, sensors) and a couple seconds delay later it turns on the DC relay (headlight, horn, sigs, taillight, speedo). I forget where the fan fits into this. The Keihin ECU is out of the loop as far as the headlight is concerned. When the kill button is pressed or the engine stops, the headlights et al are left on for another 5-7 seconds.

This strange setup made it easy for me to put all the lights on a DTSP switch though (switch controls the ground on the dc relay: "always ON" -OFF- "ON when the bike is running")

The LH switch harness should be the same. The LH switch on the 'merican bikes sucks- as is normal.
 
I have a second wiring setup (see photos) to power two led headlights and a power box (for the roadbook and ICO) when I have the navigation tower mounted. This is directly wired to the battery (instead to the harness), with independent fuses and toggle switches for each headlight and powerbox. It pulls about 80-100W (theoretically) depending on which lights are turned on. Do you see any problem with this setup being wired to the battery?
 

Attachments

  • IMG_4265.JPG
    IMG_4265.JPG
    113.4 KB · Views: 11
  • IMG_4261.JPG
    IMG_4261.JPG
    82.1 KB · Views: 7
  • IMG_4262.JPG
    IMG_4262.JPG
    110.3 KB · Views: 8
I have a second wiring setup (see photos) to power two led headlights and a power box (for the roadbook and ICO) when I have the navigation tower mounted. This is directly wired to the battery (instead to the harness), with independent fuses and toggle switches for each headlight and powerbox. It pulls about 80-100W (theoretically) depending on which lights are turned on. Do you see any problem with this setup being wired to the battery?

nope, I don't see any major problems.

with the stock loads plus your additional add-ons, you're getting a little close to the system max (~190watts IIRC) but it's not a huge issue. I'd like to see the main fuse close to the battery- but that's minor also. think about installing a capacitor also to make kickstarting easy with a dead battery. The stock one on the 310R should be fine.

anyone got a pic of that KTM switch that has turn sigs?
 
The CEV switch I copied the picture of above has turn signals. There is a thread on adv rider with all the part numbers and you can order it from Rocky mtn. Sicass will have theirs back in stock soon (I asked them) and they make a plug and play version for the 2011-2014 TE449-511 Husky. I don't know if it's the same connector though. Does anyone know?
 
Back
Top