• Hi everyone,

    As you all know, Coffee (Dean) passed away a couple of years ago. I am Dean's ex-wife's husband and happen to have spent my career in tech. Over the years, I occasionally helped Dean with various tech issues.

    When he passed, I worked with his kids to gather the necessary credentials to keep this site running. Since then (and for however long they worked with Coffee), Woodschick and Dirtdame have been maintaining the site and covering the costs. Without their hard work and financial support, CafeHusky would have been lost.

    Over the past couple of weeks, I’ve been working to migrate the site to a free cloud compute instance so that Woodschick and Dirtdame no longer have to fund it. At the same time, I’ve updated the site to a current version of XenForo (the discussion software it runs on). The previous version was outdated and no longer supported.

    Unfortunately, the new software version doesn’t support importing the old site’s styles, so for now, you’ll see the XenForo default style. This may change over time.

    Coffee didn’t document the work he did on the site, so I’ve been digging through the old setup to understand how everything was running. There may still be things I’ve missed. One known issue is that email functionality is not yet working on the new site, but I hope to resolve this over time.

    Thanks for your patience and support!

How to repair plastics 2006 610

CrankN

Husqvarna
AA Class
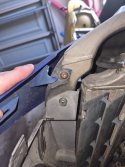
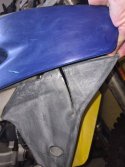
Hi guys, have a coupleof broken plastics on the right side of bike. 1st one is the tab that gets secured at the from of the tank and the other is just a tear.
What's the best method?
 

Attachments

  • 20261026_102702.jpg
    20261026_102702.jpg
    79.5 KB · Views: 3
  • 20261026_102716.jpg
    20261026_102716.jpg
    82.7 KB · Views: 3
Something that I've done successfully years ago with the air filter net detached from the plastic cover it were originally glued to was to weld the plastic. In the case of the following video, I uilized some plastic from a sacrifical broken gardenhose nozzle as a filler. The soldering iron was a cheap one I found for 4 € IIRC.
If I were in your shoes I'd just try and close the crack on the black part using a soldering iron: you slide the iron in the crack, melt both edges and keep them together for some seconds; they should cool down quickly. You can add some filler on the surface behind the part for a better look and so that it will be protected.
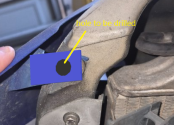
For the blue part, since the welding is usually way weaker than originally, especially without a filler, I would maybe weld another tab over it with some overlap and then I'd drill a hole where needed, or you could add the additional tab using some small bolts:

1793118229405.png

I don't know the materials of the parts, nor the one of the filler and even if I did I wouldn't know how to use that piece of information. You may ask an AI what kind of materials could be suitable.
I guess that this should work but of course there is no guarantee. The main advantage is that it's cheap and it could create a decently strong bond: I've usedthe method multiple times and sometimes it was disappointing, sometimes it was good.
 
Back
Top