luvwoods
Husqvarna
AA Class
Today I arched my front double leading brake shoes so they conform perfectly to the brake lining in the hub. It worked so good that I had to share it.
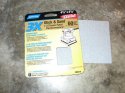
1st picture: my supplies are 60 grit precut sandpaper pads (the kind that is sized for orbital sanders), 3/4 inch wide double-sided Scotch tape and duct tape. A) Cut the sandpaper into strips 1 inch wide; that's the width of the hub brake lining and shoe. B) Apply duct tape to the back of the sand paper because the double-sided tape will not stick to the backing without it. C) Now apply the double-sided Scotch tape to the duct taped backing of the sandpaper strips.
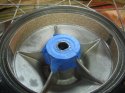
2nd pictue: A) Clean the brake lining really well with denatured alcohol or some other non residue solvent. B) Apply both sandpaper strips to the lining. C) Put some masking tape over the whell bearing to keep any grit off those surfaces. Not shown: I have EBC grooved brakes shoes so I drew a line on each surface of the shoe between the grooves using a magic marker. These lines will give you an indication of how much shoe surface is being removed in the next step.
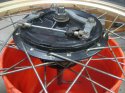
3rd picture: A) Slide the axle through the hub from the side opposite the brake. B) Mount the backing plate over the axle and into the hub. C) Thread the axle nut all the way onto the axle. D) Place the wheel onto an open top pail so the axle can drop into it. E) Gently apply the brakes and begin a back and forth rotation of the backing plate until all the magic marker lines disappear. With the whole thing assembled like this, you can simply pull up on the backing plate to expose the shoes and look at your progress. Don't go crazy without checking your progress often, the 60 grit cuts fast
When finished, pull the whole thing apart and be sure to clean out the hub real well then wipe off the lining again. Make sure there is NO GRIT anywhere in there or on the shoes or in the backing plate.
I had to trial and error this a few times until I came up with the duct tape trick as the sandpaper kept getting pulled off the hub lining without it. Now that you know this little secret, I'd say you can do all this in under 1 hour.
I can't say yet how well this worked because my bike is having its shocks rebuilt but the shoes are definately matched to the hub. I'm looking forward to finding out soon.
1st picture: my supplies are 60 grit precut sandpaper pads (the kind that is sized for orbital sanders), 3/4 inch wide double-sided Scotch tape and duct tape. A) Cut the sandpaper into strips 1 inch wide; that's the width of the hub brake lining and shoe. B) Apply duct tape to the back of the sand paper because the double-sided tape will not stick to the backing without it. C) Now apply the double-sided Scotch tape to the duct taped backing of the sandpaper strips.
2nd pictue: A) Clean the brake lining really well with denatured alcohol or some other non residue solvent. B) Apply both sandpaper strips to the lining. C) Put some masking tape over the whell bearing to keep any grit off those surfaces. Not shown: I have EBC grooved brakes shoes so I drew a line on each surface of the shoe between the grooves using a magic marker. These lines will give you an indication of how much shoe surface is being removed in the next step.
3rd picture: A) Slide the axle through the hub from the side opposite the brake. B) Mount the backing plate over the axle and into the hub. C) Thread the axle nut all the way onto the axle. D) Place the wheel onto an open top pail so the axle can drop into it. E) Gently apply the brakes and begin a back and forth rotation of the backing plate until all the magic marker lines disappear. With the whole thing assembled like this, you can simply pull up on the backing plate to expose the shoes and look at your progress. Don't go crazy without checking your progress often, the 60 grit cuts fast
When finished, pull the whole thing apart and be sure to clean out the hub real well then wipe off the lining again. Make sure there is NO GRIT anywhere in there or on the shoes or in the backing plate.
I had to trial and error this a few times until I came up with the duct tape trick as the sandpaper kept getting pulled off the hub lining without it. Now that you know this little secret, I'd say you can do all this in under 1 hour.
I can't say yet how well this worked because my bike is having its shocks rebuilt but the shoes are definately matched to the hub. I'm looking forward to finding out soon.


 but we can shred ruts two feet deep in the dirt - go figure.