MChammer
Husqvarna
AA Class
I read quite a few threads on getting the rear wheel aligned properly, and as George at Uptite said, chains/sprockets are expensive and wear quickly if misaligned, so awhile back I made a jig like I saw described in an old thread that measures from the wheel axel to the swing arm pivot and thought I was all “square”. When George recently commented about aligning, he mentioned how hard it is to accurately measure to the center of bolts/pivots like that, and I remembered feeling that I was doing some serious “guestimating” the last time I performed the operation. George talked about “eyeballing” down the rear sprocket to the front sprocket and it got me thinking….so here’s what I’ve come up with for a cheap, accurate solution that I feel works easily and very accurately.
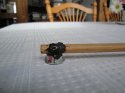
Since I’m also an archer, I have a few perfectly straight, stiff, light carbon arrow shafts sitting around that have the end broken off – you can use anything that is perfectly straight.
I cut the arrow shaft to 25”. Next I found 2 identical 5/16” nuts in my garage that were about the same thickness as the distance from the edge of the rear sprocket to the outer edge of the chain around it (about 1/4” tall).
I then epoxy’d the two nuts to the arrow shaft – one just at the end and the other about 9” away. This distance will vary depending on your rear sprocket, but for me, this distance put one nut squarely on my sprocket at the back where the chain wraps around, and the other nut on the other end of the sprocket just before the exposed teeth, parallel to the swing arm. Ideally, you want them as far away as possible but still resting squarely on your sprocket. I put a little epoxy under the arrow too so it got into the threads of the nut to give the epoxy more “bite”. I laid weights on the arrow while the epoxy dried so the arrow was perfectly parallel to the table top. (put wax paper under the nuts or your better half will clobber you for messing up the counter).
View attachment 3821View attachment 3824
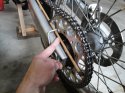
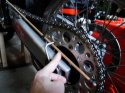
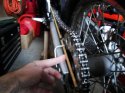
Letting the epoxy dry was the longest part of making this alignment device (and I used 5 minute JB Weld) When dry, remove the wax paper, feed the arrow shaft between your rear axel grab-bar and the sprocket and put the 2 nuts against your sprocket with slight pressure. You could come through the holes in your sprocket with some small elastic bungee to hold it against the sprocket, but I prefer the “feel” of holding it because I can tell if I’m flexing the arrow or if the nuts aren’t flush against the sprocket.
View attachment 3822
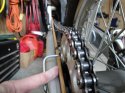
I will say, my previous alignment was off, and I was amazed at how just a quarter turn of the adjustment bolt could move the arrow off the chain up near the front sprocket.
View attachment 3823
Since I’m also an archer, I have a few perfectly straight, stiff, light carbon arrow shafts sitting around that have the end broken off – you can use anything that is perfectly straight.
I cut the arrow shaft to 25”. Next I found 2 identical 5/16” nuts in my garage that were about the same thickness as the distance from the edge of the rear sprocket to the outer edge of the chain around it (about 1/4” tall).
I then epoxy’d the two nuts to the arrow shaft – one just at the end and the other about 9” away. This distance will vary depending on your rear sprocket, but for me, this distance put one nut squarely on my sprocket at the back where the chain wraps around, and the other nut on the other end of the sprocket just before the exposed teeth, parallel to the swing arm. Ideally, you want them as far away as possible but still resting squarely on your sprocket. I put a little epoxy under the arrow too so it got into the threads of the nut to give the epoxy more “bite”. I laid weights on the arrow while the epoxy dried so the arrow was perfectly parallel to the table top. (put wax paper under the nuts or your better half will clobber you for messing up the counter).
View attachment 3821View attachment 3824
Letting the epoxy dry was the longest part of making this alignment device (and I used 5 minute JB Weld) When dry, remove the wax paper, feed the arrow shaft between your rear axel grab-bar and the sprocket and put the 2 nuts against your sprocket with slight pressure. You could come through the holes in your sprocket with some small elastic bungee to hold it against the sprocket, but I prefer the “feel” of holding it because I can tell if I’m flexing the arrow or if the nuts aren’t flush against the sprocket.
View attachment 3822
I will say, my previous alignment was off, and I was amazed at how just a quarter turn of the adjustment bolt could move the arrow off the chain up near the front sprocket.
View attachment 3823