Seahorse
Husqvarna
AA Class
LINK to Tech Ref thread: Link
FRONT WHEEL OVERHAUL: PART 1
DISCLAIMER: The procedures used in the following posts have been applied to a 2005 model Husqvarna TE250. Any specified torque settings, technical references, methodologies shown etc, refer to this model. Any work you do on your own bike using this guide is at your own risk.
Before commencing any similar work on your bike be sure to check your manufacturers literature, model, specifications and any technical recommendations for your bike.
The following post is written and edited in UK English..My apologies to any US readers who are thinking that I am possibly the worst speller they have ever encountered, (but are way too polite to say anything..!!). The “fractured” grammar however, is entirely the result of my lack of attention during English classes….. For this, I wish to apologise in advance.
My last few trail rides have been notable for some monumental heart in the mouth, front wheel washouts. After discussing this problem with fellow riding buddies, I have come to the conclusion that it is time to consider lowering my forks in the triple clamps and replacing the front tyre with something more “grippy”. While at it, I may just as well bite the bullet and replace the front wheel bearings and brake pads for good measure. Basically a complete front wheel overhaul. (BTW I will be fitting a Pirelli 454 Mid-Hard).
I figure that this is also a good opportunity to document the procedure for the benefit of those who feel that they would also like to be able to do this type of maintenance themselves, but up till now felt that they have lacked the necessary knowledge, skills and confidence to tackle this type of work on their own. Believe me, no special skills are required, just a good smattering of common sense…..so read on……
I prefer to do all my own maintenance. First and foremost as I have an inherent mistrust of anyone other than myself working on my bike, and secondly, I firmly believe that money saved on labour costs can be put to far better use by purchasing tools and/or parts that can be used for future maintenance.
Normally, I also prefer to work alone. Years of working on ships deep sea have taught me to work independent of helping hands. It has also taught me improvisational skills and the importance of doing the job right the first time. I am not saying the techniques described in this post are necessarily the best, or in fact, the only way to do the job, but I do feel that this description contains enough practical information to enable someone who has never attempted this type of thing before to have new found confidence and possibly even the incentive to “give it a go” and complete the job successfully by themselves the first time…
You may not have all the tools available to you that I have used or are shown in some of the pictures. However, the cash saved from this very job alone will go a long way to cover the expense of purchasing some of them. The only “exotic” tool used, is a torque wrench. These are certainly not cheap, and in all honesty, to cover the full range of torque settings found on most bikes, it may be necessary to purchase two or more of them. For this project however, you may be able to borrow/hire one….Or, you may elect to simply “guesstimate” the required torque, after all, this is what you would have to do out on the trail. Just a word of caution though, it doesn’t take too much effort to break small bolts like the 6mm pinch bolts on the fork leg or to overtighten the triple clamp bolts which may result in the crushing of the fork tubes…so be very careful…gently does it!!!
TIP: By regularly using a torque wrench whenever working in your shop, you will start get a “feel” for how tight different sized fasteners should be. Hopefully this “feel” will help to prevent you from breaking or overtightening any fasteners, now or in the future.
OK, where to start..?
It took me 3 easy hours to complete the entire job. This involved, firstly setting the bike up on a stand and checking the condition of the bearings to ascertain the extent of work required. In my case, the simple test shown in STEP 1 below proved conclusively that my bearings were definitely on their last legs, and needed replacing…. So it was onto the next steps which involved removing the front wheel, knocking out the seals and bearings. Correctly lubricating and installing the new bearings & seals, changing the tyre & tube, burnishing the axle and spacer, replacing the brake pads, then finally re-installing the wheel and adjusting the alignment etc.
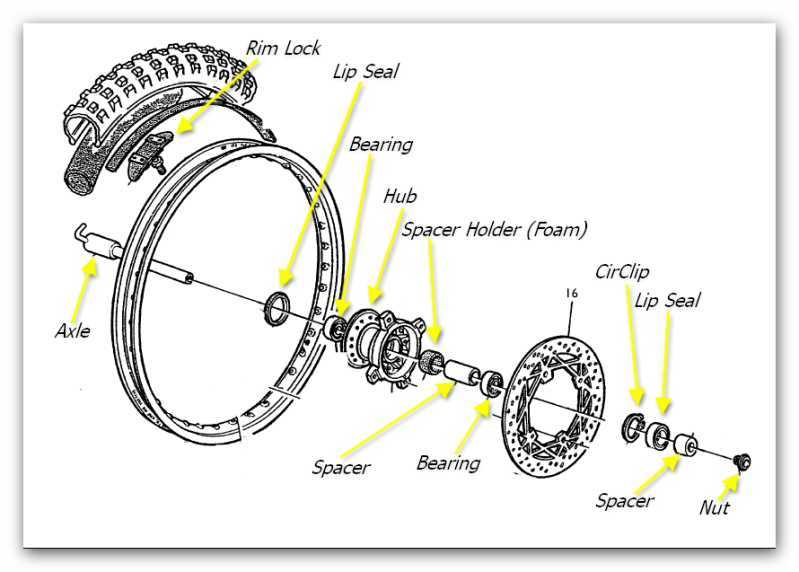
Study this exploded picture of the hub assembly taken from your spare parts manual carefully. Yours should be similar to this one. Looks straight forward enough doesn’t it…?? Believe me …you can do it!!
OK..Lets get started…Firstly I would highly advise doing this job on a firm surface in a protected, well lit and ventilated area.
ITEMS REQUIRED
New set of Bearings and seals (If Required)
Waterproof grease. I prefer Castrol APX T. Have also heard glowing reports for Belray Waterproof Grease
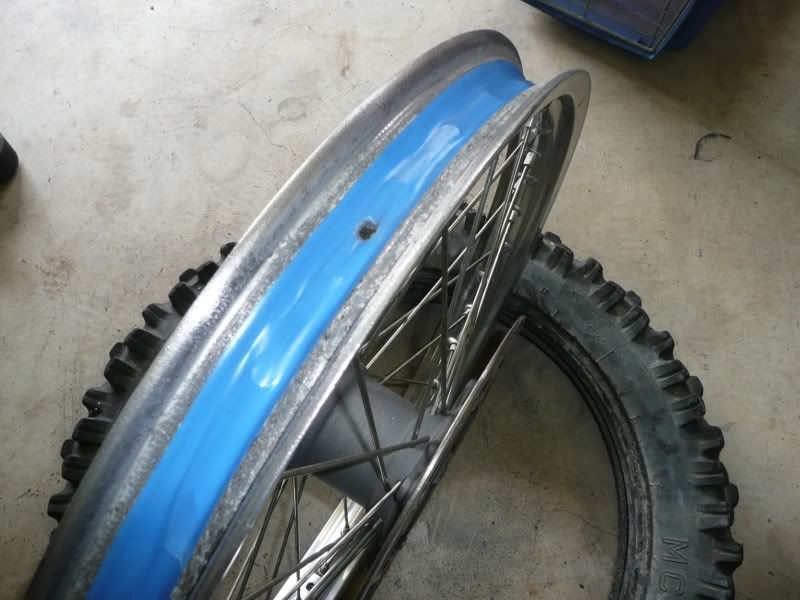
New tyre & tube (Optional)
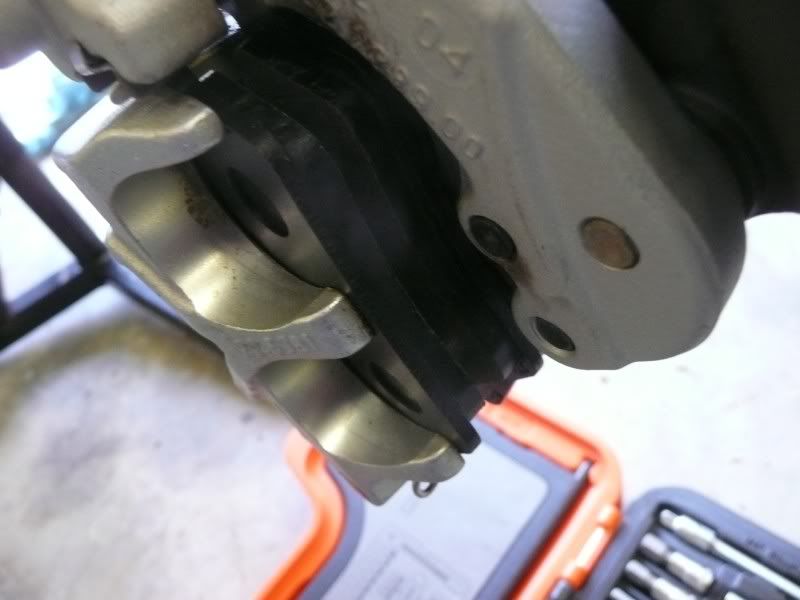
Brake Pads (Optional)
Other stuff such as protective gloves, 3M scouring pad, rags etc
TOOLS REQUIRED
Suitable ROE spanners (Ring/Open End) and sockets
Screwdrivers
Circlip Pliers
30mm socket (or suitable piece of pipe approx 40-41mm outside diameter)
Hard and soft faced hammers
TIP: The outside diameter of my Husqvarna front wheel bearing is 42mm. The approximate outside diameter of a 30mm socket is 40mm..This is almost a perfect size for driving in the new bearings. …. The 30mm socket can also be used during future maintenance to undo the steering head nut…!! (Check YOUR dimensions before purchasing)
STEP ONE: CHECKING THE WHEEL BEARINGS
There are many differing opinions/methods for doing this. My preference is to use the sound and feel method.
Sit the bike securely on a stand with the front wheel clear off the ground. If you don’t have a stand you can use an upturned milk crate or improvise with some other support that will hold the bike securely while you work on and around it. It is essential that the bike is stable!!!
There are several reasons for having the bike on a stand, Firstly, it gives us the ability to spin the front wheel and listen for any rumbling/clicking/ticking noises emanating from the bearings. (It is highly recommended that you remove the front disk pads when doing an audible test).
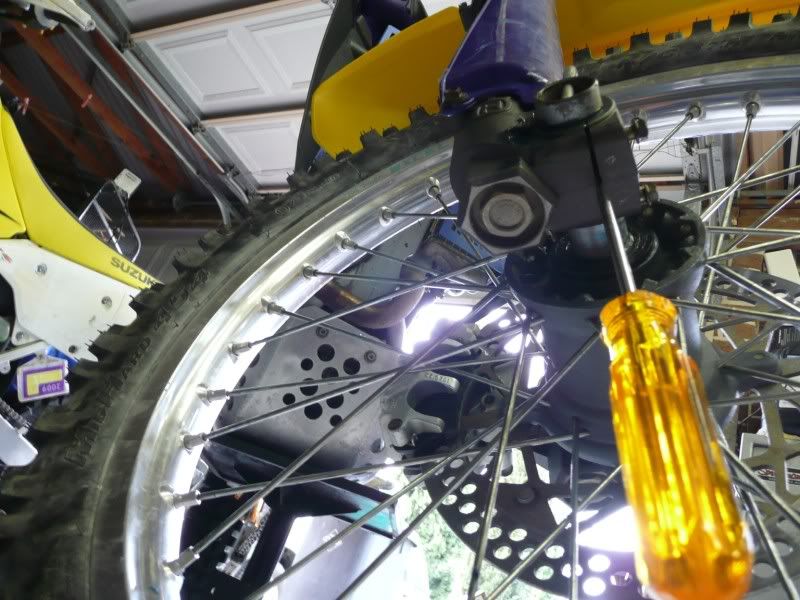
Watch the wheel carefully as it spins and slows down to see if it, “stutters”, “wobbles” or tends to lock up. Don’t be afraid to also use a screwdriver blade placed on the end of the axle with your ear pressed against the handle end….this will amplify any sounds, just like a doctors stethoscope.
Secondly, by placing the bike on a stand the front forks are fully extended and any play in these or in the steering head bearings that may potentially give false movements/sounds can be minimised.
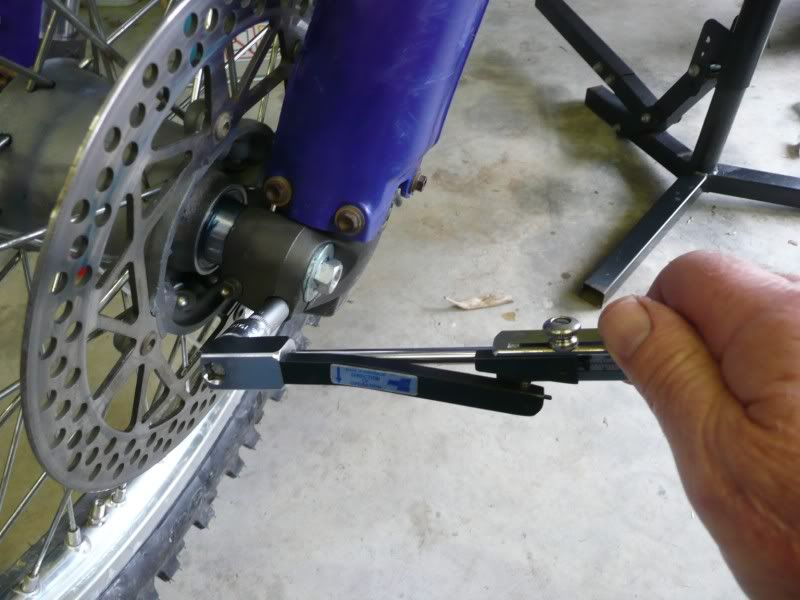
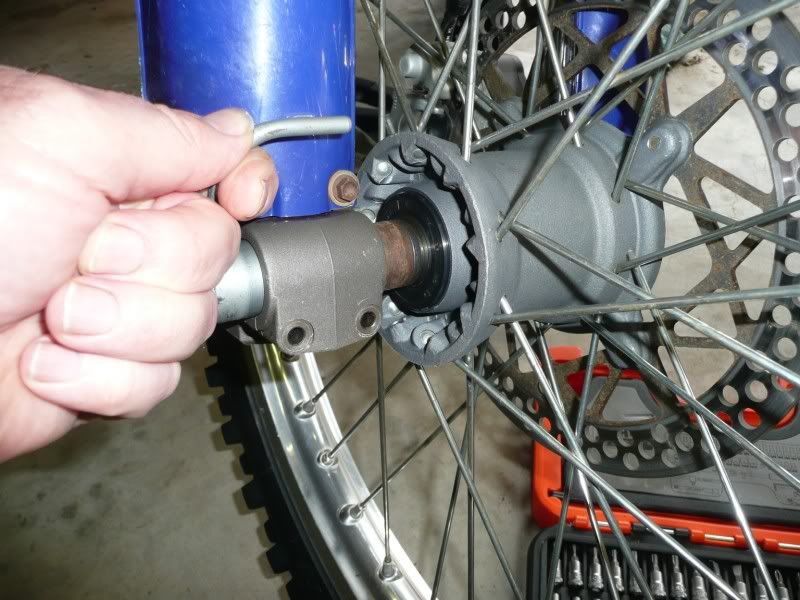
By addressing the bike in the manner shown in the picture below you will effectively prevent any extraneous free play . This method will show conclusively if the bearings have failed. Simply press gently against the axle with your left knee and pull the fork tube gently with your right hand. This will stabilise the entire front end of the bike. Now grip the wheel at the 12 O’clock position in between the forks and gently push/pull back and forth with your left hand...
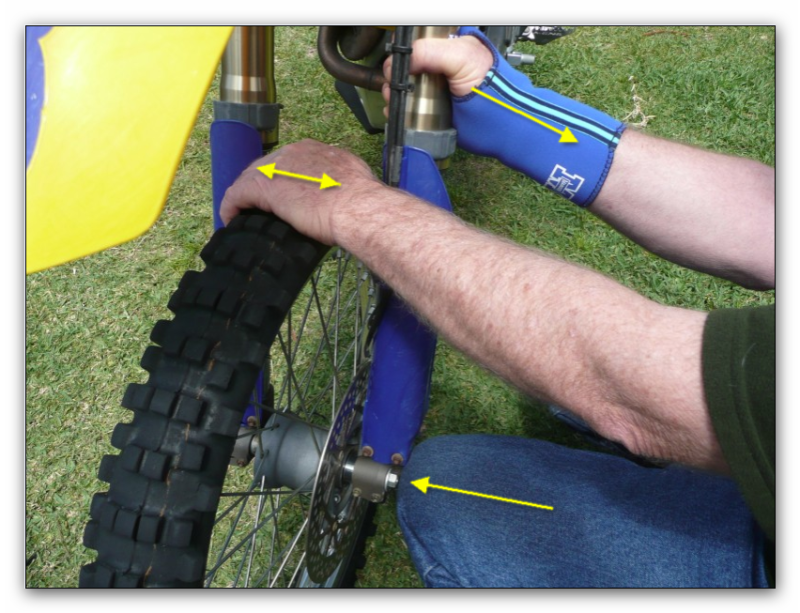
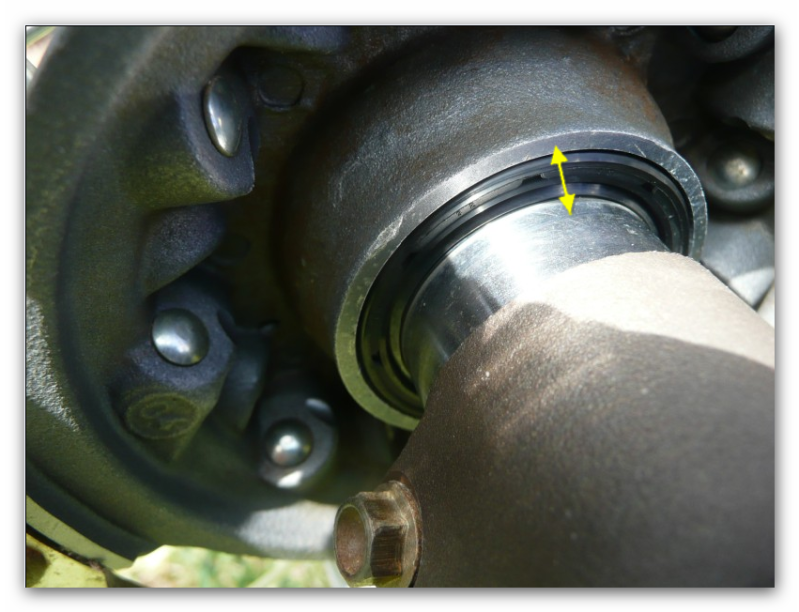
What we are looking for, is any play in the bearings, and this will be felt as a slight movement of the wheel, or, if the bearings are seriously worn, this movement will also be accompanied by a “clunking” sound. Also observe the seal face as you rock the wheel back and forth. Any free play will be shown as distortion/movement of the lip seal.
Sound, healthy wheel bearings will show virtually no discernable movement, and the wheel will be all but silent when spun.
Yes, no doubt, many of you who are reading this post will say that there are several other methods for doing this check, I agree, there sure are. My preference for doing it this way is because it can be accomplished successfully without any form of outside assistance. Remember, this post is aimed directly at those with little practical experience and a limited range of equipment and tools.
STEP TWO: REMOVING THE FRONT WHEEL
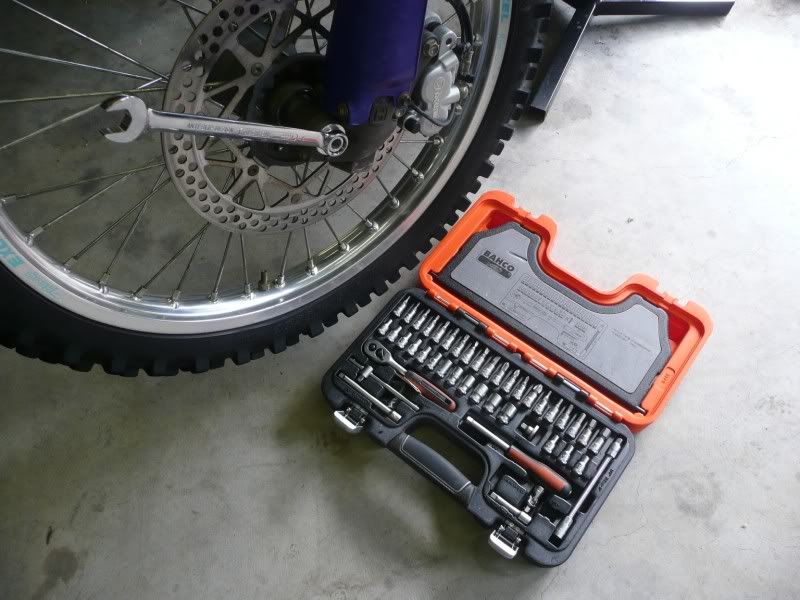
TIP: Use the tools that you normally take with you when you ride to complete this task. This will soon highlight any shortfalls of your toolkit. Hopefully this will give you the incentive to ensure that you have a fully stocked toolkit, with all the necessary tools available to remove the wheel if required out on the trail.
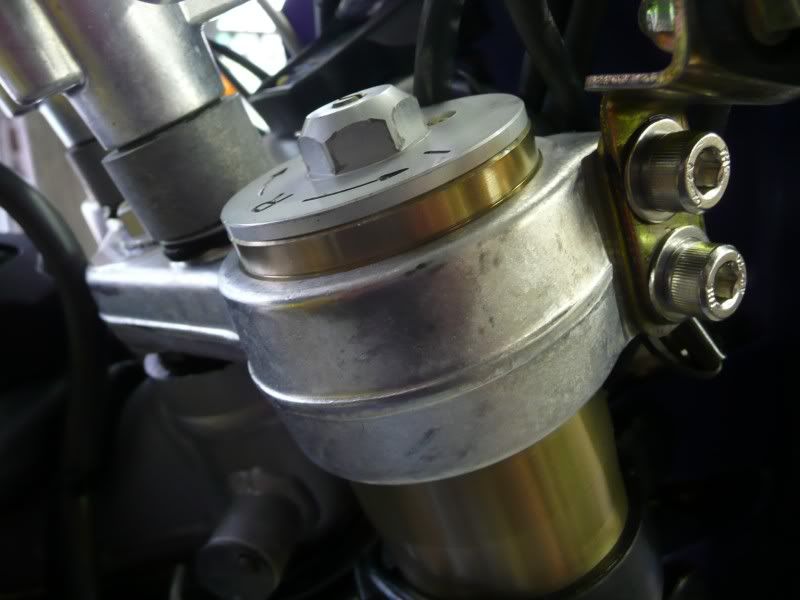
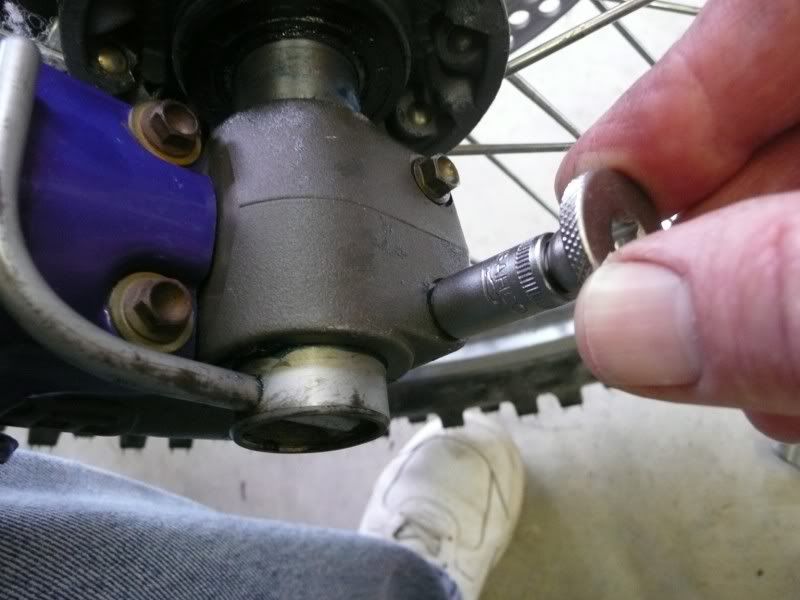
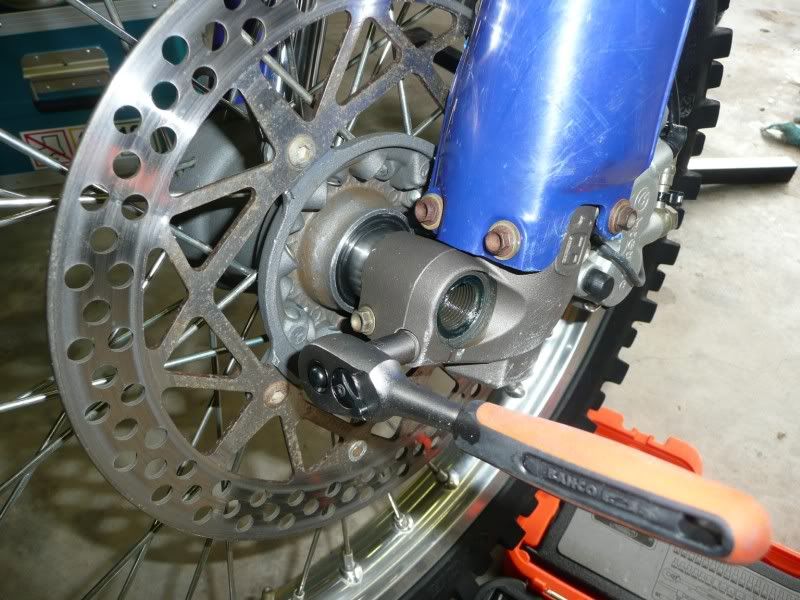
Once again, with the bike still securely on the stand and the front wheel elevated from the ground, undo the axle locking bolt (yours may require a hex tool).
Then undo the four axle “pinch bolts”. Taking care, as these bolts are very small, and if tight, it is possible to shear them off. Use penetrating fluid if necessary to help free the bolts
TIP: It is preferable to use sockets or ring spanners to undo fasteners. Open end spanners have the potential to damage or round off the bolt heads. Plus, there is a greater potential for the OE spanner to slip, possibly causing physical injury.
While supporting the front wheel with your right hand, slowly remove the axle by twisting and pulling it with your left.
If you cannot easily remove the axle, it may mean that you need to spread the pinch faces slightly using a screwdriver or small wedge. When doing this, be extra careful not to damage the pinch faces or the axle. Under no circumstances should you be tempted to drive the screwdriver in, or the axle out with a hammer. Personally, I prefer to gently bump the screwdriver in using the palm of my hand.
STEP THREE: SEAL and BEARING REMOVAL
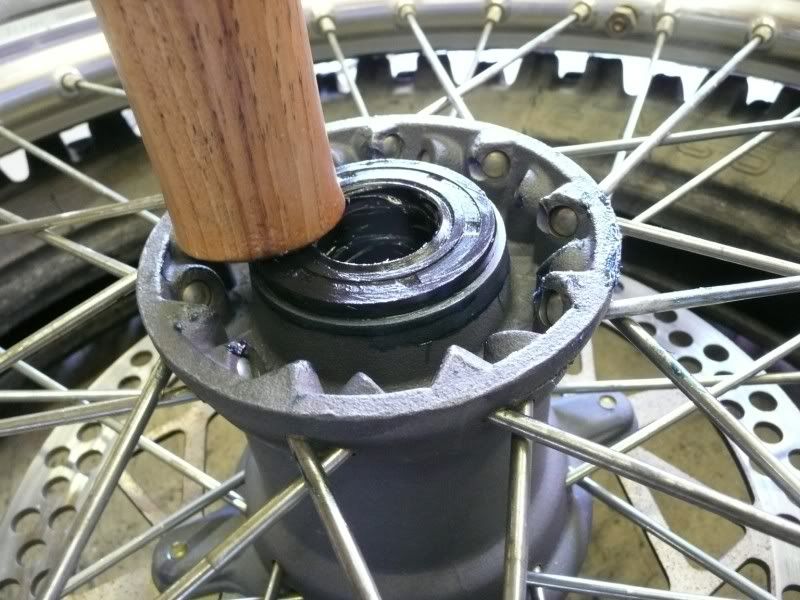
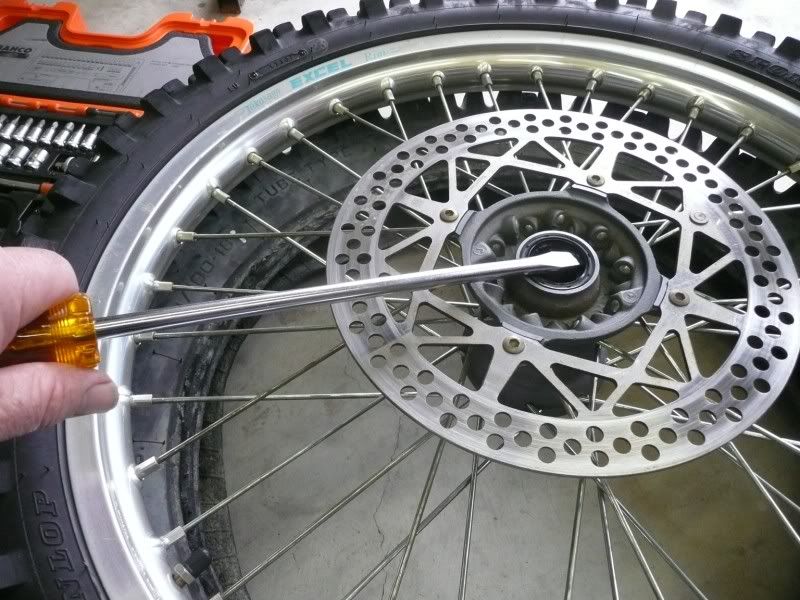
With the wheel removed from the bike I prefer to work with it brake disk side up supported on an old rear tyre to help prevent any damage or scuffing to the rim.
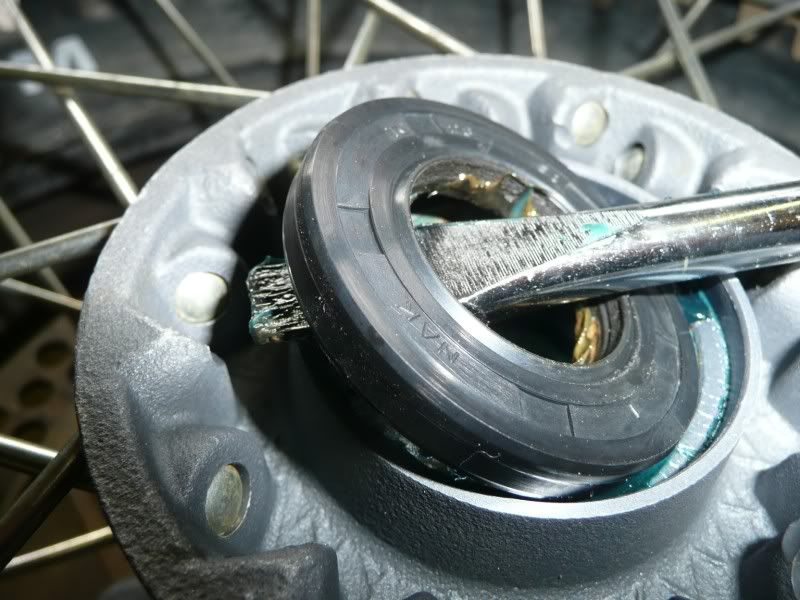
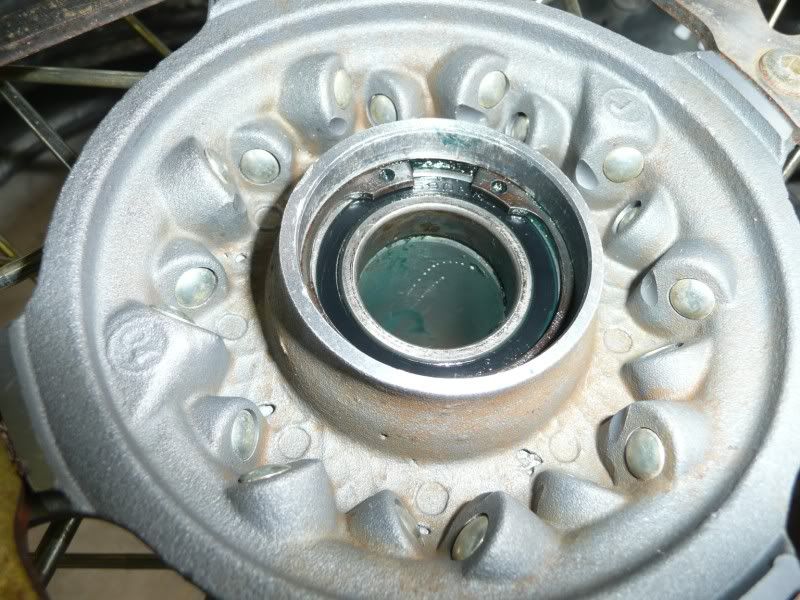
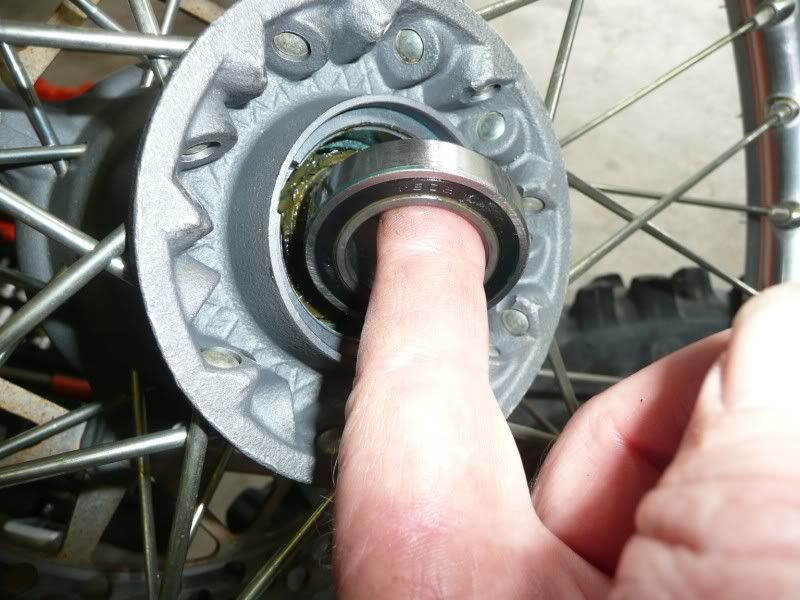
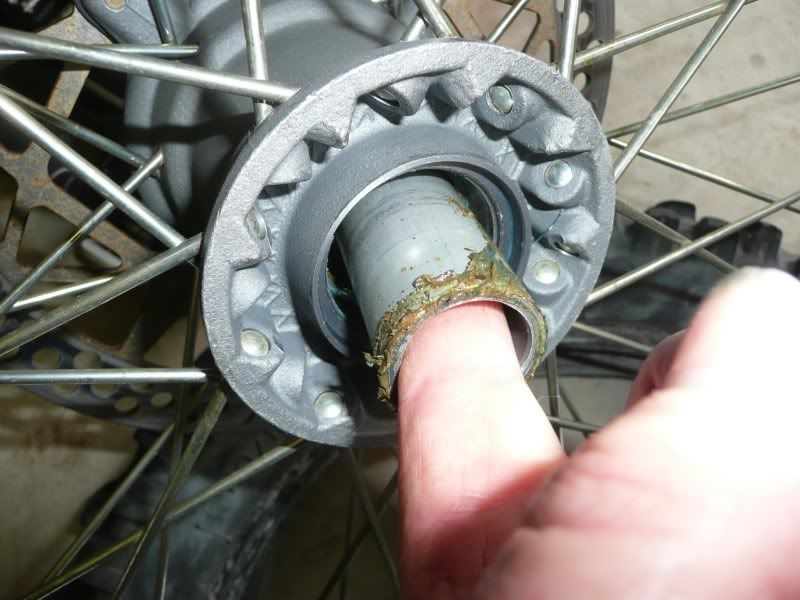
Firstly remove the small spacer from the hub and put it carefully aside. Then, using a large screwdriver, gently lever out both lip seals. Take extra care not to bruise or score the hub.
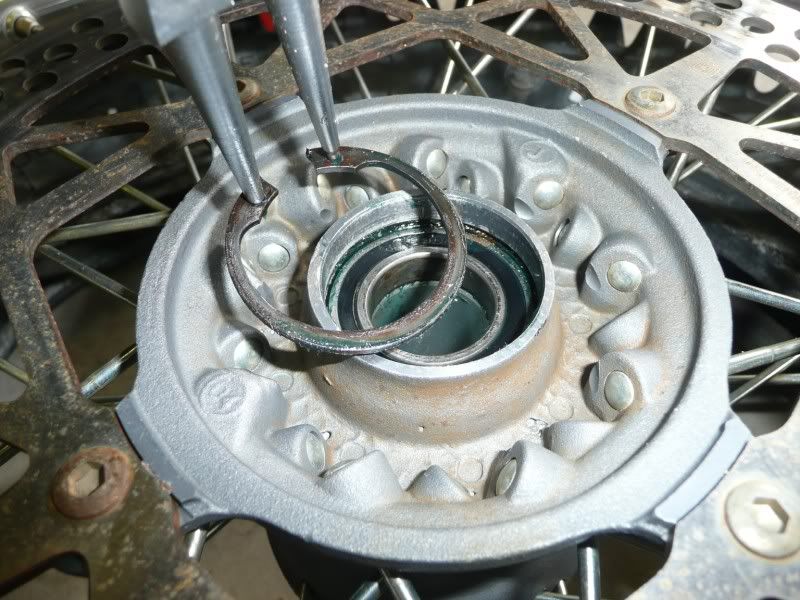
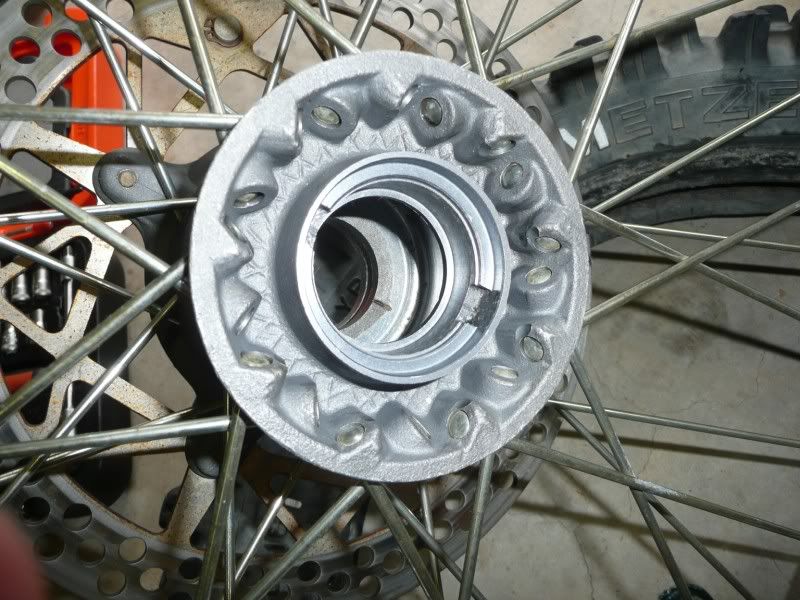
With the brake disk side up once again, clean away any grease/crud exposing the circlip that retains the bearing in the hub. Use a pair of circlip pliers to remove the circlip (It is highly advisable to wear eye protection during this operation),
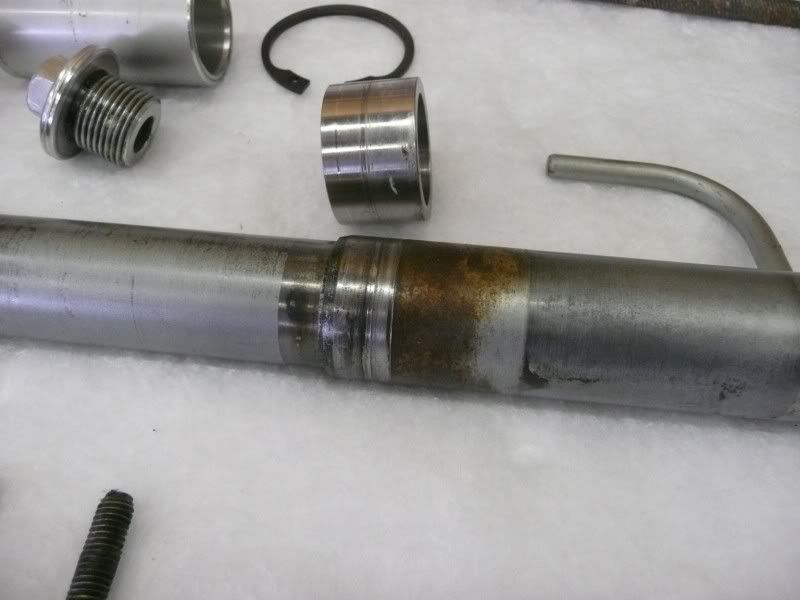
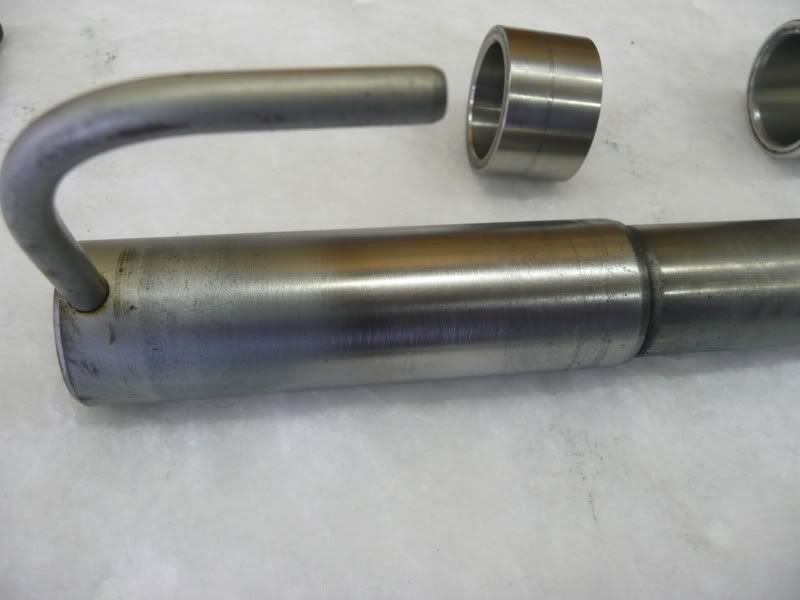
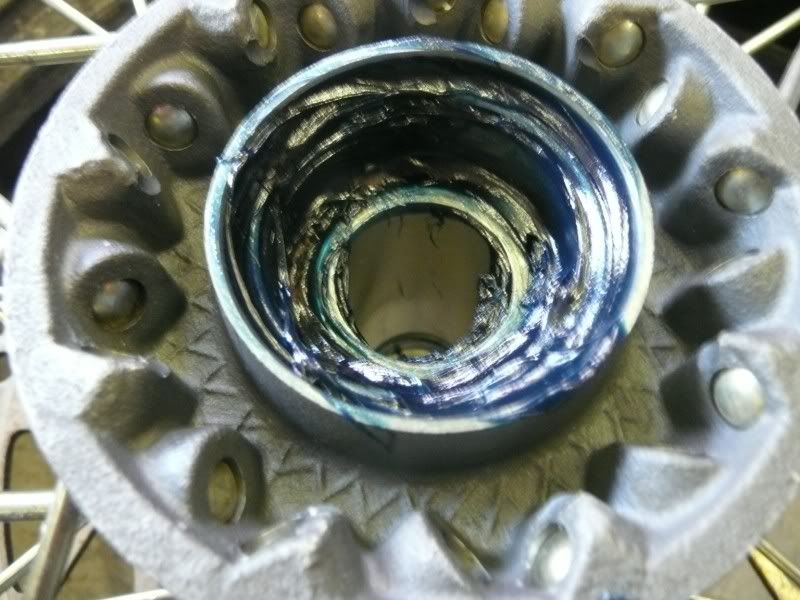
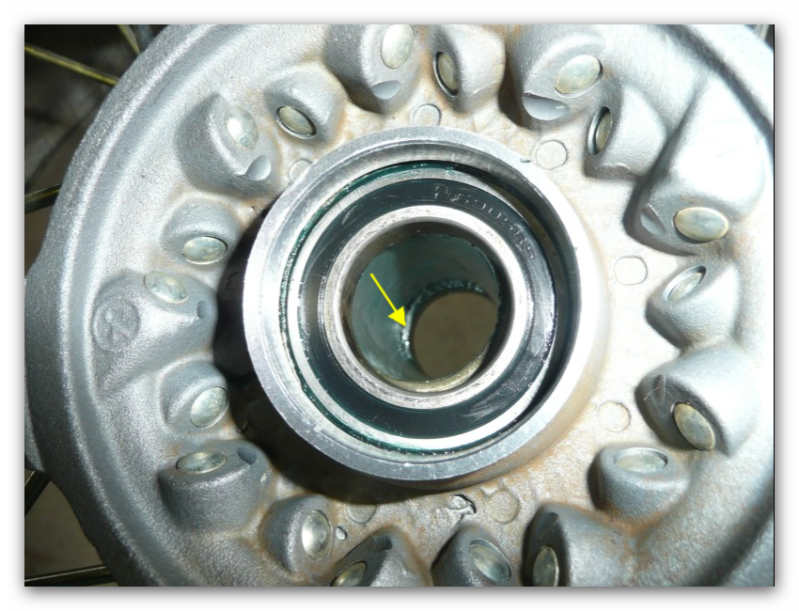
Looking down into the hub you will notice a tubular aluminium spacer between the bearings. (This is used to support the bearings when the axle nut is tightened).

We need to “upset” this spacer so that we can gain access to the inner race of the bottom bearing. To do this simply insert a screwdriver or drift and gently rock the spacer off centre. This will expose enough of the lower bearing for us to be able to drive it out using a soft “dolly” or punch. Take extra care when doing this as we do not want to damage the bore of the spacer.
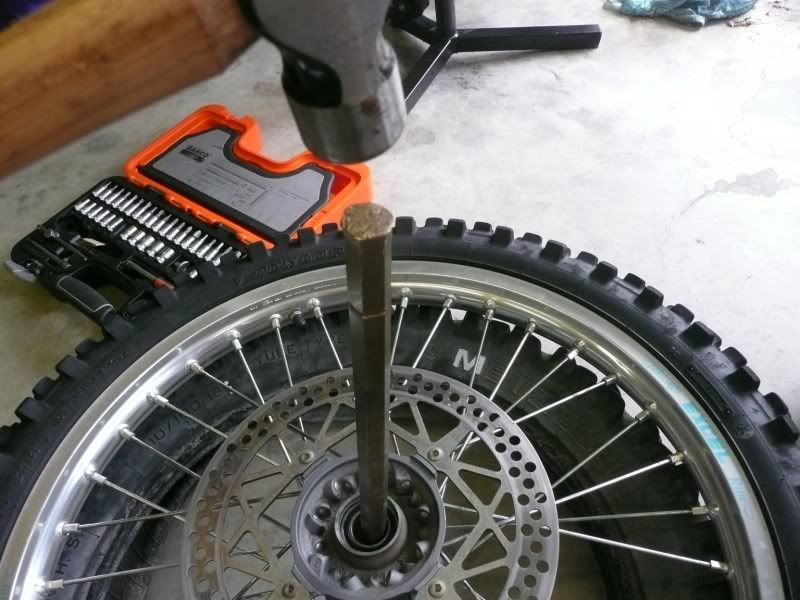
Once the bearing starts to move, the spacer can then be easily moved to enable us to drive the bearing out “square” by tapping it equally around the circumference thus ensuring it does not “cock-over” in the hub. If you drive it out squarely, it will come out easily and smoothly.
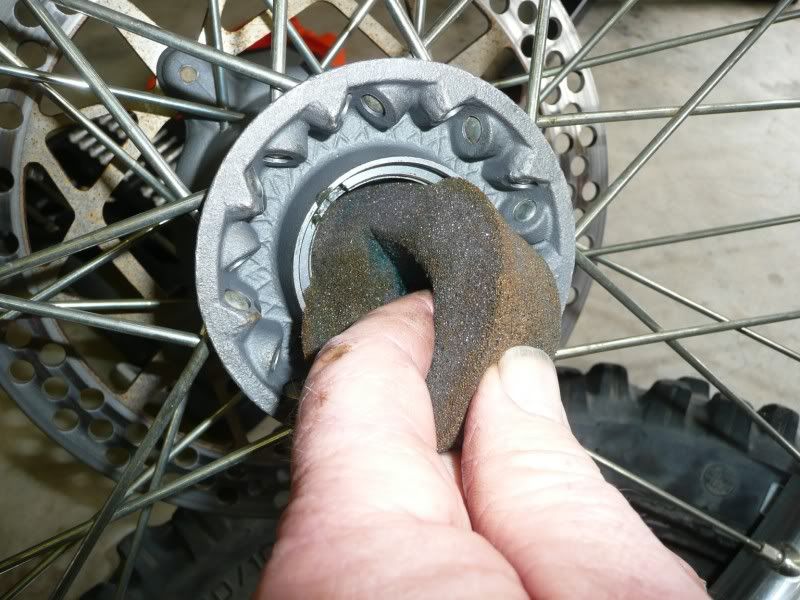
Remove the centre spacer, and if fitted, the piece of supporting foam from inside the hub.
Thoroughly clean the hub internals and bearing faces. Making sure not to remove any metal as this may adversely affect bearing fit.
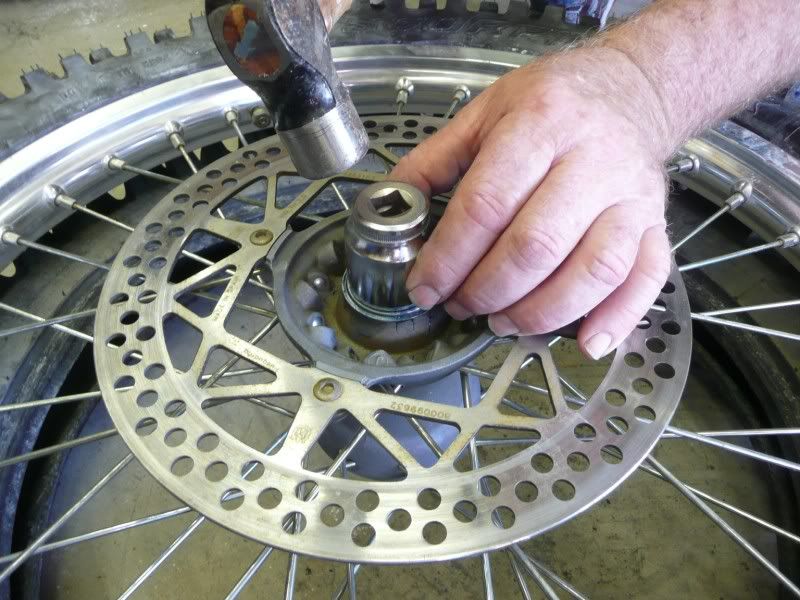
Now flip the rim over and repeat for the other side. This time all of the inner bearing race will be exposed, so you can easily drive it out with the punch or perhaps use an appropriately sized socket this time.
TIP: You can keep an old bearing for use in driving in the new bearings. My preference however is to use a neat fitting socket or piece of tube to do this, as an old bearing may end up being stuck back in the hub. To avoid this happening, it is possible reduce the outside diameter of the old bearing by filing/grinding/sanding thus ensuring it has a clearance fit in the hub.
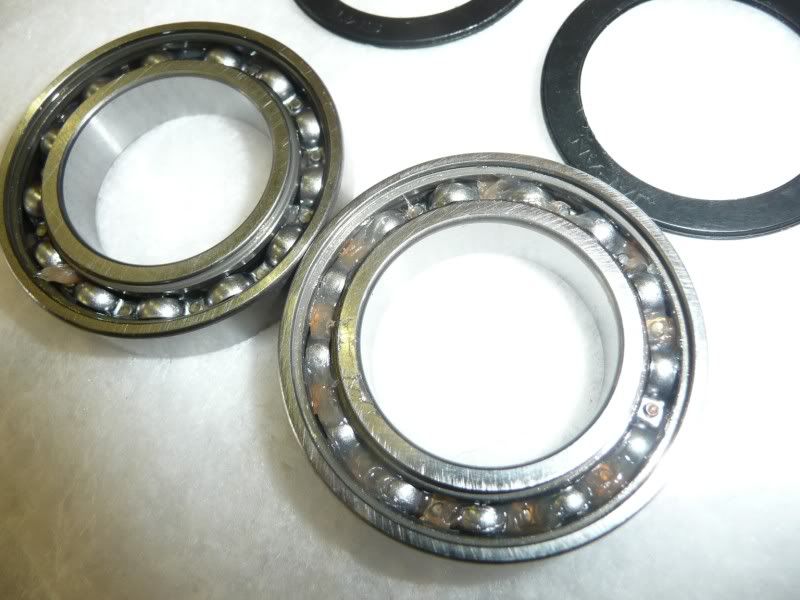
The very action of driving the bearing out by hitting it on the inner race, is in effect enough, to ruin the bearing. The hammer blows, no matter how gentle, transfer the impact through the balls, causing flat spots. This will cause the bearing to fail prematurely. I never re-install bearings that have been removed this way. It is far cheaper in the long term, to simply throw these bearings away and replace them with new. The same applies for the lip seals.
*****************************************************************************************************************
CONTINUED in PART 2
FRONT WHEEL OVERHAUL: PART 1
DISCLAIMER: The procedures used in the following posts have been applied to a 2005 model Husqvarna TE250. Any specified torque settings, technical references, methodologies shown etc, refer to this model. Any work you do on your own bike using this guide is at your own risk.
Before commencing any similar work on your bike be sure to check your manufacturers literature, model, specifications and any technical recommendations for your bike.
The following post is written and edited in UK English..My apologies to any US readers who are thinking that I am possibly the worst speller they have ever encountered, (but are way too polite to say anything..!!). The “fractured” grammar however, is entirely the result of my lack of attention during English classes….. For this, I wish to apologise in advance.
My last few trail rides have been notable for some monumental heart in the mouth, front wheel washouts. After discussing this problem with fellow riding buddies, I have come to the conclusion that it is time to consider lowering my forks in the triple clamps and replacing the front tyre with something more “grippy”. While at it, I may just as well bite the bullet and replace the front wheel bearings and brake pads for good measure. Basically a complete front wheel overhaul. (BTW I will be fitting a Pirelli 454 Mid-Hard).
I figure that this is also a good opportunity to document the procedure for the benefit of those who feel that they would also like to be able to do this type of maintenance themselves, but up till now felt that they have lacked the necessary knowledge, skills and confidence to tackle this type of work on their own. Believe me, no special skills are required, just a good smattering of common sense…..so read on……
I prefer to do all my own maintenance. First and foremost as I have an inherent mistrust of anyone other than myself working on my bike, and secondly, I firmly believe that money saved on labour costs can be put to far better use by purchasing tools and/or parts that can be used for future maintenance.
Normally, I also prefer to work alone. Years of working on ships deep sea have taught me to work independent of helping hands. It has also taught me improvisational skills and the importance of doing the job right the first time. I am not saying the techniques described in this post are necessarily the best, or in fact, the only way to do the job, but I do feel that this description contains enough practical information to enable someone who has never attempted this type of thing before to have new found confidence and possibly even the incentive to “give it a go” and complete the job successfully by themselves the first time…
You may not have all the tools available to you that I have used or are shown in some of the pictures. However, the cash saved from this very job alone will go a long way to cover the expense of purchasing some of them. The only “exotic” tool used, is a torque wrench. These are certainly not cheap, and in all honesty, to cover the full range of torque settings found on most bikes, it may be necessary to purchase two or more of them. For this project however, you may be able to borrow/hire one….Or, you may elect to simply “guesstimate” the required torque, after all, this is what you would have to do out on the trail. Just a word of caution though, it doesn’t take too much effort to break small bolts like the 6mm pinch bolts on the fork leg or to overtighten the triple clamp bolts which may result in the crushing of the fork tubes…so be very careful…gently does it!!!
TIP: By regularly using a torque wrench whenever working in your shop, you will start get a “feel” for how tight different sized fasteners should be. Hopefully this “feel” will help to prevent you from breaking or overtightening any fasteners, now or in the future.
OK, where to start..?
It took me 3 easy hours to complete the entire job. This involved, firstly setting the bike up on a stand and checking the condition of the bearings to ascertain the extent of work required. In my case, the simple test shown in STEP 1 below proved conclusively that my bearings were definitely on their last legs, and needed replacing…. So it was onto the next steps which involved removing the front wheel, knocking out the seals and bearings. Correctly lubricating and installing the new bearings & seals, changing the tyre & tube, burnishing the axle and spacer, replacing the brake pads, then finally re-installing the wheel and adjusting the alignment etc.
Study this exploded picture of the hub assembly taken from your spare parts manual carefully. Yours should be similar to this one. Looks straight forward enough doesn’t it…?? Believe me …you can do it!!
OK..Lets get started…Firstly I would highly advise doing this job on a firm surface in a protected, well lit and ventilated area.
ITEMS REQUIRED
New set of Bearings and seals (If Required)
Waterproof grease. I prefer Castrol APX T. Have also heard glowing reports for Belray Waterproof Grease
New tyre & tube (Optional)
Brake Pads (Optional)
Other stuff such as protective gloves, 3M scouring pad, rags etc
TOOLS REQUIRED
Suitable ROE spanners (Ring/Open End) and sockets
Screwdrivers
Circlip Pliers
30mm socket (or suitable piece of pipe approx 40-41mm outside diameter)
Hard and soft faced hammers
TIP: The outside diameter of my Husqvarna front wheel bearing is 42mm. The approximate outside diameter of a 30mm socket is 40mm..This is almost a perfect size for driving in the new bearings. …. The 30mm socket can also be used during future maintenance to undo the steering head nut…!! (Check YOUR dimensions before purchasing)
STEP ONE: CHECKING THE WHEEL BEARINGS
There are many differing opinions/methods for doing this. My preference is to use the sound and feel method.
Sit the bike securely on a stand with the front wheel clear off the ground. If you don’t have a stand you can use an upturned milk crate or improvise with some other support that will hold the bike securely while you work on and around it. It is essential that the bike is stable!!!
There are several reasons for having the bike on a stand, Firstly, it gives us the ability to spin the front wheel and listen for any rumbling/clicking/ticking noises emanating from the bearings. (It is highly recommended that you remove the front disk pads when doing an audible test).
Watch the wheel carefully as it spins and slows down to see if it, “stutters”, “wobbles” or tends to lock up. Don’t be afraid to also use a screwdriver blade placed on the end of the axle with your ear pressed against the handle end….this will amplify any sounds, just like a doctors stethoscope.
Secondly, by placing the bike on a stand the front forks are fully extended and any play in these or in the steering head bearings that may potentially give false movements/sounds can be minimised.
By addressing the bike in the manner shown in the picture below you will effectively prevent any extraneous free play . This method will show conclusively if the bearings have failed. Simply press gently against the axle with your left knee and pull the fork tube gently with your right hand. This will stabilise the entire front end of the bike. Now grip the wheel at the 12 O’clock position in between the forks and gently push/pull back and forth with your left hand...
What we are looking for, is any play in the bearings, and this will be felt as a slight movement of the wheel, or, if the bearings are seriously worn, this movement will also be accompanied by a “clunking” sound. Also observe the seal face as you rock the wheel back and forth. Any free play will be shown as distortion/movement of the lip seal.
Sound, healthy wheel bearings will show virtually no discernable movement, and the wheel will be all but silent when spun.
Yes, no doubt, many of you who are reading this post will say that there are several other methods for doing this check, I agree, there sure are. My preference for doing it this way is because it can be accomplished successfully without any form of outside assistance. Remember, this post is aimed directly at those with little practical experience and a limited range of equipment and tools.
STEP TWO: REMOVING THE FRONT WHEEL
TIP: Use the tools that you normally take with you when you ride to complete this task. This will soon highlight any shortfalls of your toolkit. Hopefully this will give you the incentive to ensure that you have a fully stocked toolkit, with all the necessary tools available to remove the wheel if required out on the trail.
Once again, with the bike still securely on the stand and the front wheel elevated from the ground, undo the axle locking bolt (yours may require a hex tool).
Then undo the four axle “pinch bolts”. Taking care, as these bolts are very small, and if tight, it is possible to shear them off. Use penetrating fluid if necessary to help free the bolts
TIP: It is preferable to use sockets or ring spanners to undo fasteners. Open end spanners have the potential to damage or round off the bolt heads. Plus, there is a greater potential for the OE spanner to slip, possibly causing physical injury.
While supporting the front wheel with your right hand, slowly remove the axle by twisting and pulling it with your left.
If you cannot easily remove the axle, it may mean that you need to spread the pinch faces slightly using a screwdriver or small wedge. When doing this, be extra careful not to damage the pinch faces or the axle. Under no circumstances should you be tempted to drive the screwdriver in, or the axle out with a hammer. Personally, I prefer to gently bump the screwdriver in using the palm of my hand.
STEP THREE: SEAL and BEARING REMOVAL
With the wheel removed from the bike I prefer to work with it brake disk side up supported on an old rear tyre to help prevent any damage or scuffing to the rim.
Firstly remove the small spacer from the hub and put it carefully aside. Then, using a large screwdriver, gently lever out both lip seals. Take extra care not to bruise or score the hub.
With the brake disk side up once again, clean away any grease/crud exposing the circlip that retains the bearing in the hub. Use a pair of circlip pliers to remove the circlip (It is highly advisable to wear eye protection during this operation),
Looking down into the hub you will notice a tubular aluminium spacer between the bearings. (This is used to support the bearings when the axle nut is tightened).
We need to “upset” this spacer so that we can gain access to the inner race of the bottom bearing. To do this simply insert a screwdriver or drift and gently rock the spacer off centre. This will expose enough of the lower bearing for us to be able to drive it out using a soft “dolly” or punch. Take extra care when doing this as we do not want to damage the bore of the spacer.
Once the bearing starts to move, the spacer can then be easily moved to enable us to drive the bearing out “square” by tapping it equally around the circumference thus ensuring it does not “cock-over” in the hub. If you drive it out squarely, it will come out easily and smoothly.
Remove the centre spacer, and if fitted, the piece of supporting foam from inside the hub.
Thoroughly clean the hub internals and bearing faces. Making sure not to remove any metal as this may adversely affect bearing fit.
Now flip the rim over and repeat for the other side. This time all of the inner bearing race will be exposed, so you can easily drive it out with the punch or perhaps use an appropriately sized socket this time.
TIP: You can keep an old bearing for use in driving in the new bearings. My preference however is to use a neat fitting socket or piece of tube to do this, as an old bearing may end up being stuck back in the hub. To avoid this happening, it is possible reduce the outside diameter of the old bearing by filing/grinding/sanding thus ensuring it has a clearance fit in the hub.
The very action of driving the bearing out by hitting it on the inner race, is in effect enough, to ruin the bearing. The hammer blows, no matter how gentle, transfer the impact through the balls, causing flat spots. This will cause the bearing to fail prematurely. I never re-install bearings that have been removed this way. It is far cheaper in the long term, to simply throw these bearings away and replace them with new. The same applies for the lip seals.
*****************************************************************************************************************
CONTINUED in PART 2