mtne
Husqvarna
AA Class
I decided to be preemptive in changing out the plastic elbows on the fuel pump. Just knowing my history the chances of breaking something is fairly high. Coupled with the absolute frustration with the stock connectors failing to close off when I've needed to take the tank off I wanted to get it done.
I went with the brass Omega Engineering Inc. products. If you order from them make sure that you get Viton O-rings designated by the suffix FKM on the item. This will double the price from standard and need to be made to order taking six weeks or so. If any one is hot to do this I had to get two sets as a minimum order..... I had already committed in my mind so I went ahead with it. And yes it cost too much....... $300, I probably should have canceled the order when the price doubled and the order minimum doubled too. So if anyone really wants a set up I've got one.......... $150.

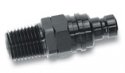
These specific items are FT-LCD230-06-FKM and FT-LCD100-06-FKM
The female body with 3/8"NPT threads and the male connector with a 3/8" male barb. Viton O-rings all around. Flow is stopped in both directions when disconnected.
As shown in Nesbocaj's helpful thread I referenced to do this I used vice grips and a lever against wood to remove the stock plastic. One came out whole and the other broke.

While your in there it's a good time to check for this common issue. You can see here that my holding ziptie was loose.

As well I checked for the wires connected to the pump. My black one was loosish and I decided to make sure it was tight. Like kewekenievial found here
Rather than keep the plate mounted to the tank I held it in a vice.

For the 3/8"NPT tap you also need a 37/64th bit.

Kind of silly to do but it helps me visualize what I'm doing....

As mentioned elsewhere, be sure to put something to block the filings in the fuel filter side.
A note about tapping something cast like this. I was nervous. I took it very slow, lots of backing out and cleaning. I was worried about how much meat would be left on the rise but feel good about sinking threads into the meat of the plate. Using Teflon tape, yellow rated for gas, was the catch. When just getting the male NPT part snugged up there was a little pop where the upper lip section seemed to let go. It was just a hairline crack but enough. I backed out the fitting, re-wrapped the threads with one less wrap and put it back in. Just for backup I used a touch of JB Weld on the hairline crack to make sure it wouldn't grow. Time will tell but I don't actually think it will be an issue. Just a word of caution to stop a touch earlier if you have any questions about it.
I used 5/16th fuel injection line. A bit of a tight fit over the 3/8" barb but it works. I took the stock fitting with the two straight connectors and cut them out, fitting them to the other end.


All done and connected up. You can just see the splash of JB Weld.

The rest of the pictures are in my SmugMug Gallery
Worth it? $150 is way steep for the four parts but the moneys is already spent and I'll never spill gas all over the shop trying to take the tank off again. I was originally thinking it would be half that..........
I guess time will tell.......
I went with the brass Omega Engineering Inc. products. If you order from them make sure that you get Viton O-rings designated by the suffix FKM on the item. This will double the price from standard and need to be made to order taking six weeks or so. If any one is hot to do this I had to get two sets as a minimum order..... I had already committed in my mind so I went ahead with it. And yes it cost too much....... $300, I probably should have canceled the order when the price doubled and the order minimum doubled too. So if anyone really wants a set up I've got one.......... $150.
These specific items are FT-LCD230-06-FKM and FT-LCD100-06-FKM
The female body with 3/8"NPT threads and the male connector with a 3/8" male barb. Viton O-rings all around. Flow is stopped in both directions when disconnected.
As shown in Nesbocaj's helpful thread I referenced to do this I used vice grips and a lever against wood to remove the stock plastic. One came out whole and the other broke.
While your in there it's a good time to check for this common issue. You can see here that my holding ziptie was loose.
As well I checked for the wires connected to the pump. My black one was loosish and I decided to make sure it was tight. Like kewekenievial found here
Rather than keep the plate mounted to the tank I held it in a vice.
For the 3/8"NPT tap you also need a 37/64th bit.
Kind of silly to do but it helps me visualize what I'm doing....
As mentioned elsewhere, be sure to put something to block the filings in the fuel filter side.
A note about tapping something cast like this. I was nervous. I took it very slow, lots of backing out and cleaning. I was worried about how much meat would be left on the rise but feel good about sinking threads into the meat of the plate. Using Teflon tape, yellow rated for gas, was the catch. When just getting the male NPT part snugged up there was a little pop where the upper lip section seemed to let go. It was just a hairline crack but enough. I backed out the fitting, re-wrapped the threads with one less wrap and put it back in. Just for backup I used a touch of JB Weld on the hairline crack to make sure it wouldn't grow. Time will tell but I don't actually think it will be an issue. Just a word of caution to stop a touch earlier if you have any questions about it.
I used 5/16th fuel injection line. A bit of a tight fit over the 3/8" barb but it works. I took the stock fitting with the two straight connectors and cut them out, fitting them to the other end.
All done and connected up. You can just see the splash of JB Weld.
The rest of the pictures are in my SmugMug Gallery
Worth it? $150 is way steep for the four parts but the moneys is already spent and I'll never spill gas all over the shop trying to take the tank off again. I was originally thinking it would be half that..........
I guess time will tell.......