motranqui
Husqvarna
AA Class
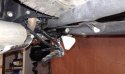
Yesterday I decided to go the “two cold weld components way”. I made a small amount with “Nural 21” and then I put it where I show in the pics. I made it a bit longer than necessary so that it get stronger and get stuck better.
I don’t know how much it will last. Time will tell.
Another solution, of course, is Rotax's idea and also the “inverted hook” that RDTCU propose. I’m looking forward to see how you make it.")


You're right. In fact, I'm aware that I will have to hold it by hand when it goes from vertical to horizontal position. Let's see how it works...
I don’t know how much it will last. Time will tell.
Another solution, of course, is Rotax's idea and also the “inverted hook” that RDTCU propose. I’m looking forward to see how you make it.
I'd just be concerned that anything added in that area might get abused by the side stand snapping up and bounching around, the spring isn't that strong, butt there's a lot of inertia in that sidestand.
There would be much less stress on a hook out at the footpeg.
You're right. In fact, I'm aware that I will have to hold it by hand when it goes from vertical to horizontal position. Let's see how it works...
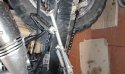
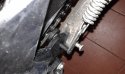


 . Better explained on pics that on words...


