• Husqvarna Motorcycles Made In Sweden - About 1988 and older

  • Hi everyone,

    As you all know, Coffee (Dean) passed away a couple of years ago. I am Dean's ex-wife's husband and happen to have spent my career in tech. Over the years, I occasionally helped Dean with various tech issues.

    When he passed, I worked with his kids to gather the necessary credentials to keep this site running. Since then (and for however long they worked with Coffee), Woodschick and Dirtdame have been maintaining the site and covering the costs. Without their hard work and financial support, CafeHusky would have been lost.

    Over the past couple of weeks, I’ve been working to migrate the site to a free cloud compute instance so that Woodschick and Dirtdame no longer have to fund it. At the same time, I’ve updated the site to a current version of XenForo (the discussion software it runs on). The previous version was outdated and no longer supported.

    Unfortunately, the new software version doesn’t support importing the old site’s styles, so for now, you’ll see the XenForo default style. This may change over time.

    Coffee didn’t document the work he did on the site, so I’ve been digging through the old setup to understand how everything was running. There may still be things I’ve missed. One known issue is that email functionality is not yet working on the new site, but I hope to resolve this over time.

    Thanks for your patience and support!

82 250 XC Refresh / dwarf build

endurodave

Husqvarna
AA Class
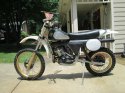
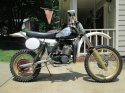
I’ve picked up a 250XC this last spring with intention of freshening it up for use perhaps in vintage racing and woods riding, not too much definite or a final plan other than a desperate need to take some of the travel out of the suspension. Admittedly I a bit of a purest and would prefer to keep the suspension as it is…….. but regretfully there is only so much a short old guy of 5’2” can reasonably handle without toppling regularly to the ground when having to dabble a foot down…

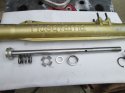
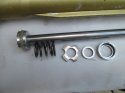
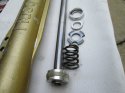
Does anyone know what size spacer or what might be needed to reduce the travel on a pair of XC piggy-back Olhins down to WR range of travel?


Attachments

  • Chicken ride 001.JPG
    Chicken ride 001.JPG
    162.2 KB · Views: 150
  • Chicken ride 002.JPG
    Chicken ride 002.JPG
    172.8 KB · Views: 147
I think the spacer in the shock is 1/4" thick but you would need a WR swingarm to reduce the seat height. You can shorten the forks just by making (2) 1.2" long spacers and putting under the head of the damping rod and on top of the top out spring. You can make these out of 1" dia PVC pipe from Home Depot or such
 
Thanks Jim,

Just finished off a re-do on the Yam 175 and have been eager to get started on the Husky.……. I’ve been around a few Huskys, in that my riding bud had a couple back in the late 70’s early 80’s when we were running cross country / enduros and such. Still yet I’m not well versed on Huskys and am working on schooling-up on the particulars as to give the 250 a reasonable sorting.

Of now I’m pondering options, rearranging the garage/shop and contemplating if I’m game enough to rebuild the Olhins myself or send them off. This may take a while guy’s to get done, but we’ll post along the way.

Thanks again

Dave
 

Attachments

  • Chicken ride 025.JPG
    Chicken ride 025.JPG
    199 KB · Views: 73
I have been puttering with a set of remote reservoir Ohlins just to see what they need. If I had more money and less things I needed to spend it on, I would send them to Drew Smith at WER. He is a forum sponsor and and is a suspension expert.

I put my 84 250WR rebuild on borrowed wheels to get it off the workstand and check the ride height. I am 5"9" tall and I could not touch the ground with the XC damping rods in the forks. So if I ride it(not likely) I will be putting the PVC spacers in the forks to lower it and sharpen the rake for sharper turning.
 
got a set of short ohlins springs with extended spacers that came with the xc i have just purchased, was told by the previous owner that they were set up for a 5'6" guy weighing approximately 60 kg.
i can send through a photo if your intersted.
 
grab some wr fork sliders and dampers to sort the front and get the spacers slotted into the shox and wr swingarm. simple fix, will bring it down to manageable levels. bound to be someone here wanting to upgrade their wr for mx / desert running
 
Thanks much guy’s for the suggestions…..So far have taken the forks down and slipped in 1.5” spacers to get the front end down a bit…… For the rear, put on a set of 16.25” Ohlins resulting in a mock-up seat height of approx 36”, which is enough for me to get toes to the ground….


I’d dropped a tank off with a local auto body shop to work out a couple small dents,,,,,My mistake, should have know better, as all I was wanting was to massage out what they could from the inside and I’d take care of the rest. The end result , yes a dent free tank, but etch primed with hours hand sanding to be done to the side panels to get them back presentable..
 

Attachments

  • husky tank 003.JPG
    husky tank 003.JPG
    178.8 KB · Views: 109
  • husky tank 001.JPG
    husky tank 001.JPG
    83.2 KB · Views: 107
  • husky tank 005.JPG
    husky tank 005.JPG
    97.1 KB · Views: 107
And hopefully they massaged the dents out and not just load them up with body filler. I am going to try my own by bonding spot weld studs into the dents and pulling with a slide hammer. 3M Panel weld is the adhesive
 
In disassembling the forks and comparing the parts manual (1982 / 250) it appears that the fork spindles have been changed. Does anyone recognize them ? or are they correct ?

Thanks much

Dave
 

Attachments

  • Husky fork spindle 002.JPG
    Husky fork spindle 002.JPG
    156.8 KB · Views: 58
  • Husky fork spindle 003.JPG
    Husky fork spindle 003.JPG
    166.2 KB · Views: 51
  • Husky fork spindle 004.JPG
    Husky fork spindle 004.JPG
    159.5 KB · Views: 54
If the damper rods are steel they may be Husky Products replacements I had found steel damper rods in my 86 400WR forks but found Husqvarna aluminum damper rods in everything else I have in terms of forks from 1982 to 1987
 
Well I’ll be; Husky Products spindles…….I’ll take that as a win :)

I’ll tell you now; Husky Café is the “place”:thumbsup: 
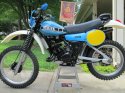
……. and If it wasn’t for you guys I might as well push this thing over in the high grass and move on.

Not much for show and tell at the time as we’re into tear-down, evaluating, stripping, cleaning and such. Figure to see if can get the fork lowers and bars prepped for primer this morning before it get hot out.

Thanks again for the help

Dave
 
Making a bit of headway on the 250, have the tank, fork lowers and bars in paint.(rattle can urethane) The tank I used Toyota/lexus black 202/026,,,, It’s a fare match and yes I got lazy when ordering as it was in the same category as the Gold color that was to be used on the fork lowers / bars / tank stripe ( Toy / Lex 202 / 026 yellow millennium gold pearl metallic).


Still have to get the clear coat on…… Figure on using SprayMax clear, which have used it in the past with relatively good results.
 

Attachments

  • Husky sort 009.JPG
    Husky sort 009.JPG
    111.1 KB · Views: 67
The swing arm side stand bracket needed attention and was able to sort it yesterday. Patched in the end and added a gusset, bit of an over build, but should do the task.
 

Attachments

  • Husky sort 001.JPG
    Husky sort 001.JPG
    100 KB · Views: 46
  • Husky sort 003.JPG
    Husky sort 003.JPG
    129.5 KB · Views: 50
I cut off a bracket that looks like what you started with from an 82 XC swingarm and welded it onto a 1978 ML swingarm. If you patched the end with mild steel the gusset you added is necessary. I am current cutting up a 1976 ML frame to use as material donor for some of my projects that require chrome moly
 
Well the first attempt on painting the tank failed,,,I’d tried using regular 3m yellow masking to lay-out the gold stripe and had problems with paint lifting, uneven edges and such, what attempts made to correct only spiraled into more folly…:cry: 
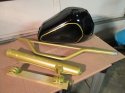
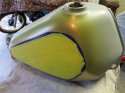
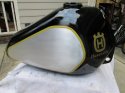
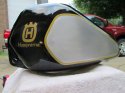
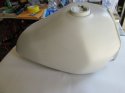
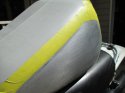
…. so went after it again this time using 3m ¼”plastic pin stripe tape with much better results; Not that the tank is near that good as many here posted and has plenty of flaws, figure though it’s respectable go at husky tank painting. Still yet lack another coating of clear today if the weather is agreeable…

Frame is out getting sand blasted, a few bits out to get plated, waiting on arrival of parts; The build slowly edging along.
 

Attachments

  • husky tank and parts 009.JPG
    husky tank and parts 009.JPG
    129.5 KB · Views: 122
  • husky tank and parts 013.JPG
    husky tank and parts 013.JPG
    110.8 KB · Views: 124
  • husky tank and parts 014.JPG
    husky tank and parts 014.JPG
    116.5 KB · Views: 120
Look good to me. I use only that vinyl tape with masking off lines, etc... tip that works well for me. Before taping off, I stick the vinyl tape on my jeans so it picks up a little lint off my pants. Then stick to surface. When removing tape pull it straight backwards for a clean line. Pulling it outwards or at an angle, can lift the mating paint or paint your covering. I do this and don't ever have to use adhesion promoter. If you use blue painters tape or regular tape. Paint can bleed under it and sometimes removing it removes paint you are covering.
 
Back
Top