• Husqvarna Motorcycles Made In Sweden - About 1988 and older

  • Hi everyone,

    As you all know, Coffee (Dean) passed away a couple of years ago. I am Dean's ex-wife's husband and happen to have spent my career in tech. Over the years, I occasionally helped Dean with various tech issues.

    When he passed, I worked with his kids to gather the necessary credentials to keep this site running. Since then (and for however long they worked with Coffee), Woodschick and Dirtdame have been maintaining the site and covering the costs. Without their hard work and financial support, CafeHusky would have been lost.

    Over the past couple of weeks, I’ve been working to migrate the site to a free cloud compute instance so that Woodschick and Dirtdame no longer have to fund it. At the same time, I’ve updated the site to a current version of XenForo (the discussion software it runs on). The previous version was outdated and no longer supported.

    Unfortunately, the new software version doesn’t support importing the old site’s styles, so for now, you’ll see the XenForo default style. This may change over time.

    Coffee didn’t document the work he did on the site, so I’ve been digging through the old setup to understand how everything was running. There may still be things I’ve missed. One known issue is that email functionality is not yet working on the new site, but I hope to resolve this over time.

    Thanks for your patience and support!

73' CR400 Restoration...

retro rocket

Husqvarna
AA Class
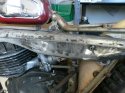
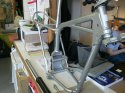
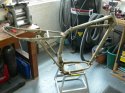
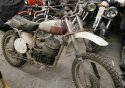
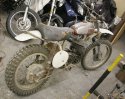
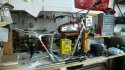
Here we have the start of what I think is going to be a pretty quick and enjoyable restoration of a 73' CR 400.

I intend to go racing.

I have started with the pipe as I had all the things needed to complete the job...

My restoration plan goes as follows:

- Leave all paint and platting finishes mostly as is ... I want a genuine fresh from the barn look. (any comments welcome!)

- Full mechanical restoration to the highest standard ...

- Perform some small modifcations along the way but only if I feel they are in good taste... as per my removable heat shield.

- Try and preserve as much of the original bike as possible ...


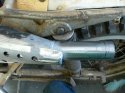
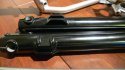
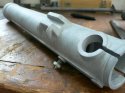
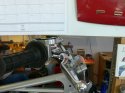
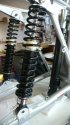
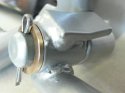
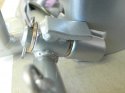
As you can see I have started with the pipe - The end of the pipe was bent inwards towards the rear wheel and there was some servere damage at the junction of the muffler pipe and the body of the expansion chamber..

I cut and removed all damaged metal. John at Vintage Husky sent me a peice of the correct tubing to replace the damaged section.

I have left that over-long for the mean time.

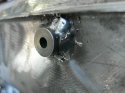
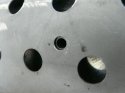
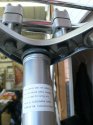
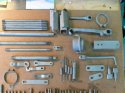
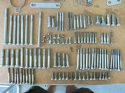
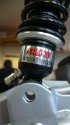
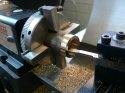
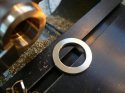
At the same time I removed the heat sheild as it had some dents and it also covered part of the section that needed repair. At this time I media blasted all the parts - straightened them out and as you can see made the heat shield removable by way of two bosses that I turned and then welded in place - I have since tapped them with a M6 thread.

All in all it looks good and the heat sheild fits perfectly.

I am wondering if anyone has any suggestions regarding a good paint finish for the pipe as thats the next step... what is the best and most original looking way to do it???

If anyone has any original 73' correct parts Im interested - preferably not broken. Good aged patene welcomed.

I am away through the weekend so probably wont reply to any posts until Sunday night - that is if anyone posts!!

Enjoy your weekend folks.
 

Attachments

  • P1060678.jpg
    P1060678.jpg
    94.8 KB · Views: 340
  • P1060679.jpg
    P1060679.jpg
    88.9 KB · Views: 335
  • P1060680.jpg
    P1060680.jpg
    96.2 KB · Views: 340
  • P1060682.jpg
    P1060682.jpg
    94.4 KB · Views: 326
  • P1060684.jpg
    P1060684.jpg
    98.9 KB · Views: 469
Good to see you have a Mag swing arm, that's the best/easiest handling mod for the $. Next would be typical suspension upgrade, then maybe VH triple clamps but they're expensive. Regarding the motor, clean up the transfers & open up the exhaust port. It's amazing how much these 400s respond to the exhaust port clean up. No need to go huge on the compression. Swap out the Bing for a Mikuni and if you're worried about spark then a modern ignition. If $ not an object make it a reed valve.
 
Leftcoast

Thank you for your comments - I am interested to know what it is that makes my swing arm a Mag - I just assumed it was the original (??) - this is my first Husky so I am still learning the exact model specs....

Thank you for the other suggestions. Mikuni makes a lot of sense as does a new stator plate.

What reed cage do you use - a later Husky one ? ... I guess you would have to do some machining.
 
I don't know about leaving paint and finish the way it is. I'd want to repaint the frame really good, to seal the metal against any further rust and corrosion. Just sayin'.....:D
 
Looks like this will turn out to be a nice restoration job... especially if it's for go and not show...

Perhaps this thread needs to be moved into the 'Restoration Projects' section if you decide to do a stage by stage and post as you go?

Stu
 
Husky37

I have nothing against the thread being moved to the 'Restoration projects' section...

Where abouts in the UK are you from? - I am originally from Devon...
 
I'm from the West Country too.... I always explain it to people as the place where all the Pirates came from.... Black Beard being one of them..

Getting close to finishing off my '85 500.... It's always good to see other rebuilds and restorations that are going on.... I find I always learn something and try and pass on as much as I can.

Looking forward to what you are going to do with yours.

Stu
 
Moved this into Vintage Restoration Section.

Looking forward to seeing more of this build! :thumbsup::cheers::applause:

T
 
My Dad had a early 70's CR400 when I was a kid. We still joke about the bike to this day. The power was ON****************************************! or off. Hold on tight and away you gooooo. I still can see him "supermaning up hills'" and holding on for dear life. Just all engine/power and so many buddies scared to get on the thing. Great Bike!!
 
Daniel508s

Great memories - I have some easy riding refined bikes and really really look forward to some of that raw all or nothing power that this bikes known for... (your dad knew all about it by the sounds of it)

I have made a lot of progress in the last few weeks and will post the pictures just as soon as possible!
 
Ok so I had thought I would do a quickish mechanical restoration and leave the bikes patene the way it was - rust and all, barn fresh...

Well that was the plan but it seems that has gone out of the window with the refinishing of most every part of the bike...

So I strarted by stripping the frame back and doing some thinking about powder coating or paint... I did a bit of reading and came to the conclusion that there are pros and cons for each and since the last bike I did got paint I figure I'll try powder this time...

My sand blast unit is not big enough to get the frame in but I did the fork legs and various brackets which are going in for powder as well.

The frame came back and I have to say the finish is first class, a couple of minor annoyances with thickish powder build up. My frame number is obscured which I will have to bring back by wet sanding the powder back and then color matching with a light coat of standard silver paint - or at leasts thats the plan. The powder seems pretty sandable.

The Fork legs could not be any better. I have assembled the forks with new stanchons from Steve (Huskydoggg) Thank you Steve
Anyone have any suggestions as to the best oil for them? I used a 20 weight and to memory 250mm's in each leg. They make a nice squellch squellch sound now!
 

Attachments

  • P1060760.jpg
    P1060760.jpg
    89.3 KB · Views: 221
  • P1060741.jpg
    P1060741.jpg
    97.3 KB · Views: 212
  • P1060755.jpg
    P1060755.jpg
    94.9 KB · Views: 229
  • P1060733.jpg
    P1060733.jpg
    92.8 KB · Views: 223
  • P1060732.jpg
    P1060732.jpg
    97.3 KB · Views: 222
The best bit of restoration is ordering of parts - which Im doing as fast as possible prior to A: Running out of money B: Getting busted by my wife.

I am in pretty good shape as my bike came with most of a second bike that has prooved useful source of good or non corroded parts.

Today I finished the cleaning of every last nut, bolt, washer, spacer, bracket and clip.... They have all gone in for cadmium plating so should look a lot brighter when I hopefully collect them on Friday!!! - I can do a bit of assembly at that point.

My shock absorbers arrived a day or so ago and I have not stopped looking at them - yes I am excited about the shocks... (I can confess that here at least)

They are produced by a UK complany called Falcon Shock Absorbers Ltd www.falconshockabsorbers.co.uk

Im also a Brit so feel like I should support Queen and country even if I live in the US. I have a set on a 77' Suzuki PE250b which have held up to some real punishment.

Other parts I bought were: Repro handle bars - magurs levers - magura throttle - oury grips - nos lower bearing cup - seat cover - seat pan - spoke set.
 

Attachments

  • P1060762.jpg
    P1060762.jpg
    86.9 KB · Views: 203
  • P1060775.jpg
    P1060775.jpg
    96.9 KB · Views: 198
  • P1060772.jpg
    P1060772.jpg
    97.4 KB · Views: 210
  • P1060766.jpg
    P1060766.jpg
    95 KB · Views: 202
  • P1060765.jpg
    P1060765.jpg
    98.3 KB · Views: 217
A picture of the bike the day I bought it... and where I am now.
 

Attachments

  • photo.jpg
    photo.jpg
    63.6 KB · Views: 262
  • ttt.jpg
    ttt.jpg
    96.5 KB · Views: 258
  • P1060771.jpg
    P1060771.jpg
    102.5 KB · Views: 291
Retro,
I'm glad you went w/ refininshing your hard parts versus leaving them as you found them. Alot of extra work, I know, but oh so nice. Makes me smile w/ each new post.
Rick
 
Rick

Yep - so am I. I'll just have to ride this bike good and hard to get that patene back...

Your project is awesome - I had originally wanted to build this bike up using a larger four stroke engine in the style of a vintage super moto or old school desert racer creation... next time.

I was interested in the tools you used to push the swing arm bearings into place - I may make a similar device as thats one of my next jobs.

Cheers Tom
 
I have made a small amount of progress ...

Having removed excess powder coating from the kick stand shaft I fitted the stand to check for excessive free play and movement - lots of play... so here is my fairly simple fix, two bronze washers turned to fit. One each side. Not exactly rocket science but it made made me happy.

While there is still play it has tightened it up to a point that I am happy with it now. The bronze I used was salvaged from the suspension bushes from a 1958 Ferrari testarossa. (sadly I do not own the car)

I had also cut off the orginal foot plate of the kick stand as it was pretty beaten and welded in place a fresh piece - around 2 inches square as per the original.
 

Attachments

  • P1060794.jpg
    P1060794.jpg
    89.8 KB · Views: 185
  • P1060795.jpg
    P1060795.jpg
    88.1 KB · Views: 189
  • P1060798.jpg
    P1060798.jpg
    96.2 KB · Views: 185
  • P1060799.jpg
    P1060799.jpg
    96.4 KB · Views: 179
Back
Top