-
Hi everyone,
As you all know, Coffee (Dean) passed away a couple of years ago. I am Dean's ex-wife's husband and happen to have spent my career in tech. Over the years, I occasionally helped Dean with various tech issues.
When he passed, I worked with his kids to gather the necessary credentials to keep this site running. Since then (and for however long they worked with Coffee), Woodschick and Dirtdame have been maintaining the site and covering the costs. Without their hard work and financial support, CafeHusky would have been lost.
Over the past couple of weeks, I’ve been working to migrate the site to a free cloud compute instance so that Woodschick and Dirtdame no longer have to fund it. At the same time, I’ve updated the site to a current version of XenForo (the discussion software it runs on). The previous version was outdated and no longer supported.
Unfortunately, the new software version doesn’t support importing the old site’s styles, so for now, you’ll see the XenForo default style. This may change over time.
Coffee didn’t document the work he did on the site, so I’ve been digging through the old setup to understand how everything was running. There may still be things I’ve missed. One known issue is that email functionality is not yet working on the new site, but I hope to resolve this over time.
Thanks for your patience and support!
You are using an out of date browser. It may not display this or other websites correctly.
You should upgrade or use an alternative browser.
You should upgrade or use an alternative browser.
50mm Zokes issues advice pls
- Thread starter andy j
- Start date
 ... usa is waking up shortly ...maybe some help is on the way ....
pvduke
Husqvarna
Pro Class
dont mess with the stack/dampers!
lets just change seals.
get everything spotless. toss the old seals. install new ones as suggested. reassble and test. lets get the leak fixed first. one thing at a time. i have shim recipes at home but i dont quote these for a few reasons.
were doing a leak fix here. tear it down, clean throughly, replace seals, reassble and test. i tape craft paper or shopping bags on my bench after final clean and blow off and just before assbly. they get sterilzed from point A before going on the bench for final. i also do one atta time.
you also cant tell by looking if the seals are failing. they might look fine but be sacked out. just inspect the bushings and stuff for glaring defects. if there is no excess wear and the stantions aint flopping in the sliders new seals should serve you well.
service the fork, get everything spotless, bag and lube the top of stantion so yo dont cut the new seals sliding them on, install new seals carefully w/ a good driver, reassble and retest.
andy j
Husqvarna
AA Class
ok im in....
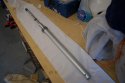
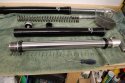
had to undo left hand nut from rhand nut & seperate.. there is a small clip to stop the rhs nud and alloy piece from sliding off.. once out i have slid the middle rod all the way out..
now this is not what i expected.. i assumed the shims to be on the rod.. where are they??? it is possible they are in the middle of the big tube it looks like this comes apart maybee it unscrews... i think i need to stop until someone can confirm where im at...
I have picked up two new seals this morning, some new fork oil, and a seal driver... got robbed on the seal driver at £50 and £12.50 per seal but at least they are original ones..
whilst i have got to the point that i can replace my seals and rebuild. im curious to see and understand the valve shims... hence why im carrying on..
where are they?? anyone?
thanks
Attachments
ray_ray
Mini-Sponsor
The shims? They are stacked on the valve .. gotta remove the nut on the end of that shaft to get them off the valve... becareful as they are small, thin, and stuck together with an oil film ... All different sizes ...
That last entry point sounds a little complex") ... U got an engineering degree?
... U got an engineering degree?
FYI: Again my forks are different but one valve on my mine had a set of shims on both sides of a valve ... one side was the rebound, then other was called the mid valve ....
That last entry point sounds a little complex
... U got an engineering degree? FYI: Again my forks are different but one valve on my mine had a set of shims on both sides of a valve ... one side was the rebound, then other was called the mid valve ....
Attachments
andy j
Husqvarna
AA Class
ok.. thanks for the advice..
ive got as far as im going to go on this tear down.. its gone well. for the moment im out of my comfort zone going any further and wouldn't know what to do anyway at the moment..
as suggested lets get it sucessfully back together and re test.... shim inspection and messing around is best left for another day..
going to start now.
andy j
Husqvarna
AA Class
sme again.. im putting the cartridge unit back inside the outer tube... it says in my manual..
"insert the cartridge unit inside the outer tube" done this.
"lock the upper end of the cartridge unit into place then tighten the bottom valve unit"
ok so i have inserted the cartidge but cant find a way to lock the upper end.. so when i attempt to do the bottom valve unit up the cartridge spins??
i am missing something here?
MXRider
Husqvarna
A Class
What I do is thread the top cap into the outer tube and put a little pressure on the fork.
This clamps the cartridge enough to tighten the bolt that holds it at the bottom.
Then take the top cap back off and continue on with the reassembly.
They probably make a cartridge holding tool for this, but I dont have one.
This clamps the cartridge enough to tighten the bolt that holds it at the bottom.
Then take the top cap back off and continue on with the reassembly.
They probably make a cartridge holding tool for this, but I dont have one.
robertaccio
Husqvarna
Pro Class
food for thought time and effort=$
another option send them out to any number of suspension specialists and have them dialed in professionally.
LTR, ZipTy racing are just 2 of many recommended here on the site.
In the US currently ZipTy racing is racing Zokes at the highest level of the sport(MXGP), in offroad with the H&H series and others and in the real suspension crucible of MX in SoCal weekend MXs and for MXGP at the Glen Helen round they were using zoke 50s and special 48s on all their race machines.
PS I had mine done by LTR and have many hours of trouble free racing and riding on them ( 1 rebuild since LTR revalve) (2008 TXC450) so since new thats one rebuild/revalve and one rebuild.
No scientific study but I believe my habit of air bleeding them (alot) and after strapping down the bike to the trailer keep the internal pressures low helping to keep seal leaks down as well seal skins to keep the muck off.
and no 50mm zokes are not that bad they are mechanical items alot like like any other brand of fork like anything they need to be set up and maintained correctly.
Again ZipTy racing used Zokes (hi ended coatings and at least one pair of 48mm specials) on their MXGP bikes when KYBs were available, Ty does not mince words on products, if it works he will use it.
So are the 50mm zoke really that bad and worth avoiding on a bike. My 45mm zokes on my 2008 cr 125 are not the best handling but have never had a leak after 2 years and 100 hours of motocross. I am hoping after getting Ross Rocher shop working on them the handling will be better than stock but as far as durable they have been good.
andy j
Husqvarna
AA Class
ok will try that...
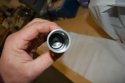
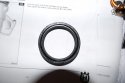
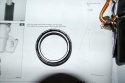
still not 100% on which way the fork seals go on..
I attach two pictures one of each side.
side A and Side B.. i think side B goes to bottom of fork ie facing out from shock and side faces oil inside of shock..
if the pictures are not clear side a has a thicker facing rim and a narrow groove at the inside lip of the thicker facing rim..
side B has a narrower facing rim but a larger deeper groove.
both sides have a small spring inside..
i can tear apart the other fork to check for sure if i need to
Attachments

andy j
Husqvarna
AA Class
All back together fine it was side a that goes to the bottom of the fork.. looked very closely at my old pictures... hopefully they were put in correct last time!.. i had no drama fitting the new seals with my new driver tool... it all feels ok.. i have filled with oil and have got all the air our by moving the rod up and down.. im giving it ten minutes to let any further air esacpe before checking oil height.. im going to run with 95mm A/g any suggestions on this whats standard??
regards
ANdy
regards
ANdy
huskyte310
Husqvarna
AA Class
I think they set mine to 130mm for woods,rocks, roots, s/t trail riding.
andy j
Husqvarna
AA Class
We did it... thank you so much for the help..
The fork action feels smoother.. there is a real satisfying clean look to the tubes once the fork rebounds after compressing it by hand.. its sealing so much better.... looks very promising..
Its a confidence thing isnt it.. as actually is straightforward once you look back on it but you do need guidance the first time.. the manual misses a few things out..
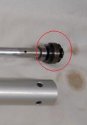
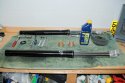
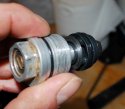
PV duke Ray.. i did find the shims once you guys pointed them out to me... wow they are small and thin, i am now more interested to discover how they work.. im intriged!.. i would like to discuss this further once bike is back together and tested..
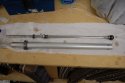
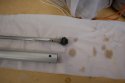
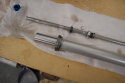
i have attached a close up and also of the completed forks with tools used.. you can see my new 50mm fork driver.. worked a treat...
One last question for today..
take a pair of forks with standard pre load say 50mm and reduce it to 30mm pre load with out any changes what effect does this have? im assuming the fork will ride lower in the stroke?
many thanks for the guidance..
andy
The fork action feels smoother.. there is a real satisfying clean look to the tubes once the fork rebounds after compressing it by hand.. its sealing so much better.... looks very promising..
Its a confidence thing isnt it.. as actually is straightforward once you look back on it but you do need guidance the first time.. the manual misses a few things out..
PV duke Ray.. i did find the shims once you guys pointed them out to me... wow they are small and thin, i am now more interested to discover how they work.. im intriged!.. i would like to discuss this further once bike is back together and tested..
i have attached a close up and also of the completed forks with tools used.. you can see my new 50mm fork driver.. worked a treat...
One last question for today..
take a pair of forks with standard pre load say 50mm and reduce it to 30mm pre load with out any changes what effect does this have? im assuming the fork will ride lower in the stroke?
many thanks for the guidance..
andy
Attachments
ray_ray
Mini-Sponsor
Reducing the load that is placed on the springs (pre-load), will cause the forks to ride lower (sag) a bit more ... The numbers for setting the sag are a variable due to rider weight ...These numbers must be at least close for the forks to perform correctly ... The springs and setting the sag are setting the starting point for the fork in its stroke ... You gotta have some sag as you don't want the forks topped out sitting still but you don't want the forks to sag down too much because you then use up some of the cush stroke at the top of the stroke ... The valving ( and oil + oil volume) takes over next from here as you start chewing up real estate .... Please feel free to correct me if anything is wrong here ...
The shim stack to me looks like a small modern marvel ... You can see the bigger shim right against the valve? The oil bends it first and wraps around the others that are smaller and harder to bend ... They'll all work together at times due to forces applied ...
This felt like a whirl-wind tour on these forks ... we'll all be interested in results ... yep, it is not too complicated, even removing the shims BUT their placement on the valve is critical 100%.
Are the Marzocchi 50mm any good? Husky Pros are using them all over the world and winning ... Most everyone likes them usually except for this leakin issue that comes up, usually specifically to this one bike... Mine on my 08 TXC250 are great I think ...
Just to re-cap, (1) you changed to a new seal and maybe (2)altered the amount of oil in the forks?
The shim stack to me looks like a small modern marvel ... You can see the bigger shim right against the valve? The oil bends it first and wraps around the others that are smaller and harder to bend ... They'll all work together at times due to forces applied ...
This felt like a whirl-wind tour on these forks
... we'll all be interested in results ... yep, it is not too complicated, even removing the shims BUT their placement on the valve is critical 100%. Are the Marzocchi 50mm any good? Husky Pros are using them all over the world and winning ... Most everyone likes them usually except for this leakin issue that comes up, usually specifically to this one bike... Mine on my 08 TXC250 are great I think ...
Just to re-cap, (1) you changed to a new seal and maybe (2)altered the amount of oil in the forks?
andy j
Husqvarna
AA Class
yes that is correct.. changed seal and moved air gap slightly..
for your information the air gap was set originally at 85mm from last april to when they were striped 25mm of oil had leaked, weeped out over the season.. as the air gap was 110mm, perhaps this was normal..
the whole process was really about trying to solve the leaky issue that I have.. by undertaking the works myself i have an understanding of my forks and i think have spent more time being carefull and paying more attention to detail on re assembly than i would get else where... for instance i spent over an hour cleaning everything of old oil, any dirt or grit particles..
There is a great satisfaction to be had from knowing that I now can tear down the forks, replace seals and check for any dirt...
Yes i have made an investment in the fork slider, but a fork seal replacment by shop/tuner is around £70-80 here i have spent £100 so its only cost me £30 plus i have tools for next time..
when i put them back on the bike today i will take special care with the re alignment and investigating why the fork leg binds on the axel in situ... when on the work bench is free and a snug fit.. obviously othis is getting out of alignment, or height some how...
I am intrigued and amazed at how small the valving actually is and in fact how it can possibly effect so dramatically the feel of forks.. before the forks were revalved at about (4hrs from new) my arms felt they were about to snap.. one revalve later, pre load change and oil level change they were dramatically better.. i do believe that as ive got faster through out the year and use the bike for mx practice as well as enduro that valving is a little on the soft side for me now..
as an easy fix and experiment we bumped the springs rate up to .475. and the effect was real good around the track of the jumps.
Perhaps the ultimate ride may come from the original .45 springs, extra preload, and stiffer valaving with slightly less air gap...
Years ago when I was involved in RC off road buggy racing we constantly rebuilt our shocks and depending on conditions would swap out small plastic inserts that had varying size holes in the middle to let the oil flow at different rates to effect suspension feel.. depending on summer or winter we would change out the oil thickness as the temperature effect on the oil effected rebound damping considerably. i guess the valving is a bigger version.. but how it can effect different parts of the suspension travel by changing the shims is a little unknown to me at present.
Regarding the 50mm forks..
it appears there are two types.. single chamber & twin chamber.. from what i have read the twin chamber have adjustable pre load internals via a clip on the middle section., my single chamber versions have a UPVC plastic spacer that is swapped or cut down to varying size.. this obviously is inferior to the clip version..
it also appears that all the high end mazocchi forks are base on the twin chamber versions.. so again i would imagaine that there are other factors that differ between the two forks.. one must be an A version & one must be the B version.. i guess it doesnt really matter providing you get a good enough ride ..
Regards
andy