• 4 Stroke Husqvarna Motorcycles Made In Italy - About 1989 to 2014
    TE = 4st Enduro & TC = 4st Cross

  • Hi everyone,

    As you all know, Coffee (Dean) passed away a couple of years ago. I am Dean's ex-wife's husband and happen to have spent my career in tech. Over the years, I occasionally helped Dean with various tech issues.

    When he passed, I worked with his kids to gather the necessary credentials to keep this site running. Since then (and for however long they worked with Coffee), Woodschick and Dirtdame have been maintaining the site and covering the costs. Without their hard work and financial support, CafeHusky would have been lost.

    Over the past couple of weeks, I’ve been working to migrate the site to a free cloud compute instance so that Woodschick and Dirtdame no longer have to fund it. At the same time, I’ve updated the site to a current version of XenForo (the discussion software it runs on). The previous version was outdated and no longer supported.

    Unfortunately, the new software version doesn’t support importing the old site’s styles, so for now, you’ll see the XenForo default style. This may change over time.

    Coffee didn’t document the work he did on the site, so I’ve been digging through the old setup to understand how everything was running. There may still be things I’ve missed. One known issue is that email functionality is not yet working on the new site, but I hope to resolve this over time.

    Thanks for your patience and support!

449/511 G450 Torque Limiter replacement

9880sts

Husqvarna
AA Class
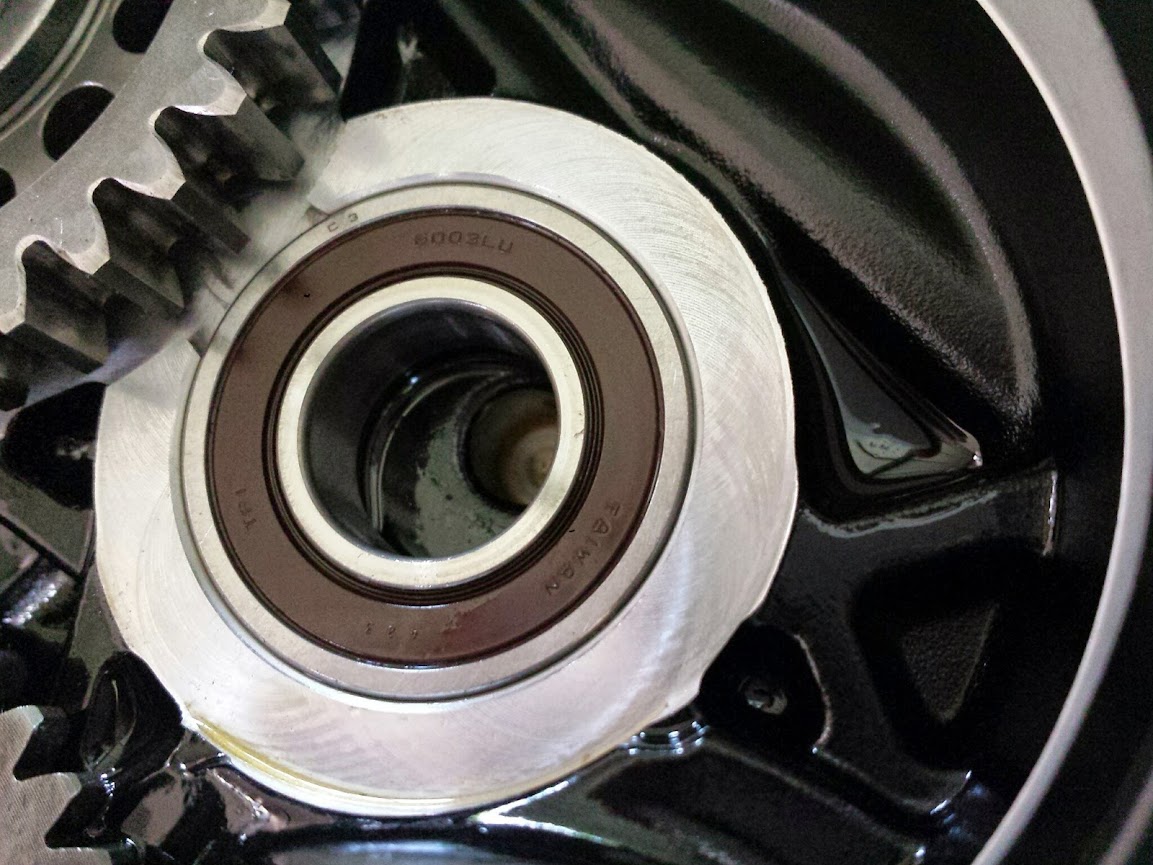
Just did my TL replacement on the TE511 2013 model.

Now i did have a chat with my Dealer , and this also possible on the 2011 model. I went there and checked the frame and bolts... it is the same as on the 2013. Some mechanics dont even remove engine mounts at all. Just loosen the bolts and leave em in the Cover while you slide it out and back in.

Not as bad as it looks... DIY possible.Slide1.JPGSlide2.JPGSlide3.JPGSlide4.JPG
 
Nice detailed write up. I decided to just pull the motor when I did mine. For me it was EZ and could then lay the motor on its side and keep everything clean an aligned. I was surprised how easy it was to extract the motor. Someone recommended heating the bearing to get the TL to drop into the case. Mine was very tight and need some persuasion. Also it seems weird to have sealed bearings in the motor. Not sure if we should be pulling the seal or not. I left mine as is. Some remove the seal and leave it out.

20140708_163015.jpg
 
Great write up.
I do have two questions.....
Where did you get the new and improved TL?
Did you purchase the one for the Husky or the BMW as the parts diagram show some differences?

Thank you,

Paw Paw
 
Good job mate. Nicely done & good info to have. :thumbsup:
Reckon I'm down for a strip & reshim of my own one fairly soon. I don't have slip yet, but I don't want it to get to that either.
 
Great detailed write up. You've outdone yourself again Helmut. For sure, we have to thank you again.:notworthy:

The flow of information is really going now. Keep it up.:applause:

The time you have spent providing us with clear and concise information is greatly appreciated. Just by your help in making it much easier to see and understand, compared to what was being done before on this issue. We should all be getting up to speed now on a subject that we will all have to service at some point as owners of the Kymco Powerplant.:D

It will fail sooner or later, some maybe much sooner than others. Under the harshest of riding conditions it really is a sacrificial component. We now at least know it is serviceable and how to check it or have it tested easier for operational function.:thumbsup:

We all knew this could be a problem after buying one of these bikes powered by this engine after either taking the time to read the service manual. Or by reading the plentiful amount of available information out there on the internet. With these threads now the average mechanic should have no reservations about doing this themselves because it's no big deal. It really is nothing to be afraid of.:cheers:
 
Nice detailed write up. I decided to just pull the motor when I did mine. For me it was EZ and could then lay the motor on its side and keep everything clean an aligned. I was surprised how easy it was to extract the motor. Someone recommended heating the bearing to get the TL to drop into the case. Mine was very tight and need some persuasion. Also it seems weird to have sealed bearings in the motor. Not sure if we should be pulling the seal or not. I left mine as is. Some remove the seal and leave it out.

20140708_163015.jpg


The sealed bearing in this case helps to channel Oilflow though the TL. The TL is Lubricated from the hole you can see in the back. If the bearing is open, no supply into the drilled TL shaft.
 
Great write up.
I do have two questions.....
Where did you get the new and improved TL?
Did you purchase the one for the Husky or the BMW as the parts diagram show some differences?

Thank you,

Paw Paw


i bought it from Dangermousse..
It was a Stock TL and i just wanted the thing with more NM, so started to test around a v bit.
The Info i gave here is for future reference. I would buy the single parts through BMW and just repair the Old one if i have to again.
I would also buy the Allen head bolt because it is coated with dry Loctide and pretty soft on the hex,
 
The sealed bearing in this case helps to channel Oilflow though the TL. The TL is Lubricated from the hole you can see in the back. If the bearing is open, no supply into the drilled TL shaft.

20140708_163015.jpg


This is incorrect. The hole you see in the background above is the breather vent. The seal on the bearing forces breather gasses to move through the torque limiter before exiting the engine. The torque limiter is not oiled from the breather vent in the back. It receives it's oil from the oil galleries cut in both sides of the larger gear in the main torque limiter assembly.

blowbydiagram-jpg.41214


tl_oil-galleries-jpg.46734
 

Attachments

  • TL_oil galleries.jpg
    TL_oil galleries.jpg
    133.5 KB · Views: 231
Not a real good picture, I'll try to get you a better one later. The left green arrow points to a hole which I have drilled into my breather vent tube (directly behind the TL).

When I had my engine apart, I drilled into the breather vent and sealed it below the drilled hole. I also milled a slot into the inner cavity of my case. This allows me to return oil from my breather bottle to my wet sump directly without going through the drain plug.


new_oil_return.jpg
 
Thanks for that. I've seen this pic of yours before now that I see it, didn't realise at the time it was the RH case. :)
The more I see of the original breather system, the less I understand how the :censored: it made it to production..... :thinking:
 
The sealed bearing in this case helps to channel Oilflow though the TL. The TL is Lubricated from the hole you can see in the back. If the bearing is open, no supply into the drilled TL shaft.


The backside shaft of the TL fills that bearing hole super tight like it should. I dont see any oil flowing through there.
 
Back
Top