• Husqvarna Motorcycles Made In Sweden - About 1988 and older

  • Hi everyone,

    As you all know, Coffee (Dean) passed away a couple of years ago. I am Dean's ex-wife's husband and happen to have spent my career in tech. Over the years, I occasionally helped Dean with various tech issues.

    When he passed, I worked with his kids to gather the necessary credentials to keep this site running. Since then (and for however long they worked with Coffee), Woodschick and Dirtdame have been maintaining the site and covering the costs. Without their hard work and financial support, CafeHusky would have been lost.

    Over the past couple of weeks, I’ve been working to migrate the site to a free cloud compute instance so that Woodschick and Dirtdame no longer have to fund it. At the same time, I’ve updated the site to a current version of XenForo (the discussion software it runs on). The previous version was outdated and no longer supported.

    Unfortunately, the new software version doesn’t support importing the old site’s styles, so for now, you’ll see the XenForo default style. This may change over time.

    Coffee didn’t document the work he did on the site, so I’ve been digging through the old setup to understand how everything was running. There may still be things I’ve missed. One known issue is that email functionality is not yet working on the new site, but I hope to resolve this over time.

    Thanks for your patience and support!

250 Mag intake question

cntymnty

Husqvarna
AA Class
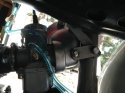
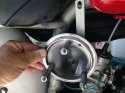
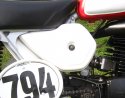
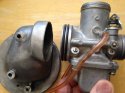
When I got the bike the intake needed attention. It was modified and a little butchered up. Got everything I needed and put it together today. So, I have a Mikuni mated to the stock air bell. Have the two flat support pieces forming kind of a Y fairly horizontal from left side of frame to air bell. Have the long support piece on right side of frame running vertical from air bell to hole in frame just behind tank. Everything snugged up straight and tight. I bought a new air filter cover. It's 3 inches deep. The problem isView attachment 45170View attachment 45171View attachment 45172View attachment 45170View attachment 45171View attachment 45172 , there's no way it will fit without notching a big chunk out of it where it hits the frame right under the seat. Is that the way the stock covers were? Is that what I need to do to make it work?? Want to get your input before I start cutting the cover>View attachment 45170View attachment 45170
 

Attachments

  • IMG_0232.jpg
    IMG_0232.jpg
    109.2 KB · Views: 78
  • IMG_0231.jpg
    IMG_0231.jpg
    118.8 KB · Views: 77
  • IMG_0229.jpg
    IMG_0229.jpg
    103.3 KB · Views: 78
If the air box cover sits vertical and looks ok I'd would fabricate a "s" bend in a new piece of metal for that support bracket that attaches the air box housing to the frame. Save the old bracket. Now if you need to adapt the air box cover once the air box housing is attached to the frame and sitting the way it should be you can notch it or maybe put a flat in the area so it fits correctly. But do the work so it fits and looks professionally perfect.
I hate to see this type of work done on a perfect awesome looking vintage valuable bike.

Maybe someone who has one of these bikes and has done this carb swap will chime in. I'd be hesitant doing something that can't be reversed. Maybe there is a air box assembly from a later bike that uses this carb that will work?

Don't do anything till you get all the info and weight all the options.
 
Bill, as far as I can tell, the carb swap is irrelevant. The air bell, with out the cover on, bolts up to the frame and sits exactly where it should (as far as I can tell without a reference). That's why I'm wondering if my new production air cleaner cover is fabricated to the same dimensions as the original stock one. Or, if the stock one had a cut out to clear that part of the frame just under the seat. And I agree, I don't want to modify anything until I am sure of what the issue is. I'm learning that this is part of the challenge of putting a 40 year old bike back the way is used to be. There's really no references for some of this stuff...except you folks!!
 
Ran into the same problem with a new mfg. cover. I just used a dremell and slowly modified it to fit. BTW I ended up using the DC Plastics high breather for the 74 wr 250. Had to cut a little off the back side, but it fit and looks good. Jeff
 
yes Jeff, that's what I did. Cut out a semi circle for the frame and trimmed a bit to clear the carb. It works great now.
 
BTW, I just recently found the DC Plastics website and am getting ready to order a few things. Have you had good luck with them?
 
D C Plastics has been great. I'm not real fond of the finish of their plastic...not very glossy. But, everything I have bought has been usable. My 75 WR came as a high breather. None of the DC stuff would mix and match . Had to use all DC high breather parts. I did modify the stock internal coverplate and used it rather than the DC part for a better fit. Don't forget to make a new gasket between the bell and the DC inner cover. I made mine out of an inner tube. The 75 WR uses the same frame, engine cases, cylinder as the Mag. Basically the 75 wr is a wide ratio 250 Mag but with lighting coil. Even has the same forks and shocks. So here is a pic of a Mag the the 74 wr air box. It is a splash cover as it does not seal. It required trimming. Jeff
 

Attachments

  • IMG_0068.JPG
    IMG_0068.JPG
    247.7 KB · Views: 34
  • IMG_0068 copy.jpg
    IMG_0068 copy.jpg
    264.9 KB · Views: 32
Just picked up a crusty 1975 250WR...will do a complete refresh to prep it for vintage CC races...
Mine has the stock Bing carb, and the plastic under-seat breather. Just for fun, I tried to fit a standard "sauce-pan" type filter cover over the 3 studs.
It would not clear the frame or edge of seat.

My question: What parts will I need to swap the clamp-on Bing with a Mikuni carb, and retain the stock air bell?
Mag 250CR manifold that bolts to the reed cage? Is there a kit? 34 or 36mm Mikuni?
Any jetting suggestions?
Any info in this area will be greatly appreciated.
-Richard
 
Hey Richard. I did the Mikuni swap. 36 mm. I purchased the kit from Huskyjunk. Everything is included to make it a bolt on kit. You will not use the rubber dough-nut used in the bell that came stock. Instead you will use a section of mountain bike inner tube. I have found the inner tube has a short lifespan, but you can get a lifetime supply by purchasing a tube. make rubber bands proper width. Some people I have heard chuck the carb in a lathe and turn groves for "O" rings. Anyway...as delivered I found the Mikuni to be very lean. I live in Nashville Tenn...about 600 ft above sea level. Once jetted, I can't tell that it ran any different compared to the Bing. Starts easier. Carb is much easier to remove. Jeff
 
Rich, I have only had my Husky for a few months, and still fine tuning it to suit me. I am not positive without looking at a parts list if the air bell on your 75 is identical to my 74. Here is what I know and have done. My Mikuni is a 36. When I took everything apart, I had an inner tube gasket sealing the carb in the air bell, like Jeff mentions. I wanted a better set up. I did some research and found Britt at VintageHuskyRestorations.com in Elizabeth, Colorado. I sent him my carb and he machined two grooves around the flange and provided the O rings (pic attached). The O ringed flange slips inside the air bell. It's a great set up. At the track, I can rotate the carb around enough to change the main jet. On the carb to engine side, look at Husqvarna-parts.com. in Arizona. The owner is Phillip. He's very helpful and has allot of after market parts. He has a rubber Mikuni Intake manifold for 75-85 Huskys (fits my 74 also). I would also suggest the "Parts CD for 66-79 Huskys" that Phillip sells. It will give you great references and part numbers when it comes time to work on the bike. As far as jetting, I'm still experimenting with what works for me at the elevations I race. The carb came with a 330 main, and either a 35 or 40 pilot (cant recall now). Don't know what needle jet I have but the clip is in the last groove, setting the needle all the way up for the richest setting. I live at 4000 feet and the main was too rich. My first race with the bike was at 3900 feet. It was still too rich. My last race at Glen Helen (about 1700 feet) the bike ran very well with the 330 main. I still need to dial it in better. Hope this helps.
 

Attachments

  • photo.JPG
    photo.JPG
    132.2 KB · Views: 51
The "O" ring set-up looks far superior to the inner tube gasket set-up that I have. Since I have a lathe, I might just groove the bell on my mikuni. How tight is the carb going into the bell? Jeff
 
The carb fit into the bell with the O rings is snug. Snug enough that I know it's sealing well, but not too tight that the carb wont rotate around to change the jet. I lubed the O rings up with some grease also.
 
Back
Top