• Hi everyone,

    As you all know, Coffee (Dean) passed away a couple of years ago. I am Dean's ex-wife's husband and happen to have spent my career in tech. Over the years, I occasionally helped Dean with various tech issues.

    When he passed, I worked with his kids to gather the necessary credentials to keep this site running. Since then (and for however long they worked with Coffee), Woodschick and Dirtdame have been maintaining the site and covering the costs. Without their hard work and financial support, CafeHusky would have been lost.

    Over the past couple of weeks, I’ve been working to migrate the site to a free cloud compute instance so that Woodschick and Dirtdame no longer have to fund it. At the same time, I’ve updated the site to a current version of XenForo (the discussion software it runs on). The previous version was outdated and no longer supported.

    Unfortunately, the new software version doesn’t support importing the old site’s styles, so for now, you’ll see the XenForo default style. This may change over time.

    Coffee didn’t document the work he did on the site, so I’ve been digging through the old setup to understand how everything was running. There may still be things I’ve missed. One known issue is that email functionality is not yet working on the new site, but I hope to resolve this over time.

    Thanks for your patience and support!

2006 Husqvarna 610 Can't Set Timing Correctly

In my EFI 610, when the two dots are aligned the engine is at TDC. In the attached picture I was pulling the conrod, keeping it at TDC.


dots remain aligned 5 to 10 degrees before and after TDC, it's not a reliable way to check crank timing.

Another possible cause that occurs to me is that on the camshaft there is a centrifugal decompression system which could be malfunctioning.

IIRC auto-decompression works on exhaust valve, also he stated earlier that leakdown was done with rockerbox removed, that rules out decompression mechanism
 
dots remain aligned 5 to 10 degrees before and after TDC, it's not a reliable way to check crank timing.
A mechanic told me the same thing (without saying angle values) years ago and he suggested to use something like a straw in the spark plug hole to find TDC. I also checked with a straw, but with my engine it seemed to me that the dots were accurate; maybe I was just lucky to have accurate components, or inaccurate components whose inaccuraceis canceled each other.

IIRC auto-decompression works on exhaust valve
Yes, it does.

also he stated earlier that leakdown was done with rockerbox removed, that rules out decompression mechanism
What I meant was that the mechanism could have prevented the bike from starting when he just tried with the e-starter before doing the test.

I think the decompression mechanism is working it rotates freely and has the spring attached correctly.
I think it should be fine, then.

I think what happened was I must have been off on the timing the first time I put the bike together which bent the intakes. Then all my other attempts wouldn’t work due to the lack of compression. The machine shop guy put the intake valves in a lathe and spun them to show me that they were wobbly and therefore bent. When I set the timing this next time I’ll take a bunch of pictures so that everyone can see clearly if it’s right or not.
There are two other things that you could do to check the timing:
  • You find TDC and then align the dot on the cam gear with the head surface like in the picture with the white number 54 in the post #1 of this thread. Then you rotate the crankshaft one turn to the next TDC and check that the dot is flush on the other side, too. Remember that every turn of the crankshaft makes the camshaft revolving half a turn. I did this but with a new timing chain.
  • I guess that the valves could have been bent by the piston. You could remove the spark plug so that the pressure/depressure is vented through it and there is less resistance in making the engine revolve. Then you engage sixth gear and rotate the rear wheel carefully with your hands. If two valves hit the piston you should feel more resistance at one point and understand that it's happening. I have never tried this, though.
 
A mechanic told me the same thing (without saying angle values) years ago and he suggested to use something like a straw in the spark plug hole to find TDC. I also checked with a straw, but with my engine it seemed to me that the dots were accurate; maybe I was just lucky to have accurate components, or inaccurate components whose inaccuraceis canceled each other.

If you draw a line between shaft centers and dots are directly below it then it would likely be TDC, but not guaranteed since they did not specifically state it in the manual.
I'm not sure how many teeth are on the cam gear but if you make a slight mistake you can be off a tooth and you would be off few degrees (360/number of teeth) bike would still run but would be slightly down on power (depends how much of an error one tooth will give you) I have seen it in cars several times after DIY timing belt change
 
Cleaned up the head and valves. Going to the machine shop today.
 

Attachments

  • B8D06795-C76C-43A8-A3C8-E0ECAA5A7A1C.jpeg
    B8D06795-C76C-43A8-A3C8-E0ECAA5A7A1C.jpeg
    141.4 KB · Views: 14
  • 946CD1FE-8AD1-4C05-A99F-B49B781F5687.png
    946CD1FE-8AD1-4C05-A99F-B49B781F5687.png
    584.6 KB · Views: 15
  • 31A01D11-72F2-45B9-AECD-35632CCD8C60.png
    31A01D11-72F2-45B9-AECD-35632CCD8C60.png
    565.5 KB · Views: 12
  • 6E7D4DC6-83D0-4CEF-9E0D-7D2925F5D0DB.png
    6E7D4DC6-83D0-4CEF-9E0D-7D2925F5D0DB.png
    653.3 KB · Views: 13
Continued
 

Attachments

  • B6D0E84A-B37C-4A9E-ACD5-0C7324D30971.png
    B6D0E84A-B37C-4A9E-ACD5-0C7324D30971.png
    636.5 KB · Views: 8
  • 904209A9-D476-4AB8-9E68-B825B3DE9863.jpeg
    904209A9-D476-4AB8-9E68-B825B3DE9863.jpeg
    127.2 KB · Views: 12
Looks nice! Good luck getting valves fixed.

Something to consider: head studs are "torque to yield" which means you stretching them every time you torque down the head, can't recall what it was, 30 ft/lbs then 90 degrees, when you do the final step you can feel them stretching, in all cars with same type of stud they are discarded after every use, for some reason they don't say anything about measuring and replacing them for the Husky, but I did measure mine and they were over 1mm stretched (0.040") so I replaced them to make sure they don't snap, which is a very common problem with Ducati, (also several cars, mainly Porsche)
 
Something to consider: head studs are "torque to yield" which means you stretching them every time you torque down the head, can't recall what it was, 30 ft/lbs then 90 degrees, when you do the final step you can feel them stretching, in all cars with same type of stud they are discarded after every use, for some reason they don't say anything about measuring and replacing them for the Husky, but I did measure mine and they were over 1mm stretched (0.040") so I replaced them to make sure they don't snap, which is a very common problem with Ducati, (also several cars, mainly Porsche)

I've read about this for some cars but I didn't replace them in my Husky because neither the manual, nor people on the internet mentioned that for the specific model. As far as I remember, I have read that some people have disinstalled and reinstalled the head of the 610, none of them mentioned a studs replacement and I never read about someone whose 610 studs broke. I did it too and so far, after 2.5k miles of only track use, I have never had problems.
However, your test is quite interesting and if I'll do it again I will replace the studs because if they elongate that much there is some plastic deformation, probably wanted by the manufacturer, which makes them disposable.
Probably reusing them once is pretty safe, but considering your test and their price I'd say that they should be replaced every time.
 
.
Probably reusing them once is pretty safe, but considering your test and their price I'd say that they should be replaced every time.


I used to do this for a living, so billing a customer for extra $45 in studs and having to explain it VS having to redo the whole job for free is a simple choice.
I can see where a shady tree mechanic will say NO to the new studs and it's a gamble, to me it was a nobrainer, even having to wait 3 weeks for them to come from Italy. I believe stock length was exactly 180mm and mine were 181+, I even sized them up against new ones to make sure my measurement was correct
 
I’m going to reuse the studs since I’m doing it on my own bike and don’t have to worry about making a customer mad. If they break I’ll just wait until spring to finish the project.

Got the head back from the machine shop. It looks so much better polished up and with no carbon. They lapped the valves in and did a suction test to verify seal.
 

Attachments

  • F965B4A0-8F15-4809-8934-28FFAA499B75.jpeg
    F965B4A0-8F15-4809-8934-28FFAA499B75.jpeg
    147.3 KB · Views: 10
  • 87925271-522C-4170-A18F-59F6A13F465F.jpeg
    87925271-522C-4170-A18F-59F6A13F465F.jpeg
    132.2 KB · Views: 10
  • DFC729F5-6477-493B-BD37-53D7BB93BD4C.jpeg
    DFC729F5-6477-493B-BD37-53D7BB93BD4C.jpeg
    102.4 KB · Views: 11
I’m testing the seal myself with wd40 with the method that was posted in this forum earlier. So far looks good. I’m really hopefull that I can do this. I’ll be posting a lot of pictures for you guys to check out when I go to set the timing. Thank you for helping guys.
 

Attachments

  • 8DC8EF6C-1614-4C79-8814-E26E7FD041F6.jpeg
    8DC8EF6C-1614-4C79-8814-E26E7FD041F6.jpeg
    132.9 KB · Views: 9
I’m going to reuse the studs since I’m doing it on my own bike and don’t have to worry about making a customer mad. If they break I’ll just wait until spring to finish the project.
.


Studs usually break under load, at full throttle going down the road, in Ducatis it commonly causes massive oil leak sometimes followed by a fireball... seen it first hand at the track.
Luckily Husky is Water cooled so there is much less oil going to the head and it's external feed so no big leak or fireball, but still you will have to pull the cylinder off and replace all the gaskets as well...
I would maybe reuse them once, but if you already had this head torqued to spec when you did it first time (maybe more than once?) they are on their at least 3d round of being stretched and you are entering danger zone.
 
Lukewalk, I have already written that I second MATPOC’s opinion about the studs, but I understand that it’s your Husky and the choice is up to you.
If you at least measure one of them and maybe post the results here it will be useful for the community and for yourself in order to either validate or discard your aforementioned choice.
 
I'll measure them up before I do it to see how bad they have stretched will let you guys know. This would be the third time they will be torqued. If I decide to order new studs then I wont be able to break the bike in before winter.
 
I dropped off my head to do valves in November last year with a promise of a 3 day turnaround, 4 month later I picked up untouched head and took it to another machinist who did it in 2 week, barely got the bike on the road by end of April!
It was worth it, also I spent the 4 month fixing every nagging little issue.
 
I went ahead and ordered new studs, bolts, and washers. Better safe then sorry, will let you guys know when everything gets here and I continue.
 
I think studs had some sealant on the bottom threads, but probably only to keep them in place since those are blind holes and no chance of leaks, so probably locktite? I used locktite on mine but I don't remember anything in the manual saying about replacing them.
For the rocker box I used HondaBond (ThreeBond) it works well on on my KTM LC4, which has very similar engine design, lasts longer than permatex. I only had Husky for about a year, LC4 has been with me since '09 and has about 30k now
 
Engineering finals are over and parts are in. The old one is slightly longer but I don't have dial calipers on me.
 

Attachments

  • IMG_1838.JPG
    IMG_1838.JPG
    53.9 KB · Views: 12
I set the timing and took pictures of everything that was relevant. Before I move on please let me know if I messed something up. I feel like I set it up exactly like this the first time, but my intake valves ended up bent.
 

Attachments

  • IMG_1839.JPG
    IMG_1839.JPG
    157.6 KB · Views: 15
  • IMG_1840.JPG
    IMG_1840.JPG
    163.6 KB · Views: 16
  • IMG_1841.JPG
    IMG_1841.JPG
    130.2 KB · Views: 16
  • IMG_1842.JPG
    IMG_1842.JPG
    117.8 KB · Views: 16
After taking those pictures I tightened down the MCCT (manual cam chain tensioner) and turned the crank over a couple rotations. Now the cam dot has sunk slightly and is no longer visible when looking from a perfect 90 degrees. I took pictures from a couple different angles let me know what you guys think. I'm really worried about bending valves. I cant really afford to make that mistake again.
I'm thinking about picking up a dial indicator depth gauge tomorrow to really confirm where TDC is for sure.
 

Attachments

  • IMG_1844.JPG
    IMG_1844.JPG
    118 KB · Views: 12
  • IMG_1845.JPG
    IMG_1845.JPG
    108.2 KB · Views: 13
  • IMG_1846.JPG
    IMG_1846.JPG
    122.1 KB · Views: 13
On one hand I am afraid that I'll tell you that it's right, you bend a valve and I will be guilty for that, on the other hand I don't want to leave you alone because if it was my bike I would want do it myself like I did years ago and I think you can do it, too.

So here is what I would do if I was in your shoes:

1) In the manual, in the reassembly chapter, the chain timing setting is listed just before the tensioner installation, anyway it shouldn't affect the timing so much that you can't tell whether it is correct, unless your chain is very stretched I guess, and as a matter of fact you wrote that the dot has sunk "slightly". So I would not worry too much about that.
2) I repeat what I wrote some weeks ago: I'd check the alignment on one side, turn the crankshaft 360° so that the camshaft will turn 180° and check the alignment on the other side. They should both be ok.
3) From your pictures I would say that your timing is right and if it's off it can't be off by more than one tooth. So I suggest that you do this:
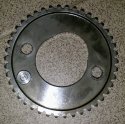
I edited a picture of my cam gear adding two dots just aside the actual dot on it and you can do the same with a marker on your gear. Use two different colors or maybe one color and you will draw a circle on one side and a cross on the other.
colored dots.jpg
Then you can check the timing pretending that one of the two dots (e.g. the green one) is the right one and see whether it looks better or not. Then you repeat the process using the other mark (e.g. the Yellow one). And I would still check the timing on both sides by turning the camshaft 180°.
 
Back
Top