• Husqvarna Motorcycles Made In Sweden - About 1988 and older

  • Hi everyone,

    As you all know, Coffee (Dean) passed away a couple of years ago. I am Dean's ex-wife's husband and happen to have spent my career in tech. Over the years, I occasionally helped Dean with various tech issues.

    When he passed, I worked with his kids to gather the necessary credentials to keep this site running. Since then (and for however long they worked with Coffee), Woodschick and Dirtdame have been maintaining the site and covering the costs. Without their hard work and financial support, CafeHusky would have been lost.

    Over the past couple of weeks, I’ve been working to migrate the site to a free cloud compute instance so that Woodschick and Dirtdame no longer have to fund it. At the same time, I’ve updated the site to a current version of XenForo (the discussion software it runs on). The previous version was outdated and no longer supported.

    Unfortunately, the new software version doesn’t support importing the old site’s styles, so for now, you’ll see the XenForo default style. This may change over time.

    Coffee didn’t document the work he did on the site, so I’ve been digging through the old setup to understand how everything was running. There may still be things I’ve missed. One known issue is that email functionality is not yet working on the new site, but I hope to resolve this over time.

    Thanks for your patience and support!

1986 Husqvarna 510TX Build

Hwy

Mini-Sponsor
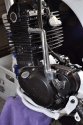
Ok, now starting late in this rebuild.
Re-acquire my old 510 from a friend I sold it to 15 years ago. It was neglected and in sad shape. Luckily it was stored in the desert.

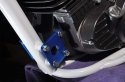
Anyhow, parts were sent out to be plated, polished, powder coated or anodized. Much of the polishing was done in house by me.
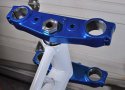
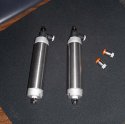
Parts bought from Phillip, Australia, Italy and Sweden. About $1500 worth in cables, chain rollers, plastics (except tank- could not find a new one) and just about anything I could get me little hand on.

This series will be the re-construction - I'll see if I can dig up a old photo from 20 years ago to show before.

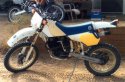
Edit: I found a photo from 10 or so years ago is stock trim. Notice the turn signals? Yes, it's street legal registered, unfortunately the plate is laying in rust somewhere in the Mojave.

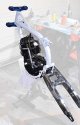
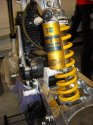
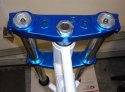
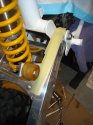
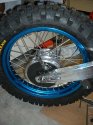
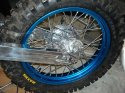
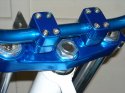
Step 1 - The mock up ( please be patient on photos)
 

Attachments

  • 86HUSQ510TX_1ST MOCK UP.jpg
    86HUSQ510TX_1ST MOCK UP.jpg
    95.2 KB · Views: 258
  • 86HUSQ510TX_MOTOR MOUNT2.jpg
    86HUSQ510TX_MOTOR MOUNT2.jpg
    85.1 KB · Views: 246
  • 86HUSQ510TX_TRIPLE CLAMPS.jpg
    86HUSQ510TX_TRIPLE CLAMPS.jpg
    73.1 KB · Views: 244
  • 86_Husq510TX.jpg
    86_Husq510TX.jpg
    72 KB · Views: 293
The Finish on the swingarm and triple clamps look stellar!

A very cool project keep us posted. I remember that model well, they were great converters of fuel into power and noise!!! LOL!

Best of luck:thumbsup:
 
510 Engine

Did you "go through" the engine?
ie head,,, new guides,valves,etc? stock sizes?
New piston?
Stock cam?
If so, did you do the work?
 
Yes, complete engine rebuild. Bearing and valves, camshaft chain and carb rebuild for the most part. Every part, except the camshaft chain was within specs. New piston and rings too. Clutch stack measured as new, just as I previously installed way back when.
I had previous (16 years ago) rebuilt the engine prior to selling it and since then has only been run about 25 hrs total. Very timidly at that.
My plan was to send the engine out to the "reputable" engine builder's but they're lack off interest put me off and decided against it.
I did the motor myself.
 

Attachments

  • 86HUSQ510TX_MOTOR.jpg
    86HUSQ510TX_MOTOR.jpg
    69.5 KB · Views: 164
Hwy,
I'm working on my 86 510 too, almost done with motor rebuild, valves need to be
installed & top end buttoned up.

Then it will be time to decide whether to put it back in the original frame, or make a
EVO racer out of it by using a spare 81 250CR rolling chassis. I've already collected the
83-85 twin shock pipes, 80 250CR tank, 82 seat, repainted the frame.

I'll post pictures once i get the motor back from my friends shop & start either build.

later
John
 
Double check the '81 frame... I've looked over the 2 stroke frame vs. the 4... similar but not - kink in front down tube, bracing in carb area... all will need attention. Do-able,,,but not a slam dunk.
 
Thanks for info

westcoast,

Thanks for the info, i've only dropped my extra 82 430 motor into the
510 frame to see if the mounts lined, they did, because the 510 motor
was at the shop.

I figured i'd have to do something, maybe making a air box, as
i'm not destroying any of the original 510 parts, so it can be made
stock again if needed.

Like i said i should have it back in a few weeks,so that's when
i'll have a good look see.

Only good thing about having a Winter season (non riding) :thumbsdown: is i can do projects :applause:.

Later
John
 
ruwfo;58645 said:
Hwy,
I'm working on my 86 510 too, almost done with motor rebuild, valves need to be
installed & top end buttoned up.

Then it will be time to decide whether to put it back in the original frame, or make a
EVO racer out of it by using a spare 81 250CR rolling chassis. I've already collected the
83-85 twin shock pipes, 80 250CR tank, 82 seat, repainted the frame.

I'll post pictures once i get the motor back from my friends shop & start either build.

later
John

81/82 frame with a 510 motor of my german friend UWE Picasso !:notworthy:
 

Attachments

  • Michel-_2011[1].jpg
    Michel-_2011[1].jpg
    96.1 KB · Views: 173
  • Michel-_2010[1].jpg
    Michel-_2010[1].jpg
    97.4 KB · Views: 166
  • Michel-_2001[1].jpg
    Michel-_2001[1].jpg
    96.7 KB · Views: 162
Plastic Plans

What are your thoughts about the plastic?

seal and paint the tank?
fenders,,, DC? UFO? OEM? Maier?
side covers ??

Also... seat cover?
 
Today's progress on the build.

Suspension bolted on.

When I was installing the forks I spied the shrader valve and thought I would upgrade it to a "push button" type bleeder valve.
I did have to re-tap the fork caps (a scary proposition) because these are expensive in good condition - cheap stripped and banged up are dime a dozen on eBay but I HATE BUYING USED CRAP ON EBAY!

I did this with sub tanks in mind as the tap is the same size needed for tank to cap fittings which will be installed after the break in period.

First photo shows fork cap, push button valve, schrader valve and tap.
Tap used is 1/8-27 NPT and drill size needed is 21/64".

Second photo show completed cap.

Third photo shows cap and forks.

Fourth photo is installed Ohlins Shock

Last photo are specially designed (by me) sub tanks for 40mm Husky forks.
 

Attachments

  • sub tanks.jpg
    sub tanks.jpg
    74 KB · Views: 127
  • 86HUSQ510TX_Ohlins.jpg
    86HUSQ510TX_Ohlins.jpg
    71.1 KB · Views: 155
  • 86HUSQ510TX_bleeder forks.jpg
    86HUSQ510TX_bleeder forks.jpg
    76.5 KB · Views: 130
  • 86HUSQ510TX_bleeder single.jpg
    86HUSQ510TX_bleeder single.jpg
    95.6 KB · Views: 117
  • 86HUSQ510TX_bleeder wide.jpg
    86HUSQ510TX_bleeder wide.jpg
    87.4 KB · Views: 110
WestCoast;58841 said:
What are your thoughts about the plastic?

seal and paint the tank?
fenders,,, DC? UFO? OEM? Maier?
side covers ??

Also... seat cover?

Plastic tank. No commercially available product for polyethelene tanks.
That being said, POR-15 has been reported to work in some instances but the manufacture does not recommend nor warrant it's use.

OEM plastic...ALWAYS, for myself anyways. You'll pay thru the nose for it new but I can't bring myself to use ill fitting aftermarket plastics like DC. New plastics are available from Sweden or Italy or husvarna-parts.com
Luckily I only needed fenders which I got from Phillip (good price) and tank shrouds from Italy ($120 for two little dinky OEM plastics)

I sure would like to find a new tank for my 510TX - none available. I searched the entire world!

The seat cover I bought was from a gentleman in Washington state that does repro's - good quality and color correct. About $65 + 5 shipping.
 
WestCoast;58663 said:
Double check the '81 frame... I've looked over the 2 stroke frame vs. the 4... similar but not - kink in front down tube, bracing in carb area... all will need attention. Do-able,,,but not a slam dunk.


Yup- what Westcoast said.
Your pipes will not clear the down tubes on a two stroke frame. A modified exhaust pipes will be needed - not cheap...about 500 bucks.
Take a look at the frame unique only to the four strokes.
 

Attachments

  • 86HUSQ510TX_Frame indention.jpg
    86HUSQ510TX_Frame indention.jpg
    80 KB · Views: 121
  • 86HUSQ510TX_Frame indention2.jpg
    86HUSQ510TX_Frame indention2.jpg
    73.2 KB · Views: 117
WestCoast;58841 said:
What are your thoughts about the plastic?

seal and paint the tank?
fenders,,, DC? UFO? OEM? Maier?
side covers ??

Also... seat cover?

Re: seal and paint tank...

I know this product is from a UK based company but when I spoke to the guy he confirmed that it was suitable for my '85 tank. You can only ask..

http://www.tankcareproducts.co.uk/

I'm going to order some soon for my tank so we'll see how that goes..

Stu
 
HWY,
Progress looks fabulous. Love the blue bling. Love the fork cap air bleeders and chambers. (Individual thread on those?) I want to see those bad-as "ti" pegs mounted up.
 
Thanks.
Did not get much done today But here are a few photos of what I did accomplish.

Bar clamps and bars installed, swingarm hardware bolted down and rear wheel trial assembly (new Maxxix Desert IT).

Chain pad did not fit flush and bowed up when tightened - cure was to cut the tail piece of old pad and installed under new pad. It now sits flush across top of swingarm.

I did make a major screw up on the valve cover bolts when engine was out of the frame. I replaced the allen head valve cover bolts with newer style reduced head 6mm bolts. Luckily, I noticed it before I proceeded and further.
There would have been no way to remove those bolts for valve adjustment if I had completed the build. No socket or wrench fits in between the casting.

I had to grind down a 8mm box wrench to fit the narrow passages -
Note to self.....leave the allen head bolts alone.

To be continued....
 

Attachments

  • 86HUSQ510TX_Valve cover bolts.jpg
    86HUSQ510TX_Valve cover bolts.jpg
    81.7 KB · Views: 157
  • 86HUSQ510TX_chain pad.jpg
    86HUSQ510TX_chain pad.jpg
    82.3 KB · Views: 212
  • 86HUSQ510TX_Maxxis Desert IT_2.jpg
    86HUSQ510TX_Maxxis Desert IT_2.jpg
    64.4 KB · Views: 147
  • 86HUSQ510TX_Maxxis Desert IT.jpg
    86HUSQ510TX_Maxxis Desert IT.jpg
    74.3 KB · Views: 151
  • 86HUSQ510TX_bar clamps.jpg
    86HUSQ510TX_bar clamps.jpg
    78.9 KB · Views: 136
HWY,
Again, love the blue bling. Your going to need a tinted lense for your goggles. So bright and shiney - the refelection will be a killer****************************************! Looks sweet.
Rick
 
Leftcoast leftkicker;59238 said:
i'm waiting to see the matching helmet & riding gear.....


I have the matching pants and jersey. I found these two Husky Products pants in Finland during my parts quest.
BRAND NEW IN THE PACKAGE, I bought both the summer (vented) and winter pants.
 

Attachments

  • Husky Products Pants Vented.jpg
    Husky Products Pants Vented.jpg
    81.9 KB · Views: 54
  • Husky Products Pants winter.jpg
    Husky Products Pants winter.jpg
    75.3 KB · Views: 63
sweet, i have a set of vented too but i meant that you'd have a set plus helmet to match the bike :)

Let me know if you source another pair of non-vented sz 34-36.
 
Back
Top