• Husqvarna Motorcycles Made In Sweden - About 1988 and older

  • Hi everyone,

    As you all know, Coffee (Dean) passed away a couple of years ago. I am Dean's ex-wife's husband and happen to have spent my career in tech. Over the years, I occasionally helped Dean with various tech issues.

    When he passed, I worked with his kids to gather the necessary credentials to keep this site running. Since then (and for however long they worked with Coffee), Woodschick and Dirtdame have been maintaining the site and covering the costs. Without their hard work and financial support, CafeHusky would have been lost.

    Over the past couple of weeks, I’ve been working to migrate the site to a free cloud compute instance so that Woodschick and Dirtdame no longer have to fund it. At the same time, I’ve updated the site to a current version of XenForo (the discussion software it runs on). The previous version was outdated and no longer supported.

    Unfortunately, the new software version doesn’t support importing the old site’s styles, so for now, you’ll see the XenForo default style. This may change over time.

    Coffee didn’t document the work he did on the site, so I’ve been digging through the old setup to understand how everything was running. There may still be things I’ve missed. One known issue is that email functionality is not yet working on the new site, but I hope to resolve this over time.

    Thanks for your patience and support!

1981 430XC Street Legal Motard Conversion Project - Schimmelaw

ok more questions:

1) black ano rear sprocket? hardcoat or standard ano?

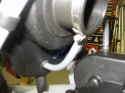
2) Plastidipped airbox mounting strips? more detail please. Are these the black plastic ones from Phillip? I like.

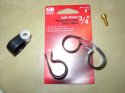
3) Rubber stick on tabs...where from? size/diameter/thickness?

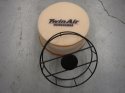
4) does the twin air have an internal cage... if so .. picture please!

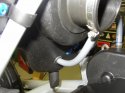
5) what keeps the new cover from flopping open? or forward if you will?

Very nice!

T
 
HuskyT,
1 Anod - future post.
2 Photo 1and 2: I dipped each clamp one time in the plasti dip product. As I remember, the airbox cover mounting clamps were loose and w/ the continuous vibration would wear the paint down on the frame where they attached. Didn't want to go through that w/ this bike so each got "dipped" to coat and take up a little of the looseness. W/ one dip the clamps are protected and snug. (Air box cover still rotates opens easily - but it doesn't just flop open) Yes, the ones I used were from Phllip. Replacements can be purchased at any home improvement center. 3/4" cable clamp.
3 Rubber bumpers are just some I had. About 3/8" round and about 1/8" thick. Home Depot has something similar. Think cabinet door bumper.
4 Photo: Air filter cage as requested. Black powder.
5 Cover has a lip that fit under upper frame tube. Cover will also sandwich btwn the rear number plate. Plastic coated clamps help, too.
 

Attachments

  • sandblaster 007.jpg
    sandblaster 007.jpg
    89.2 KB · Views: 92
  • sandblaster 008.jpg
    sandblaster 008.jpg
    96.5 KB · Views: 99
  • sandblaster 005.jpg
    sandblaster 005.jpg
    89.1 KB · Views: 88
I like how you plumbed the crankcase vent hose into the airbox. Can we get a pic of the fitting you put in the airbox please? Thanks, man.

And GREAT idea to plastic dip those airbox lid straps. They DO flop around and they DO wear right down to the metal. This sounds like a very effective fix. Nice detail!! (and I just happened to choose the exact same straps. Home Depot I think).
 
Pick,
Thanks.

Just a gromet from local hardware store (Home Depot? - i think). Took the hose w/ me to the store and found a grommet that fit real tight. Took everything home, drilled box to fit grommet, slid hose through w/ some slack in the box, mounted up a UNI breather, done.

I was going to try a wrap some clear number plate background strips around the frame where the clamps go to aliviate the wear. W/ a little more thought I realized that would eventually lead to a big sticky mess and I would have created a problem rather than solving one. Had the plasti dip for some other parts and thought .....why not give it a try..... Only one dip is needed for the air box cover side. (Two dips takes out ALL the built in tolerance and you can't open the cover b/c the clamps won't rotate on the frame - ask me how I know). Two dips, maybe, for the left handside number plate b/c its stationary.
Rick
 

Attachments

  • sandblaster 012.jpg
    sandblaster 012.jpg
    87.7 KB · Views: 168
  • sandblaster 011.jpg
    sandblaster 011.jpg
    88 KB · Views: 160
Chain Tensioner (prior post) mounted up.

Photo 1: Stock wheel cleaned up and reused w/ new bearings from local bearing shop. Aluminum arm was replaced by steel. I punched the holes for fun. Concho for fun too.

Photo 2: View from top. Nickled and sleeved tension spring. NOS aluminum bushing w/ some new o-rings resides under all that.

Photo 3: Back side view. Sleeved spring to proctect the swingarm finish. Ssteel and anod aluminum mounting hardware finish up the resto.

Done.

Photo 4: Why I had to redo to begin w/. Arm garred up, mount holes wallowed out, and overall disrepair. Chain tension bushing was completely seized in the mounting tube and was FUBAR in its removal. Bushing required an air hammer to remove it.
 

Attachments

  • Husky Chain Tensioner 007.jpg
    Husky Chain Tensioner 007.jpg
    99 KB · Views: 132
  • Husky Chain Tensioner 001.jpg
    Husky Chain Tensioner 001.jpg
    89 KB · Views: 145
  • Husky Chain Tensioner 004.jpg
    Husky Chain Tensioner 004.jpg
    87.6 KB · Views: 144
  • Husky Chain Tensioner 005.jpg
    Husky Chain Tensioner 005.jpg
    93.7 KB · Views: 153
LCLK,
Is that a good thing or a bad thing?

Kickstand mounted up. Lame update i know but that is all I have done this week. Rebuild (bent and mounting tab) is a prior post.

Photo 1: Went w/ black for the contrast and this stand may have to be cut down once tires are mounted up. Won't know for awhile. If it does have to be cut and rewelded, I can just paint the lower end black and no one will know.

Photo 2: Backside view. Nickled and sleeved spring.

Photo 3: Front side mounting hardware. Ssteel bolt w/ flange nut and anod conical washer

Photo 4: My spring pullers. Bethca can guess which once I used for that bada-s kickstand spring. Spare stand that got the resto treatment too. This one is frame silver for future (waaaaaaaaaay waaaaaaaaay off in the future) project
 

Attachments

  • Husky Kickstand 005.jpg
    Husky Kickstand 005.jpg
    95.5 KB · Views: 104
  • Husky Kickstand 004.jpg
    Husky Kickstand 004.jpg
    90.5 KB · Views: 110
  • Husky Kickstand 003.jpg
    Husky Kickstand 003.jpg
    87.4 KB · Views: 106
  • Husky Kickstand 001.jpg
    Husky Kickstand 001.jpg
    91.9 KB · Views: 116
Did we ever discuss what color you used for the frame? It looks pretty darn close to that bizarr-o silver the factory used (which I love).
 
schimmelaw;59484 said:
Chain Tensioner (prior post) mounted up.

Photo 1: Stock wheel cleaned up and reused w/ new bearings from local bearing shop. Aluminum arm was replaced by steel. I punched the holes for fun. Concho for fun too.

Photo 2: View from top. Nickled and sleeved tension spring. NOS aluminum bushing w/ some new o-rings resides under all that.

Photo 3: Back side view. Sleeved spring to proctect the swingarm finish. Ssteel and anod aluminum mounting hardware finish up the resto.

Done.

Photo 4: Why I had to redo to begin w/. Arm garred up, mount holes wallowed out, and overall disrepair. Chain tension bushing was completely seized in the mounting tube and was FUBAR in its removal. Bushing required an air hammer to remove it.

Creative use of FUBAR. I love it. Concho. Pancho Villa would be proud. John Wayne would be prouder. Style points for you brother.

T
 
WOW what a build I've seen works bike not as tricked out. Well, would put a period correct works Husky to shame. Beautiful work.:thumbsup::applause::notworthy:
 
Pic,
The frame had been rattle can painted when I got it and I really didnt have a clean good base color to work off of. Powder is based off of the wife's Yamaha XT225 silver. I just went w/ something I liked. Didn't really try to match up to the stock Husky silver.

Hemitkn,
Thanks. Its been alot of fun.

Photo 1, 2 and 3: Business side of the rear guide and backing plate. Both are prior post .

Photo 4: Front side.

Photo 5: My "Made in Sweden" sticker proudly displayed. Thanks, HWY.
 

Attachments

  • Husky Rear Backing and Chain Guide 002.jpg
    Husky Rear Backing and Chain Guide 002.jpg
    92.3 KB · Views: 148
  • Husky Rear Backing and Chain Guide 014.jpg
    Husky Rear Backing and Chain Guide 014.jpg
    87.9 KB · Views: 172
  • Husky Rear Backing and Chain Guide 011.jpg
    Husky Rear Backing and Chain Guide 011.jpg
    93.6 KB · Views: 153
  • Husky Rear Backing and Chain Guide 005.jpg
    Husky Rear Backing and Chain Guide 005.jpg
    89.6 KB · Views: 162
  • Husky Rear Backing and Chain Guide 006.jpg
    Husky Rear Backing and Chain Guide 006.jpg
    87 KB · Views: 170
It's gunna be one 'ell of a bike when you're done..... :notworthy:

Did you make the new rollers for the chain guide or are they available off the shelf?

Stu
 
Great looking. I like your attention to detail.
What kind of material are you using on the chain guide? That looks like a pvc of some type.
I have some UHMW Polyethylene that I's like to try for the same thing. Thanks for the idea.
 
Husky37 and HWY,

The whole rebuild is here in Vintage. The search is "chain guide before".

The key part of the guide is the expanded upper aluminum mount. (Photo 3) The original bushings were lengthened to accomodate the larger rollers and the nylon wear pads then tacked to the aluminum mount. It then got anod as one part versus three.

Its expansion has lead to a clearance issue between the lower roller attachment hardware and the sm rim. Its going to be close. Thats why the lower roller anod conical washer is on the inside - need the clearance right there. Don't know if there would be any issues w/ a dirt oriented setup.
 
Fork'n A

The heart and kinda soul of the conversion. Current USDs which support an EBC sm rotor.

Photo 5: Bushing which made it all possible
 

Attachments

  • Husky Forks 002.jpg
    Husky Forks 002.jpg
    89.1 KB · Views: 192
  • Husky Forks 004.jpg
    Husky Forks 004.jpg
    91.2 KB · Views: 234
  • Husky Forks 009.jpg
    Husky Forks 009.jpg
    88 KB · Views: 198
  • Husky Forks 026.jpg
    Husky Forks 026.jpg
    92.3 KB · Views: 196
  • Husky Forks 022.jpg
    Husky Forks 022.jpg
    88.5 KB · Views: 199
I'm really loving this thread. This is one of those projects that I always wanted to do but the logistics of living in Ca, prevented.:thumbsup:
 
schimmelaw;60620 said:
Fork'n A

The heart and kinda soul of the conversion. Current USDs which support an EBC sm rotor.

Photo 5: Bushing which made it all possible

The fork conversion is sweet and very clean.... hat off to you.

I've come across the same problem with the Husky head stock being short compared to say late KTMs... other than shortening the stem or pressing in a Husky stem there is no other alternative but to put a spacer at the bottom.

BTW. Thanks for the pointer on the Chain Guide.
 
Schimmelaw,
Do you think hydrogen embrittlement is a concern with the springs that you are nickel plating? Are you performing a post-plate baking or is it not an issue? I'll be performing some similar plating operations on my project and was wondering if I'll need to bake the items afterwards.
 
Rajo and Stu,
Thanks guys - have had a blast! and killed alot of time.

NYWR430,
I don't have any concerns w/ the parts/springs I have been plating. Anything I might do/or have done to the parts on this bike is an improvement over what I started out with. Most all parts have been abused, neglected or just plain-o wore out. I figure you can't really hurt something that messed up already - sooooooooooo - why not.

I have no idea how the nickle plating process works. I just sand blasted everything, drop my parts off at a buddy's shop (w/ a bottle of whiskey - Canadian Club to be exact) and pick them up when he calls. I will say that the nickle plating process is the way to go for our old parts. A little prep work, drop off and then pick up some brand new looking components.
Rick
 
Hydrogen embrittlement post bake is necessary on the aircraft seat belt buckles that we make in our shop .... basically relieves stress....

Answers the question of " does the seatbelt buckle shear or brake before the web of the seatbelt cuts through a body moving at xxx speed on impact..."

Not exactly a requirement that we need to worry about on some old Moto parts...

T
 
Back
Top