-
Hi everyone,
As you all know, Coffee (Dean) passed away a couple of years ago. I am Dean's ex-wife's husband and happen to have spent my career in tech. Over the years, I occasionally helped Dean with various tech issues.
When he passed, I worked with his kids to gather the necessary credentials to keep this site running. Since then (and for however long they worked with Coffee), Woodschick and Dirtdame have been maintaining the site and covering the costs. Without their hard work and financial support, CafeHusky would have been lost.
Over the past couple of weeks, I’ve been working to migrate the site to a free cloud compute instance so that Woodschick and Dirtdame no longer have to fund it. At the same time, I’ve updated the site to a current version of XenForo (the discussion software it runs on). The previous version was outdated and no longer supported.
Unfortunately, the new software version doesn’t support importing the old site’s styles, so for now, you’ll see the XenForo default style. This may change over time.
Coffee didn’t document the work he did on the site, so I’ve been digging through the old setup to understand how everything was running. There may still be things I’ve missed. One known issue is that email functionality is not yet working on the new site, but I hope to resolve this over time.
Thanks for your patience and support!
You are using an out of date browser. It may not display this or other websites correctly.
You should upgrade or use an alternative browser.
You should upgrade or use an alternative browser.
1973 Husqvarna 250WR
- Thread starter DeathFromAbove
- Start date

DeathFromAbove
My Cat Says AREAR!
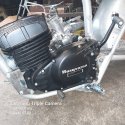
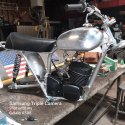
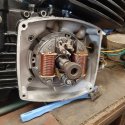
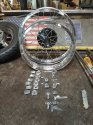
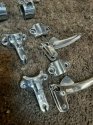
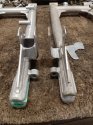
So are these outside clutch covers Aluminum or Magnesium. I have few that are pretty broken at the kick lever stop and would like to have them welded! I got the steering stops welded on these 2 frames and had them re blasted. and welded the right size triangles under the pegs. Tomorrow I'll tape them up for powder. Hope I remember to tape the Serial Numbers
Crashaholic
Husqvarna
Pro Class
Wow, nice work my friend. Its been a few years since I did a resto, I forgot the time it takes when there are many repairs.
About those steering stops from Tritophy, the ones pictured on his website are for the pre 72 frames. The MJ and MK are straight across the front opposed to angling back. The angle will allow the steering to turn farther and the top triple clamp bolts will hit the tank.
All the clutch covers I have acid tested were magnesium. Not sure if aluminum was ever used.
Simple test from Lincoln Electric to determine Magnesium vs Aluminum:
View: https://www.youtube.com/watch?v=tausy8soPzU
Also, good tech tips for welding Magnesium.
Also, good tech tips for welding Magnesium.
DeathFromAbove
My Cat Says AREAR!
Well looks like I should mock a set of Tripples and Tank to see what has to be added to the stops Before I Powder coat. And I'll test the cover with white vinegar to see what happens. Thanks for the heads up[! Chris
DeathFromAbove
My Cat Says AREAR!
Crashaholic
Husqvarna
Pro Class
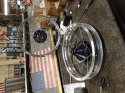
When doing a restoration lacing the wheels is always one of the last things I do, really don't care for it. But when they're all laced up and true its a pretty good feeling of accomplishing something so damn tedious. Your wheels are looking great by the way, nice work.
DeathFromAbove
My Cat Says AREAR!
I got the spoke from Buchanan, and I think I have a problem with the odd ball set up. Stay tuned
Crashaholic
Husqvarna
Pro Class
When lacing a Husky rear wheel I always have to refer to the service manual for the procedure. Its one of those things I'd have to do often to commit to memory.
DeathFromAbove
My Cat Says AREAR!
Yeah even with the manual it is not easy. I have 9 spoke that are about .5 " too long. Will advise Buchanan. Tried flipping the rim and working it in reverse. Same spokes are long. They are the up spokes on the brake hub side. Forgot to take a pick in Mt frustrations.
motomwo
Husqvarna
AA Class
Yeah even with the manual it is not easy. I have 9 spoke that are about .5 " too long. Will advise Buchanan. Tried flipping the rim and working it in reverse. Same spokes are long. They are the up spokes on the brake hub side. Forgot to take a pick in Mt frustrations.
Chris, I had the same exact problem with a set of Buchanan stainless spokes while using the same hub you have. This was many years ago when I restored my 76 175XC. I was able to lace up the wheel completely and then cut off the extra long spokes. Shouldn't have to do that but that is what I ended up doing. In the end it all worked out.
Marty
Crashaholic
Husqvarna
Pro Class
I have 9 spoke that are about .5 " too long.
Are you comparing the 9's length with the other spokes when they're off the hub or just based on the fact they stick out from the rim 1/2"? Nine is the number of spokes on one side of the rim going in the same direction. I've run into this before and it turned out to be my incorrect lace pattern.
Heres the spoke length as seen in the parts list. 189mm qty 12; 201mm qty 18; 159mm qty 6.
DeathFromAbove
My Cat Says AREAR!
I called Buchanan and they said to relace the hub. So I did, granted the new wheel is not an original, it's a Italian knock off. Not as beefy or drilled at the correct angles. But the up spokes are too long by about 3/8". I have to finish to take pick to send to tech support. I think the wheel is marginal at best. After I get the 411 from Buchanan, I will probably swallow my pride and change the spoke angles by drill to get them at least pointing in the correct direction. If no joy then I'll toss it in the recycling. And write off 130$. I've drank more in an evening.
DeathFromAbove
My Cat Says AREAR!

DeathFromAbove
My Cat Says AREAR!
Haha Marty, it's only money!!
DeathFromAbove
My Cat Says AREAR!
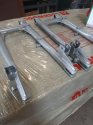
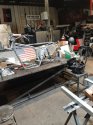
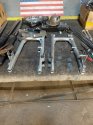
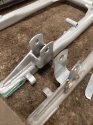
Finally got to rebuilding the swingarm shock mounts. I'll have my certified welder do the real welding, then they are ready for powder.
Attachments
DeathFromAbove
My Cat Says AREAR!
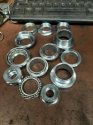
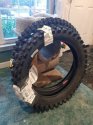
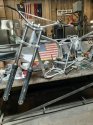
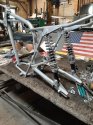
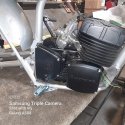
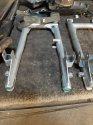
Swingarm is Done and Powdered, also got the triple tree bearing cups and races and stuff back from the plater!! Gonna start to assemble the 250 and 450 this weekend. Ordered tires and got a front that is 5.3 yrs old and a rear that is not the matching tire. They are both going back and I will buy from a reputable dealer and not off Amazon!! Live and Learn!!