• 2 Stroke Husqvarna Motorcycles Made In Italy - About 1989 to 2014
    WR = 2st Enduro & CR = 2st Cross

  • Hi everyone,

    As you all know, Coffee (Dean) passed away a couple of years ago. I am Dean's ex-wife's husband and happen to have spent my career in tech. Over the years, I occasionally helped Dean with various tech issues.

    When he passed, I worked with his kids to gather the necessary credentials to keep this site running. Since then (and for however long they worked with Coffee), Woodschick and Dirtdame have been maintaining the site and covering the costs. Without their hard work and financial support, CafeHusky would have been lost.

    Over the past couple of weeks, I’ve been working to migrate the site to a free cloud compute instance so that Woodschick and Dirtdame no longer have to fund it. At the same time, I’ve updated the site to a current version of XenForo (the discussion software it runs on). The previous version was outdated and no longer supported.

    Unfortunately, the new software version doesn’t support importing the old site’s styles, so for now, you’ll see the XenForo default style. This may change over time.

    Coffee didn’t document the work he did on the site, so I’ve been digging through the old setup to understand how everything was running. There may still be things I’ve missed. One known issue is that email functionality is not yet working on the new site, but I hope to resolve this over time.

    Thanks for your patience and support!

125-200cc 125 Powervalve Spring--How do I get to it?

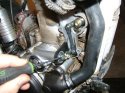
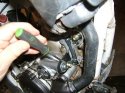
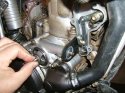
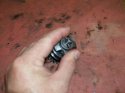
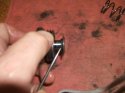
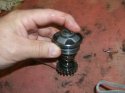
Me too Kelly. I couldn't really tell the difference going back and forth so the change in rpm must be very negligable. The only thing that makes any real sense is that when completely closed the balls are against the shaft and once they open they have no metal contact on that side. So it slightly delays opening and approximates the initial opening of the steel balls. The govenor is geared to spin at a higher rpm than the engine is turning and once you start move the balls away from the shaft the centrifugal force goes up exponentially. Think of spinning with your arms against your sides and then extend them outwards and it takes much more energy to pull them in. So I assume without doing the math that once either ball starts to leave the shaft and proceed outward the force goes up so quickly that both balls dump the govenor open quickly.

Sounds like WAG doesn't it.:lol:
Walt
 
Here are some pictures of me removing the PV today. In the first pic you see me pointing to the bolt to remove from the linkage. The second pick shows me gently prying the linkage off. The third pic shows where you want to wiggle the govenor while turning the shaft clockwise. The fourth pic shows the govenor popped out with about 1/4 turn of the shaft. The fifth pic shows the govenor on the bench and now compressing the cups down to remove the pin.

Walt
 

Attachments

  • DSCF0539.jpg
    DSCF0539.jpg
    58.1 KB · Views: 56
  • DSCF0540.jpg
    DSCF0540.jpg
    56.3 KB · Views: 54
  • DSCF0541.jpg
    DSCF0541.jpg
    61.3 KB · Views: 54
  • DSCF0542.jpg
    DSCF0542.jpg
    60.4 KB · Views: 93
  • DSCF0543.jpg
    DSCF0543.jpg
    37.8 KB · Views: 57
The first pic shows the ball cups being removed after the pin is out. Make sure you do this in one piece to keep the balls in the cup. The second pic shows the spring washer that rides against the bearing of the govenor. Make sure you get this back in the right way when you put it back together. You can see the extended lip of the washer goes towards the bearing.

Walt

PS. I will have power valve comparison pics up tomorrow
 

Attachments

  • DSCF0547.jpg
    DSCF0547.jpg
    35.3 KB · Views: 35
  • DSCF0544.jpg
    DSCF0544.jpg
    43 KB · Views: 34
Here are some pics with side by side comparisons between stock power valves and the reground power valves I am using.

Pic #1: This shows how far the sealing surface was relieved to gain clearance with the 2 mm larger radius of the new piston. I made a dashed line on the stock valve to give you a better visual on the difference.

Pic #2: This is a face on shot of the power valves. The sealing surface on the modded valves is ~.11" wide. The sealing surface on the stock valves is ~.21" which means I raised the effective height of the exhaust port 2.5 mm above stock. When Eric grinds the sealing surface back the 2mm, it actually lowers the exhaust port ~ 1.5mm and I had to raise the bottom edge by ~4 mm to get it to this point. The back side grind on the stock valves is ~ 90 degrees to the sealing surface. I made my grind at about a 35-40 degrees to this grind. The stock grind when fully open creates a smooth exhaust port surface on the way out. I wanted to leave as much of this surface in tact and yet still make the angle to the sealing surface steep enough to facilitate gas movement.

Pics #3 & #4: These are pics to illustrate the difference in width of the sealing surfaces new to stock.

Pic #5: This is a front side oblique angle that illustrates the width differences of the sealing surfaces. I blacked out the sealing surfaces on the ground valves to make it more visible. You can also see the angle differences between my grind and the stock grind of the back side.

If I was going to do anything I would actually raise the height of the exhaust port even further( reduce the width of the sealing surface). Another mm or so would make it as good as it can get with these exhaust valves. The extra cc's make this very doable and it only makes it run better on the bottom/mid than it did before.

Hope this makes sense.
Walt
 

Attachments

  • power valve 015.jpg
    power valve 015.jpg
    76.2 KB · Views: 28
  • power valve 018.jpg
    power valve 018.jpg
    45.8 KB · Views: 28
  • power valve 027.jpg
    power valve 027.jpg
    57.8 KB · Views: 28
  • power valve 028.jpg
    power valve 028.jpg
    47.3 KB · Views: 24
  • power valve 033.jpg
    power valve 033.jpg
    51.2 KB · Views: 33
Back
Top