• 2 Stroke Husqvarna Motorcycles Made In Italy - About 1989 to 2014
    WR = 2st Enduro & CR = 2st Cross

  • Hi everyone,

    As you all know, Coffee (Dean) passed away a couple of years ago. I am Dean's ex-wife's husband and happen to have spent my career in tech. Over the years, I occasionally helped Dean with various tech issues.

    When he passed, I worked with his kids to gather the necessary credentials to keep this site running. Since then (and for however long they worked with Coffee), Woodschick and Dirtdame have been maintaining the site and covering the costs. Without their hard work and financial support, CafeHusky would have been lost.

    Over the past couple of weeks, I’ve been working to migrate the site to a free cloud compute instance so that Woodschick and Dirtdame no longer have to fund it. At the same time, I’ve updated the site to a current version of XenForo (the discussion software it runs on). The previous version was outdated and no longer supported.

    Unfortunately, the new software version doesn’t support importing the old site’s styles, so for now, you’ll see the XenForo default style. This may change over time.

    Coffee didn’t document the work he did on the site, so I’ve been digging through the old setup to understand how everything was running. There may still be things I’ve missed. One known issue is that email functionality is not yet working on the new site, but I hope to resolve this over time.

    Thanks for your patience and support!

125-200cc 06 Wr125 Redo - Done

dartyppyt

Husqvarna
Pro Class
I will be posting the steps that I am taking to restore and bling an 06 Wr125. I want this bike to look like it rolled off the showroom floor, be dependable for racing/trail riding, plus doing some bling stuff to set it apart from an ordinary Husky.

This is a home garage, budget build project. I am trying to save as much money as possible by doing this resto in house. I will only be replacing any parts that are necessary plus ones that will make it last for years to come.

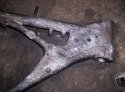
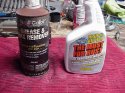
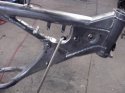
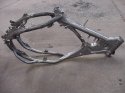
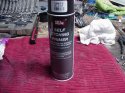
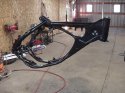
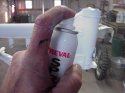
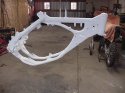
I spent a day, this past weekend, removing all the parts off the frame in order to get it ready for a nice acrylic enamel paint job. I chose to strip the frame using a spray on Aircraft Stripper versus sandblasting the frame. It is actually done pretty fast, can be a little messy, but if I went the sandblasting route then I have the fear of removing the VIN number off the frame and then doing alot of sanding to get a nice smooth finish.

Please feel free to participte at any time and make suggestions on how to do things easier or better!

Here we go!

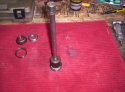
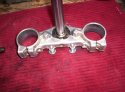
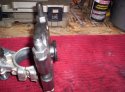
Pic 299 Shows the actual steering bearings that I had to remove from the the steering tube in frame and on the triple clamps.

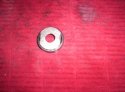
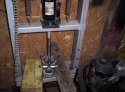
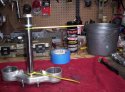
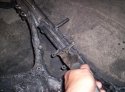
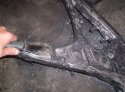
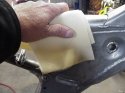
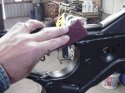
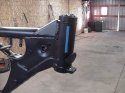
Pic 303/304 So how did I get the bearing races removed from the inside of the steering frame tube and didn't have one of those $50 tools? I went to the hardware store and bought a $.50 cent, thick 1 3/4 " washer. I ground the edges off so you could turn the washer on its side and drop it into the steering stem tube. It fell on top of the bearing race perfect. Then I used a 1/2 Drive rachet extension and a 1 1/16" socket, using a heavy plastis hammer. I drove the races out of the tube with about 4 hits.

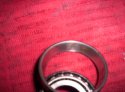
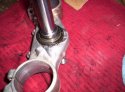
Pic 305 Show one of the actual steering bearings, rusted and pitted.

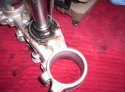
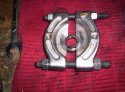
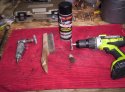
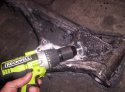
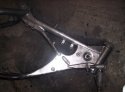
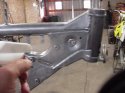
Pic 306 In order to get the bottom bearing off the Triple Clamp. I had to refer to my bearing seperator tool/puller. I first realize that I could get the tool up under the bearing because the steering stops were in the way. I had to take a screw driver and break the carrier and remove all the rollers away from the bearing collar still stuck on the shaft.

Continued
 

Attachments

  • 000_0299.jpg
    000_0299.jpg
    96 KB · Views: 69
  • 000_0303.jpg
    000_0303.jpg
    93.2 KB · Views: 64
  • 000_0304.jpg
    000_0304.jpg
    97.1 KB · Views: 67
  • 000_0305.jpg
    000_0305.jpg
    90.2 KB · Views: 64
  • 000_0306.jpg
    000_0306.jpg
    93.8 KB · Views: 71
Pic 307 Shows the collar still stuck on the shaft.

Pic 309 I am using my trusting bearing seoerator tool/puller to pinch the top lip of the bearing collar since i can't get the toll under the collar.I want to remove this collar from the steering shaft.

Pic 308 Using a garage style 12 ton press ($189 investment years back), I am going to now pess the collar off the shaft.

Pic 310 Shows the collar removed from the steering shaft.

Pic 311 Is just a side view of how I clamped my bearing seperator tool onto the bearing collar that was left on the shaft before pressing it off.

Continued
 

Attachments

  • 000_0310.jpg
    000_0310.jpg
    96.4 KB · Views: 57
  • 000_0308.jpg
    000_0308.jpg
    96.6 KB · Views: 59
  • 000_0309.jpg
    000_0309.jpg
    96.1 KB · Views: 59
  • 000_0307.jpg
    000_0307.jpg
    94.7 KB · Views: 57
  • 000_0311.jpg
    000_0311.jpg
    96.8 KB · Views: 62
Pic 312 Shows how I used inexpensive Zip Ties to keep track of the parts on my steering shaft. When I get new bearings. I won't forget where the spacer and things go for reassembly.

Coming soon: I am going to show you how to strip a frame and get it ready for an automotive quality finish.
 

Attachments

  • 000_0312.jpg
    000_0312.jpg
    97.7 KB · Views: 61
Cool quik removal tool for the steering head races. I just take my wire feed and run a quick bead around the inside of the race. When the bead cools the race falls out. I like your stem race removal.
 
Now I am going to chemically strip the paint off the frame to get it prepped for painting. I will be using Tal Strip Air Craft Paint Remover. I will need some tools. A couple of wire wheels for my cordless drill or you can use a small air grinder, a wire brush (to get in between where the sub frame bolts), a small wire wheel to get into the recessed areas (like where your swing arm shaft goes thru and etc....) and a paint scraper.

Pic 313 Shows what I am using for the job. Eye protection is a must, also a dust mask, rubber gloves and wear a long sleeve shirt. If you are going to do this in your garage, make sure you don't get the stripper on your floor, a drop cloth should be placed under frame. Move all the stuff (Lawnmowers, vehicles and etc...) out of your garage so you don't get stripper on anything when wire wheeling.

Pic 314 Spray on the stripper and let the chemical do the work.

Pic 315-317 Shows using a paintr scraper to get as much goo off as possible.

Continued
 

Attachments

  • 000_0313.jpg
    000_0313.jpg
    97.7 KB · Views: 66
  • 000_0314.jpg
    000_0314.jpg
    97.1 KB · Views: 71
  • 000_0315.jpg
    000_0315.jpg
    98.1 KB · Views: 65
  • 000_0316.jpg
    000_0316.jpg
    97 KB · Views: 68
  • 000_0317.jpg
    000_0317.jpg
    97.6 KB · Views: 66
Pic 318 Shows me using a wire wheel to remove the left over paint.

Pic 319 Shows progress of the paint being removed.

Continued
 

Attachments

  • 000_0318.jpg
    000_0318.jpg
    97.1 KB · Views: 58
  • 000_0319.jpg
    000_0319.jpg
    97.4 KB · Views: 79
Pic 001 Shows the frame after it has been stripped and wire wheeled. I used 4 cans of stripper @ $7.99 a can. I now take the frame to the local do it yourself car wash to rinse the frame off. I want to get all the stripper out of the threads and nooks and seams.

Pic 004 Shows the Materials I will be using and tools. I never did use my small touch up gun. I purchased one of those small Prevail sprayers and a couple extra cartridges. The sprayer was $7.99 and the refills were $5.99 each. It worked just like putting automotive paint in a spray can. It did very well, to spray paint in the tight areas.

Pic 005 I used 600 grit sand paper to go over the frame light before priming. I then used a scotch brite (scratch pad) to get into the tight areas. I then used a tack rag to remove all dust and lint.

Pic 006 You will need to hang your frame with wire from your ceiling about chest high. I also used an air compressor to blow any hidden water from the seams.

Pic 007 I wiped the frame down with Duplicolor Wax and Grease remover. You apply it with one rag and remove it with a seperate dry rag.

Continued
 

Attachments

  • MVC-007S.JPG
    MVC-007S.JPG
    76.5 KB · Views: 54
  • MVC-006S.JPG
    MVC-006S.JPG
    46.1 KB · Views: 61
  • MVC-005S.JPG
    MVC-005S.JPG
    52.6 KB · Views: 52
  • MVC-004S.JPG
    MVC-004S.JPG
    74.7 KB · Views: 62
  • MVC-001S.JPG
    MVC-001S.JPG
    50.7 KB · Views: 68
Pic 008 I am using a product called Krud Kutter. It removes any rust, etches the metal and puts a protective (Pickling) barrier on the metal. I simply spray it on, let it soak in for 5 Mins and wipe off with a clean dry rag.

Pic 009-010 After the frame is dry, I tack rag it to remove any dust or lint from rag.

Pic 011 I am using a good quality Self Etching Primer (SEM 39673 $18). It penetrates the metal pores and is very durable.

Pic 012 I make some masking tape balls to place in the bearing, steering tube locations.

Continued
 

Attachments

  • MVC-008S.JPG
    MVC-008S.JPG
    43.9 KB · Views: 38
  • MVC-009S.JPG
    MVC-009S.JPG
    49.6 KB · Views: 28
  • MVC-010S.JPG
    MVC-010S.JPG
    47.9 KB · Views: 33
  • MVC-011S.JPG
    MVC-011S.JPG
    65.8 KB · Views: 27
  • MVC-012S.JPG
    MVC-012S.JPG
    43.3 KB · Views: 33
Pic 013 Shows the masking tape balls installed in the steering tube ends.


Pic 014 Wallah! A primered durable frame just about ready to paint!


Note: I only spent about 4 hours total getting the frame to this point.
 

Attachments

  • MVC-014S.JPG
    MVC-014S.JPG
    58.7 KB · Views: 86
  • MVC-013S.JPG
    MVC-013S.JPG
    48.1 KB · Views: 64
After my primer has dried (1hr). It was time to move on and get ready for paint. I chose Dupont Acrylic Enamel. It seems to flex a little more. I am not a big fan of powdered coating because it chips real bad. My 08 Wr250 looks terrible just from all the chips taking it on and off the bike stand.
Automotive type Base coat/clear coat paint is also good (what is on vehicles today), is a little pricey when all the materials you need, add up.
I was after a spray on shine that is flexible and will last for a couple years.
Using an, over the counter paint like rustoleum or something like that, will only give you a 1 day good looking paint job.

To do a quality, factory job. You have to use automotive, body shop quality paint.

You can consult your local automotive paint store. They are very informative on products and advice. You should always tell them that you are a beginner and first time, do it yourself painter.

Product List:

1 Quart of Dupont Acrylic Enamel Centari

1 Pint of Generic Enamel Hardener

1 Prevail sprayer plus 1 extra refill cartridge

1 Pint of Dupont 259S Fish Eye eliminator paint additive

1 Gal of Dupont Cool Weather Paint Reducer.

Paint Strainers

Paint Mixing/Measuring Container

1 Tack Rag

1 Scratch Pad

1 Disposable respirator (You do not want to get this paint in your lungs and you need to make sure that you paint to allow ventilation).

Note; Mix your paint according to the manufactures label. Also your paint guy can give you directions.

Pic 017 Run your scratch pad over your primer to remove any nibbles in primer and also to scuff your primer.

Pic 018 Mix your paint and strain into your sprayer.

019 I never did use my small Air-touch up gun. I really like the Prevail sprayer.

Pic 020 Final tack rag your frame.

Continued
 

Attachments

  • MVC-016S.JPG
    MVC-016S.JPG
    60 KB · Views: 37
  • MVC-017S.JPG
    MVC-017S.JPG
    48.4 KB · Views: 43
  • MVC-018S.JPG
    MVC-018S.JPG
    55.6 KB · Views: 37
  • MVC-019S.JPG
    MVC-019S.JPG
    61.1 KB · Views: 36
  • MVC-020S.JPG
    MVC-020S.JPG
    47 KB · Views: 43
Pic 021 Cut and Place strips of masking tape over your frame numbers on both sides. You are going to leave this masking tape on and paint over it. Some day, if someone wants to verifyy your frame number with your title. You simply can see the outline of the tape, under your paint and you can remove it. If you paint over your frame numbers, you'll never read them unless you scrape the paint off with a knife and will go down to the metal. You never sandblast the numbers or sand over them. It will remove them.

Pic 022 I sprayed the 1st coat light (just cover coat).

Let paint sit (flash) for 10 mins.

I sprayed the 2nd coat light to medium.

Let paint sit for 10 mins.

I sprayed 3rd coat light to medium.

Let paint sit for 10 mins.

I sprayed the last coat medium.


Painting tip: Always paint your hard to do areas first, and areas you'll never see, to get a feel of your sprayer. Over lap your coats about 50%. Guys that get runs are guys in a hurry!

If you can paint with an ordinary can of household spray paint, without runs. You can paint like a pro! I also sprayed a couple extra coats on my frame high rub areas between coats.

Tip: You can also go to body shops and have them sell you smaller amounts of like, The Fish Eye Eliminator Additives instead of buying a whole pint.

Pic 023 It's done, no runs and a great shine that will last for years. Looks like a factory Husky job. I did this total paint job for around $150.
 

Attachments

  • MVC-021S.JPG
    MVC-021S.JPG
    51.9 KB · Views: 67
  • MVC-022S.JPG
    MVC-022S.JPG
    35.7 KB · Views: 70
  • MVC-023S.JPG
    MVC-023S.JPG
    50.6 KB · Views: 101
wallybean;133484 said:
Cool quik removal tool for the steering head races. I just take my wire feed and run a quick bead around the inside of the race. When the bead cools the race falls out. I like your stem race removal.

That's an excellent pointer! Can't wait to try it next time!
 
that bike 'll turn out way too nice looking for ya to be riding it.

send it me so i can ride it instead. ya know, that way ya wont loose any sleep over the first scritch n' stuff...

maybe i should send ya a couple of mine fer a redo too!

neat tips on painting. i do wrenching and stuff but am ignorant to paint. thanks.
 
pvduke;133808 said:
that bike 'll turn out way too nice looking for ya to be riding it.

send it me so i can ride it instead. ya know, that way ya wont loose any sleep over the first scritch n' stuff...

maybe i should send ya a couple of mine fer a redo too!

neat tips on painting. i do wrenching and stuff but am ignorant to paint. thanks.

You are just itchin to ride this thing when it's done.

This is kinda my gift to my son before he goes off to boot camp next July. Anytime you want to venture to Illinois, you sure could ride it.

We'll appreciate your wrenching anytime throughout the thread and are looking forward to any and all tips/pointers. We are going to do some neat stuff with this bike before it is all said and done. I hope everyone will like it.

Thanx!

Darin
 
oneal;133798 said:
Keep the pics coming its good to see huskys bought back to life.

Glad you like the progress. I am going to try and get the swing arm done/back on, plus the triple clamps and try to get the engine cases painted this weekend. I am a little further ahead with one engine case half, painted and it looks great!
 
dartyppyt;133863 said:
You are just itchin to ride this thing when it's done.

This is kinda my gift to my son before he goes off to boot camp next July.

yes i is. :busted:

yer a good father for doing this. bless ya and yer son, what a great sending off gift. thoughts and prayers for him coming back safe with major roost-lust ona new bike on his mind. :thumbsup:
 
Back
Top