• 4 Stroke Husqvarna Motorcycles Made In Italy - About 1989 to 2014
    TE = 4st Enduro & TC = 4st Cross

  • Hi everyone,

    As you all know, Coffee (Dean) passed away a couple of years ago. I am Dean's ex-wife's husband and happen to have spent my career in tech. Over the years, I occasionally helped Dean with various tech issues.

    When he passed, I worked with his kids to gather the necessary credentials to keep this site running. Since then (and for however long they worked with Coffee), Woodschick and Dirtdame have been maintaining the site and covering the costs. Without their hard work and financial support, CafeHusky would have been lost.

    Over the past couple of weeks, I’ve been working to migrate the site to a free cloud compute instance so that Woodschick and Dirtdame no longer have to fund it. At the same time, I’ve updated the site to a current version of XenForo (the discussion software it runs on). The previous version was outdated and no longer supported.

    Unfortunately, the new software version doesn’t support importing the old site’s styles, so for now, you’ll see the XenForo default style. This may change over time.

    Coffee didn’t document the work he did on the site, so I’ve been digging through the old setup to understand how everything was running. There may still be things I’ve missed. One known issue is that email functionality is not yet working on the new site, but I hope to resolve this over time.

    Thanks for your patience and support!

valve cover wear

nep2012

Husqvarna
A Class
While taking my valve cover off today for an adjustment I noticed a wear mark where the fuel line comes off the fuel cock on my 2012 te 310. It sits on the valve cover and I guess from vibration it has worn a groove in my valve cover, more than I am comfortable with. Seems to be a lot of pressure because of the angle of the fuel line and really no other other alternate route to run the fuel line. Put some telescopic black plastic around fuel line but am afraid if the rubber fuel live wore the aluminum on the valve cover so will the black plastic tubing. Anybody experience this.
 
I simply have rub/vibration/scuff marks from the sheath but yours sounds like a bit more. I would suggest careful routing as you can when reinstalling but also consider how you are spacing the tank if you are. Some use one of Zip Ty's 5mm spacers all around or just in front. I prefer to use (3) 2mm steel 1/2 in. ID spacers for a 6mm lift instead just in front (along with the stock rubber washer that gets compressed on tightening and use some Blue Loctitite too on the screw). The reason I prefer just in front is 1) It keeps the rear of the tank solid on the frame and the seat fitting well and aligns the side panels best. The 3 shims allow the front right shroud to just catch the slotted tank side cover. 2) Most important is the lift in front alone aims the petcock barb upward so it gains lift as it extends towards the valve cover. Also raises the tank nicely over the radiator hose along with use of a 3mm button head screw. I know this can be almost splitting hairs but every mm helps with the tight clearances.

Hardened Steel washers from Ace Hardware = 2 mm.. You can fine tune your fit to suit more easily.

spacer-jpg.26744
thanks for the info I will definitely give it a try.
 
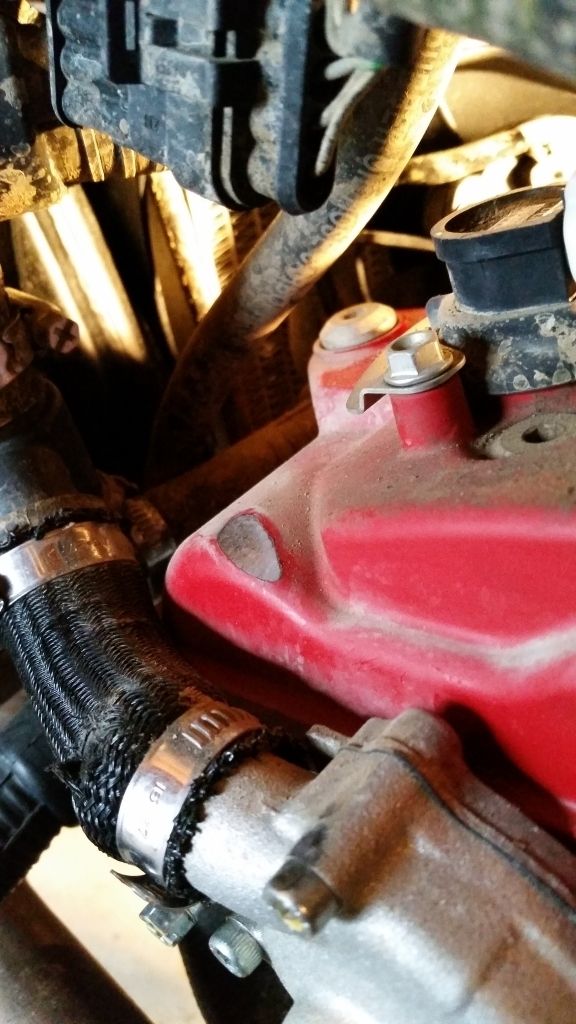
I just recently got a 2013 te310r with about 850 miles on it and as I took things apart to install radiator guards I noticed this issue. :(
6bdb9283-dadd-4b3a-87a6-db6f92f520f9_zpscnssch69.jpg


I'm thinking about running a new longer fuel line that goes up over that hose that is running down the middle of the picture. I figure that would keep it off the head. Anyone see any issues with doing this?
I'm also going to have to do something about the bolt head on the fuel pump rubbing the coolant line in the picture. Glad I'm finding this stuff now rather than after an issue on the trail.
 
Back
Top