Stranded (again)- please advise

Discussion in '610/630' started by EricV, Oct 20, 2012.

  1. EricV Husqvarna
    AA Class

    Husqvarna Motorcycle:
    TE630
    Hi gang. Two weekends ago it was the battery (but, in light of today may be a bigger issue....read on please), the next weekend blown radiator- fixed and went riding today. Well, out in the back country, fuel light came on...bike hiccuping and me thinking wtf, I've only put 30 miles on this tank. Shut it down, wouldn't start (same as when my battery was shot...weak sounding fuel pump, almost no crank over power, display oddly behaving.) Both fuel cocks were wide open...can hear fuel in there.

    My guess is that the charging system isn't doing its thing. This morning, pre ride, I tested the 2 week old battery and it showed 12.5 volts, started right up. Stopped for lunch....started right up then it was about 50 mins later when this stuff happened.

    If anyone has advice on how to troubleshoot the issue I'll be forever grateful. I haven't much exp w/ this type of thing (did lots of two stroke wrenching as a teen/young adult, but not on a bike like this.) I'm also 2.5 hours away from the nearest dealer. I was able to bump start...rode maybe one mile towards a better spot, the thing was popping and behaving badly (stuttering also) so when I came upon a house shut down. It's there now...rounding up a posse and a pick up to go retrieve this Italian prank (don't get me wrong....I freaking Love this bike to Death, but these last few weekends have me lacking in Husky love right now.)

    Thanks !!
    Reflexrider likes this.
  2. Ex HVUK Husqvarna
    AA Class

    Location:
    England
    Husqvarna Motorcycle:
    None
    First test is simple - put your meter on the battery when the bike is running and see if it's charging. Should be over 13 volts up to approx 14.5v.


    Dave
  3. EricV Husqvarna
    AA Class

    Husqvarna Motorcycle:
    TE630
    Huge thanks Dave- you'd think I'd have thought of that (well, actually, you really wouldn't after you read on...)

    OK, I'm just gonna rip this band-aid right off, potentially sending me careening down into the annals of internet Fail threads at breakneck speed where I shall remain until time immemorial. All I can say, in feeble proactive defense, is that I've never done anything this bone-headed to a bike, car, or small animal.

    So of course I immediately go to see what the charging system is putting out. Now when I went to pick up the bike I turned it on and tried to crank it. Very feeble response- display lit normal, could hear pump (but didn't seem as strong), got a crank and a half out of it, no joy, loaded up...drove...and off-loaded here. So of course it's not gonna start to let me measure output, so I did what I did a few weeks ago when the battery went out- jump it off the car being careful to ground neg on the bike and not have the donor running. Worked great last time. Well (here it comes...if anyone has food or liquid in their mouth I advise you to swallow Now, before): I hooked it up wrong...got terminals on the donor switched and had the positive of the bike connected to the negative of the donor and the grounded negative cable coming off the bike was connected to the positive of the donor. Yes it sparked (just upon contact to the terminal) when I hooked it up but we thought it was normal spark you sometimes see when hooking up cables (God, you've no idea how it hurts to out ones self like this. :) ). BUT Wait- it gets better, much better (hold on tight...swallow and...hell, I'd even suggest relieving yourself of other body functions in prep)- I also had the ignition switch- during this- on. Hot da*n folks- there you go...it's out there now. Jesus that actually hurt to write.

    So you know where I am now... The bike is 100% dead, does not light up at display, no sounds, no nothing. That makes perfect sense, now and at least in light of this crime spree, and it stings to know it was a stupid bone-headed-got too comfy-and-effed-up moment. Lick your wounds, out yourself to the worldwide net, and hope for guidance from pitying souls. :)

    OK, so we hooked it back up proper, volts on bikes terminals close to 12. Shouldn't be enough for a good start but if all would have been well it would activate the pump/display. Death confirmed, we knew that. So then on to look at fuses. What's the main fuse? I looked at my shop manual and confirmed what I was staring at on the fuse block- 3 fuses and the middle (15A) is assigned as "12 volt system." All three fuses are intact though. So predictably the chest pain I feel...w/ requisite projectile sweating...tells me major fryage (wiring harness, dunno.)

    So is that center fuse the "main fuse" and, if not, where does one find it? I am looking at the shop manual now (haven't seen it yet) but, in the interests of expedience and also because I've no choice but to choose it to feel cathartic, I out myself to you. Any feedback on where I should start would be great...just need to know order of attack, so to speak.

    Sorry to go long gang. Hope someone gets a laugh out of it and it's OK, really, lemme have it. :) Again, I've tinkered with bikes and cars for 30 years and never would have thought I'd be the guy frying something royally. :)
    Reflexrider and johngil like this.
  4. glangston Husqvarna
    Pro Class

    Location:
    Gardnerville, NV and Mammoth Lakes, CA
    Husqvarna Motorcycle:
    2012 Husqvarna TE 310
    Other Motorcycles:
    2012 BETA 350 RS
    I hooked up my lawn mower ass backwards to the battery and it spun the starter but sounded pretty odd to my "highly trained" ear. So I looked at the battery (new) and the old and although they were exactly the same layout, the positive and negative were reversed...Bastards.! Sears ride-em lawn tractor. Everything survived and it started fine after a switch of the battery cables. I now scrutinize every battery connection...even in my flashlights.

    Isn't there a starter relay fuse also? I'm less than a wizard at any of this so I'd personally just call my friend George if I could bring myself to admit it.

    http://www.r1-forum.com/forums/showthread.php?t=224998

    This guy did it and fuses fixed it according to him.
  5. EricV Husqvarna
    AA Class

    Husqvarna Motorcycle:
    TE630
    Thanks man. I only see 3 fuses and, as you can see into them, they're all clearly good. Thanks for the link. The very last post (page 2) makes some sense (when juiced in reverse the fuses are the last to get hit.) Looks like I'm in for lots of tracing. My worst fear, of course, is that I fried the wiring harness or ECU or something equally significant/expensive.
  6. glangston Husqvarna
    Pro Class

    Location:
    Gardnerville, NV and Mammoth Lakes, CA
    Husqvarna Motorcycle:
    2012 Husqvarna TE 310
    Other Motorcycles:
    2012 BETA 350 RS
    Some people have found the fuses to look good but not test good.

    A fairly cheap "fix" to replace them if it works and doesn't hurt to have spares.
    PALMER84ONE likes this.
  7. maxyb Husqvarna
    AA Class

    Location:
    Adelaide, Australia
    Husqvarna Motorcycle:
    TE630, classica 105
    Other Motorcycles:
    CB350, CD90z
    entirely true, the only way to test fuses is with a test light

    (but make sure the test light works properly first! DAMHIK)
  8. PALMER84ONE Husqvarna
    AA Class

    Location:
    Silverado, CA.
    Husqvarna Motorcycle:
    08 TE450 THE ROCKET
    Other Motorcycles:
    12 RS520, CRF150F/230F, YZ250
    I had a cracked fuse and the bike was dead. Pulled them out, looked at them all and they were good. The fuse was cracked at the base near the thick plastic part and you could no see it until I put it under a scope with lighting. There should be regular auto fuses (not mini's) off the battery as well as the three in line (15A 15A 20A)
    Good luck and ratting yourself out is the first step to your therapy.
  9. Wrryder Husqvarna
    AA Class

    Eric,

    Don't feel too bad, we've all done something similar at one point or another. Do you have a manual for your bike? If you need one PM me your email address and I'll send it to you. It's a 30 MB file but it has a pretty good section on the electrical system. - Craig
  10. EricV Husqvarna
    AA Class

    Husqvarna Motorcycle:
    TE630
    I sure do- thanks to Jesse. I've read over it, of course, and will hopefully begin testing things tomorrow. Gotta get whatever's fried resolved so I can then move on to whatever was today's original problem. :)

    Thanks for the supportive words...it's one thing to have a dead bike, a might worse knowing you had a hand in making it worse. Only a few good weekends left in the season here and hoping to get more fun out of it. I've got over 4K of enthusiastic mileage on the thing, so I can't complain in the bigger picture. I'll swap fuses out and go from there. Thanks again!
  11. organ donor Husqvarna
    Pro Class

    Location:
    Berlin
    Sound much like me. BUT ... I´d never be brave enough it admit it.
  12. EricV Husqvarna
    AA Class

    Husqvarna Motorcycle:
    TE630
    Thanks again gang. GOOD news today, at least. You guys are right- don't trust a fuse on face appearance. My polarity reversal did fry one, thank God. So replaced, hooked up to good donor battery, and bike is powering up normally, starts and runs great.

    BUT that now leaves me with the core problem: System is not charging back to battery. Hooked up multimeter and only receiving 12.1 back to the battery (assuming I do not have to have battery in bike for this test - had jumpers from donor battery to bikes leads, and tested what was coming back to battery by touching multimeter leads to the bikes battery cables.)

    So how does one attack a non-charging issue? Voltage regulator testing? Sorry to get ahead of myself and thanks for your patience- will also be reading manual. At the same time picking the collective knowledge here because I don't want to replace parts, find that wasn't it, replace more, etc.

    Thanks gang- always glad that CH is here. Last night was a little rough worrying that I'd totally baked the system. :)
  13. KXcam22 Husqvarna
    AA Class

    Location:
    Kamloops, BC, Canada
    Husqvarna Motorcycle:
    2011 SM630, 2017 300XC
    Other Motorcycles:
    08FZR6;07CRF450;98CBR900RR;02KTM200
    What bike and year are we talking about? There's not much to a bike charging system, stator, voltage regulator, battery. I would suggest starting by looking at the voltage regulator and its connectors. They run hot and must be grounded well to the frame and bolted to the frame as a heat since. That being said, an aluminium frame is a bitch to do either on since aluminium naturally builds a thin oxide skin that insulated against both. On my fireblade (AL fram) one of the secrets to keeping the VR alive was to add a separate ground wire from the VR to the engine ground bolt. It is possible something like this could help huskies. Have a look at the connectors. It there has been any heat or high current they will be discolored or melted. I would also remove the stock battery and try running the bike with the donor battery only in the circuit. I have batteries fail in some weird ways. Hope this helps. Post back when you have more results. Cam.
  14. EricV Husqvarna
    AA Class

    Husqvarna Motorcycle:
    TE630
    Huge thanks Cam. I'll be looking closely at the Reg/connections closely in a minute. It's a 630- 4K on the clock.

    UPDATE: placed old battery back in, hooked up, jumped the bike alive/running and tested value coming back to battery...8.5 volts. Huh? Was higher when hooked up to car by cables (as mentioned 2 posts up.) I did this because, upon reading the shop manual, learned that to properly check the supply back (should be 12.5 to 14) you need to have rpm's at least up to 3K. So I did that and got 8.5....clearly seems a charging problem.
  15. PALMER84ONE Husqvarna
    AA Class

    Location:
    Silverado, CA.
    Husqvarna Motorcycle:
    08 TE450 THE ROCKET
    Other Motorcycles:
    12 RS520, CRF150F/230F, YZ250
    To insure your charging system is working the bike should have the batterie installed and bike running. This should show more than 12.5v while idle and spike when the throttle is twisted. That will show if system is working. Good luck!

    Yep, double check all you earth grounds. Is the batterie grounded to frame or engine?
  16. EricV Husqvarna
    AA Class

    Husqvarna Motorcycle:
    TE630
    OK, so now we're getting someplace. The harness to the Voltage Regulator (consisting of four wires) is frayed/fried (pic below.) Here's what has me confused/concerned though...not sure what to make of it. You see, at first I saw it and thought "good news! It's frayed! Now fix it up and see what that yields." So I get the whole thing out (routed away from bike) and this is what I see (sorry for poor quality pics):

    [IMG]

    So of course the next task is to fix it all up (need to see what gauge wires these are...that section must be replaced) BUT the concern is why it's baked to begin with.

    This is what it looked like prior to taking off the wrap...looks as though it frayed where it rubbed against around lower edge of battery tray. I'm hoping that the fraying caused shorting there, which caused the frying- possible? Hoping it's something like that, as opposed to too much load running through it (signifying origin in another component.)

    [IMG]
  17. EricV Husqvarna
    AA Class

    Husqvarna Motorcycle:
    TE630
    Significant bummer here....Husky doesn't color code wires much. :( 
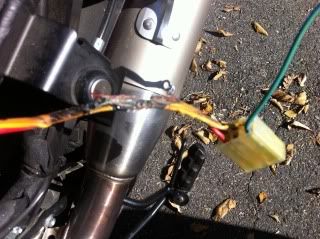
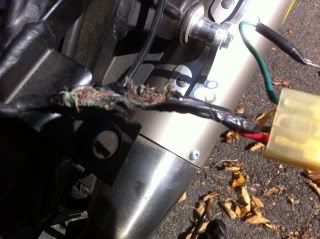
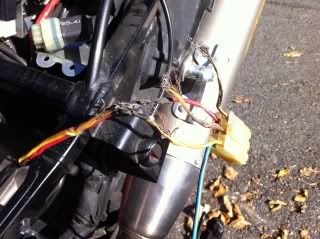
You see, in trying to separate the melted strands some came apart...wasn't any way around that and there certainly wasn't any way to see which lead to what (melted together, and 3 of the 4 wires are...get this...yellow. One is closer to orange, but two are yellow.) So now I've no way to splice/reconnect as I can't tell what goes to what for sure. What's worse is that the other end appears to lead into the wiring harness. :(

    [IMG]

    Looked at parts fiche and sure enough the end not frayed leads into the main wiring harness....no way to just replace this plug/wires (no plug at other end...goes into main harness.)

    So I hope you see the predicament (because now I'm really at a loss)- the four intact wires (laying on the frame above) I can solder back to the VR connector, BUT it's a crap shoot as only 1 or 2 can I be sure I re-connect correctly (red obviously, and maybe the orange if I'm reading that right) but the 2 that are the same yellow.... ? I guess trial and error? Worried about frying something by doing that. I can look at the schematic of what the slots are coming out of the connector, but that doesn't help either as I still won't be able to differentiate which yellow goes to which yellow on the other side of the fray/break.

    FURTHER CLARIFICATION: Just stripped off more of the black covering on the harness side of the break (not connector side): Get this- 3 of 4 wires are the same yellow...so it's a 3 way combo to figure out. No way to figure out which of the 3 fried pigtails on the connector to hook up to. If anyone is creative please offer ideas.
  18. KXcam22 Husqvarna
    AA Class

    Location:
    Kamloops, BC, Canada
    Husqvarna Motorcycle:
    2011 SM630, 2017 300XC
    Other Motorcycles:
    08FZR6;07CRF450;98CBR900RR;02KTM200
    That's one sign of a high resistance ground to your VR. They heat up but usually the pins and connectors melt. Rewiring this is easy. According to the diagram there are 5 wires, 3 yellow, 1 red and 1 black. THe 3 yellows are from the stator and get power to the VR, the Red gets DC power from the stator to the battery and the black is the ground wire.
    1. Splice the red
    2. Splice the black (this wire should give 0 ohms to the VR heat fins).
    3. Splice the 3 yellow wires. It shouldn't matter which yellow connects to which yellow based on the VR schematic.

    The system maxes out at 25A so you can use #14 wire for your short splices. Use non-insulated crimp connections and not solder (it melts). Non-insulated crimps can be got by cutting off the insulation from a reg. automotive butt splice. Makes getting a solid crimp connection easier. Then use heatshrink tubing over the connectors and wire.

    Note: This is the repair. It still is possible that the VR or battery caused this mess and that one is damaged. Once all the wiring is fixed, do all the ohm tests as stated in the manual. Put the battery on charge to see if it responds. I cant recall if those are AGM batteries but if it is, once the charge goes low they are screwed. I lost 2 in one winter by not paying attention. Get a WR450 battery for cheaper and saves 7 or 8 pounds. The stock is huge. There is some WR battery info on here. Its a common swap.

    Now the extras. Use a length of #10 wire and add an extra ground wire from the ground lug on the VR to the engine ground stud. There is usually one on the cases that the starter ground wire bolts to. VR usually use heat paste on back for heat transfer to the frame. Clean and sand the frame before bolting it back on. Use lots of paste and you may have to buy a small packet at an electronics store. A TV repair shop would probably give you a bit. These last items are maybe not required on a Husky but were vital on my fireblade to keep the VR alive for any length of time. Hope this helps. Cam.
  19. EricV Husqvarna
    AA Class

    Husqvarna Motorcycle:
    TE630
    Dude- you are awesome...many thanks. Starting on this now, we'll see where it gets me. Seeing as I provide too frequent updates I needn't say I'll keep you posted. :)
  20. EricV Husqvarna
    AA Class

    Husqvarna Motorcycle:
    TE630
    Gotta quit for the day, but got the splicing done and then, because I don't have a fully charged bike battery, I put the old one back in, jumped it to start...started right off, disconnected all cables and took the reading while hovering around 3K rpm's. The feed back to the battery is a solid 13.5. Is that enough? I was really hoping for at least 14. Here's the result:

    [IMG]

    Will charge the battery (on the charger) and see how that goes also.