• Hi everyone,

    As you all know, Coffee (Dean) passed away a couple of years ago. I am Dean's ex-wife's husband and happen to have spent my career in tech. Over the years, I occasionally helped Dean with various tech issues.

    When he passed, I worked with his kids to gather the necessary credentials to keep this site running. Since then (and for however long they worked with Coffee), Woodschick and Dirtdame have been maintaining the site and covering the costs. Without their hard work and financial support, CafeHusky would have been lost.

    Over the past couple of weeks, I’ve been working to migrate the site to a free cloud compute instance so that Woodschick and Dirtdame no longer have to fund it. At the same time, I’ve updated the site to a current version of XenForo (the discussion software it runs on). The previous version was outdated and no longer supported.

    Unfortunately, the new software version doesn’t support importing the old site’s styles, so for now, you’ll see the XenForo default style. This may change over time.

    Coffee didn’t document the work he did on the site, so I’ve been digging through the old setup to understand how everything was running. There may still be things I’ve missed. One known issue is that email functionality is not yet working on the new site, but I hope to resolve this over time.

    Thanks for your patience and support!

Trailtech Vapor Stealth speedo/dash

Sizzler

Husqvarna
AA Class
As I have got both 17” and 21” front wheels for my TE630, I need to be able to switch the speedo from one to the other. As this is not an option with the standard 630 dash, I have gone for a Trailtech Vapour Stealth unit, with the dash for “idiot lights”.

This is a pretty nice bit of gear, with advantages and disadvantages compared to the standard dash.
•It is slightly smaller and sits lower than the standard
•The shiny black finish of the dash doesn’t quite match the matte-grey of the old dash
•It has a tacho that you can actually read, with shift and over-rev lights (although, on a big single, they are more bling than useful)
•The trip-meter isn’t as flexible as the standard
•It does have a temperature gauge, with high and danger settings.

Wiring of the main unit was pretty straight forward. The tacho and temperature have their own sensors, and it just connects to the standard speed sensor (although they do supply one).
The challenge I had was with the connections for the other lights. The Husqvarna wiring diagram gave a few hints, but not definite connections, particularly for the low fuel and neutral lights, which are valuable. Armed with a multimeter and a pile of spare fuses, this is what I got.

The standard plug that connects to the back of the dash is a 26-pin, with 1-7 across the top row, 8-13, 14-19, and 20-26 across the bottom row. Not that as this plug is reversed; the numbers go from right to left.
•2 - 12v – switched power supply
•20 - 12+ switched power supply- this comes on with the ignition.
•3 & 14 - High beam
•3 & 16 - Low Fuel
•5 & 17 - High beam
•5 & 18 - Left Blinker
•5 & 19 – Right blinker
o(I put a 5w diode in each of the blinker wires, before connecting them to the one dash light. This prevented the single dash light making both indicators flash)

There are only 4 lights on the Trailtech dash, as opposed to 5 on the standard. But, as Australian-delivered bikes have their headlights wire on, there is little point having a light to tell me that it is there (I found the constant green light on the dash a bit irritating).

The wires supplied with the dash are pre-soldered, so they are pretty rigid. To make a plug, I put a bit of plastic over the standard plug, and punched the wires through into the holes. I then glued them in place with 2-part epoxy. When this was set, it pulled apart like a normal plug (the bit of plastic stopped the two plugs being glued together).

The dash was supplied with a set of LED globes. Use them.

I hope this makes thing easier for the next person who wants to do this.

That is awesome, could you post some pictures?
 
As I have got both 17” and 21” front wheels for my TE630, I need to be able to switch the speedo from one to the other. As this is not an option with the standard 630 dash, I have gone for a Trailtech Vapour Stealth unit, with the dash for “idiot lights”.

This is a pretty nice bit of gear, with advantages and disadvantages compared to the standard dash.
•It is slightly smaller and sits lower than the standard
•The shiny black finish of the dash doesn’t quite match the matte-grey of the old dash
•It has a tacho that you can actually read, with shift and over-rev lights (although, on a big single, they are more bling than useful)
•The trip-meter isn’t as flexible as the standard
•It does have a temperature gauge, with high and danger settings.

Wiring of the main unit was pretty straight forward. The tacho and temperature have their own sensors, and it just connects to the standard speed sensor (although they do supply one).
The challenge I had was with the connections for the other lights. The Husqvarna wiring diagram gave a few hints, but not definite connections, particularly for the low fuel and neutral lights, which are valuable. Armed with a multimeter and a pile of spare fuses, this is what I got.

The standard plug that connects to the back of the dash is a 26-pin, with 1-7 across the top row, 8-13, 14-19, and 20-26 across the bottom row. Not that as this plug is reversed; the numbers go from right to left.
•2 - 12v – switched power supply
•20 - 12+ switched power supply- this comes on with the ignition.
•3 & 14 - High beam
•3 & 16 - Low Fuel
•5 & 17 - High beam
•5 & 18 - Left Blinker
•5 & 19 – Right blinker
o(I put a 5w diode in each of the blinker wires, before connecting them to the one dash light. This prevented the single dash light making both indicators flash)

There are only 4 lights on the Trailtech dash, as opposed to 5 on the standard. But, as Australian-delivered bikes have their headlights wire on, there is little point having a light to tell me that it is there (I found the constant green light on the dash a bit irritating).

The wires supplied with the dash are pre-soldered, so they are pretty rigid. To make a plug, I put a bit of plastic over the standard plug, and punched the wires through into the holes. I then glued them in place with 2-part epoxy. When this was set, it pulled apart like a normal plug (the bit of plastic stopped the two plugs being glued together).

The dash was supplied with a set of LED globes. Use them.

I hope this makes thing easier for the next person who wants to do this.

Yes please post some pics. Your connector sounds interesting. My speedometer died and I was thinking of installing the Vapor and dash indicators. What else do I need to know?
 
The Vapor came with a 6-wire connector.
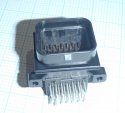
This is the plug that I made up. A classic piece of Aussie ingenuity.
plug1.jpg

And this is the plug that I found today. A classic piece of Japanese attention to detail.
plug2.jpg

Google "Superseal 26-pin, 4 rows". I had to Dremmel of a few lugs, but then it was a perfect fit.
This is what it looks like on the bike.
dash1.jpg
 
How are those mirrors not all up in your knees when you're up on the tank? :p

ETA: and buy some grip glue, your left grip is twisted all the way around, haha...
 
Surprisingly, the mirrors stay well clear of my knees. This is no doubt helped by the TE's minimalist steering-lock.
They give a getter view behind me that the original shoulder-level mirrors did.
 
I have to say those mirrors might be the best thing I've done to the bike. There is just something about not having the big stalks up top, it feels like a totally different riding experience. Plus when I lean forward to get my leg over the back when I have luggage on I don't bash my helmet into the mirrors!
 
Just ordered the Stealth. Couple of questions:
1 How did you mount it?
2 Where does the tach sensor go? Do you know if you can use the lead from the stock sensor?
 
I removed the stock dash (2 bolts) and mounted it on the standard bracket. (which is also a headlight support)
I had to drill a couple of holes for the mounting bolts and wires, but the standard dash would bolt straight back on (although I'm not sure why I would)

The tach-sensor is just a wire wrapped around the spark plug lead. Do not do more than a few loops, or it will give weird readings.

The temp-sensor fits into a radiator hose by cutting a section out and clamping it in place. This is one shortcomming of the design, where the lead for the sensor is a bit short, so it limits where you can fit the fairly large sensor. I managed to get it into the hose between the head and radiator, but it was a struggle. You are probably better off extending the lead and finding a straight bit of hose to tap into, but I only thought of that after I had cut the hose. I don't think it would be a good idea to tap into the standard sensor, as the extra resistance from the reader may do funny things to the EFI, and the reading may not be compatible, anyway.

http://australia.rs-online.com/web/p/rectangular/7267020P/
is where I got the connector in Australia, but this was a local over-the-counter sale, so I'm not sure where they are available for you.
 
OK, on closer inspection, those connections aren't quite right.
Terminals 3 & 14 are the neutral light.
The only way I could get the taco to work was to the coil signal wire, with a 600k ohm, 1/4 watt resistor inline.
 
Thanks for the update. As I mentioned in our PM, unless the Australia bikes are different, terminals 3 and 20 are +12V switched and 2 and 5 are ground. I didn't get this with a meter, that is how the wiring diagram shows it. Also, they are the same-colored wire (blue is ground, Brown/White is +12V).
 
Another update, terminal 14 is not the neutral indicator. I finished my install over the weekend and made my own plug using D-sub pins and JB Weld. Unfortunately I'll have to drill out terminal 14 and figure out which of the remaining pins are for neutral - using pin 14 my neutral light is always on when the key is on.
 
This is all based on a probably faulty assumption on my part. You had listed pin 2 as +12V and given your connections for neutral and low fuel I assumed you had pin 3 as ground. On my bike pin 2 is ground and pin 3 is +12V, so for neutral and low fuel I was assuming you meant 2 & 14 and 2 & 16. But the 14 and 16 might get grounded to turn on the indicator, so I really would need pin 3 with them. Can you just verify that pin 2 is ground and not +12V?

thanks
 
Okay, got this all working. Sizzler's original post was right on, except for pin 2. Had I just followed his directions in the first place I would have been done a week ago.

dsc1933o.jpg


Pinouts are as follows, looking at the plug on the bike starting at top right:

Pin 1: Yellow/Black, constant +12V
Pin 2: Blue, ground
Pin 3: Brown/White, switched +12V
Pin 4: empty
Pin 5: Blue, ground
Pin 6: Speed sensor
Pin 7: ECU pin 26 (no idea, maybe the annoying 'headlights are on' indicator?)
Pin 14 (third row, right side): Yellow/White, low fuel indicator
Pin 15: empty
Pin 16: White/Blue, Neutral indicator
Pin 17: White, High beam indicator
Pin 18: Black/Red, Turn signal
Pin 19: Light Blue, Turn signal
Pin 20 (fourth row, right side): Brown/White, switched +12V

Low fuel and Neutral indicators both go to ground when active, so they need to be paired with either pin 3 or 20.
Signals and High Beam go to +12V when active, so they need to be paired with pin 2 or 5. As Sizzler said, make sure you put a diode in line with pins 18 and 19 before you splice them to your turn signal indicator, otherwise both signals will blink when you turn either way. A 1 watt diode was large enough.
 
Hi Guys

Well documented install. I would like to get one of these for my 610 so I can run both sets of wheels and have the correct speed read out.

Where would I get one of those connectors from the UK ?

Thanks
Gav
 
Back
Top