• 4 Stroke Husqvarna Motorcycles Made In Italy - About 1989 to 2014
    TE = 4st Enduro & TC = 4st Cross

  • Hi everyone,

    As you all know, Coffee (Dean) passed away a couple of years ago. I am Dean's ex-wife's husband and happen to have spent my career in tech. Over the years, I occasionally helped Dean with various tech issues.

    When he passed, I worked with his kids to gather the necessary credentials to keep this site running. Since then (and for however long they worked with Coffee), Woodschick and Dirtdame have been maintaining the site and covering the costs. Without their hard work and financial support, CafeHusky would have been lost.

    Over the past couple of weeks, I’ve been working to migrate the site to a free cloud compute instance so that Woodschick and Dirtdame no longer have to fund it. At the same time, I’ve updated the site to a current version of XenForo (the discussion software it runs on). The previous version was outdated and no longer supported.

    Unfortunately, the new software version doesn’t support importing the old site’s styles, so for now, you’ll see the XenForo default style. This may change over time.

    Coffee didn’t document the work he did on the site, so I’ve been digging through the old setup to understand how everything was running. There may still be things I’ve missed. One known issue is that email functionality is not yet working on the new site, but I hope to resolve this over time.

    Thanks for your patience and support!

Motosportz damper install, 09 SMR510

saki302

Husqvarna
A Class
I just received my Motosportz damper yesterday and finished the install- it works great, but the instrutions are a little lacking. Here's my addendum to their instructions:

Remove the handlebars, triple clamp, and then remove the bar clamps from the triple.

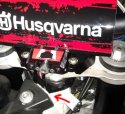
Then install the Motosportz clamp on your frame neck. I added some blue loc-tite on the screw- snug it, but it doesn't need to be super tight.

Here's the tricky part- you have to first clamp the handlebar to the triple, then install and torque the bar clamp bottom bolts BEFORE you put the triple back on the bike. If you don't do it in that order, the washers will yank the damper clamp off the frame. You must install the bar so the bar clamps don't rotate and end up in the proper position when torqued.

Put the Motosportz damper mount between the bar clamp and triple (stock hardware goes under the damper mount). Torque the bar clamp bolts to 16 ft-lbs.

Remove the handlebars again- now reinstall the triple clamp, and torque the steering stem nut to 61.4 ft-lbs. Then torque the fork clamp nnuts to 19ft-lbs.

Now reinstall the handlebar and upper handlebar clamp- torque to 21 ft-lbs, taking care to keep the clamp piece level (I tightened each bolt little by little- imagine you're doing an intake manifold on a car- keep it level and even).

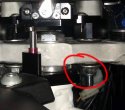
Now you can put the connecting rod for the damper into the hole on the frame clamp- I put a dab of grease on the shaft below and a dab on the flats up top- it'll wear less and run smoother that way.

Install the damper unit itself so the shaft sits in the center of the slot (it's adjustable forwards/backwards- mine fit well in the full-forwards position. Install and tighten the two damper clamp bolts- you're done!

I also trimmed the gas tank to clear the mount so it can be removed without removing te damper clamp. I used a utility razor knife to cut it- just go slow and shave off bits until it fits- I had to bevel the bottom edge to clear.

The soft/hard label is also reversed on mine- but that's easy enough to figure out!

-Dave
 

Attachments

  • d1.jpg
    d1.jpg
    117.2 KB · Views: 57
  • d2.jpg
    d2.jpg
    57.5 KB · Views: 52
Anytime :)

I'd have taken pics during the install but I'm a little sick- takes enough effort to maintain focus without tossing a camera in the mix :D

For anyone wondering, the Husky bar pad fits right on top of the damper with no mods.

I still can't believe how small this is- it's tiny compared to the GPR I had on the DRZ years ago, and works SO MUCH BETTER! You guys should make a DRZ kit :) (I sold my old SM, but a friend of mine has one in need of damping).

-Dave
 
I just installed my Motosportz damper last night. I agree, the instructions are lacking and the dinky black & white pictures on the bottom are pretty sad for a reference. I had no idea what the 'C' clamp was, my unit arrived fully assembled, I didn't know I had to loosen the #4mm allen bolts to remove the actual damper first and so on...if you are mechanically inclined, you can figure it out!

The biggest hassle for me was my IMS desert tank on my '08 TE510. What a pain! Had to shave quite a bit by the steering collar, then get out the sledge hammer to "persuade" the tank to fit. Hopefully I won't get any wear into the tank from vibration.


I also noticed the reversed soft and hard markers on the label, c'mon, seriously, what's up with that? I'm a little weary of what I'm getting into with this unit. I was debating a Scott's, but I wanted the MZ one for the on the fly adjustability, and people seem to love theirs.
This is my first damper ever. When I finished the install, I put the wiper/selector arm on full hard ('S' in this case with the reversed label!!) and I had the front of the bike up in the air on a stand, I moved the bars back and forth. It had a fair amount of resistance from the damper, but after, say about 10 forceful back and forth motions, I noticed a small amount of oozing oil by the wiper/selector arm---Is this normal??

Other issues I noticed:
- The little red sleeve on the connecting rod didn't hold my rod (haha) high enough into the damper arm, so I put a small zip tie under the red sleeve to lift the rod higher.
- There is a fair amount of play from center to when the damper starts 'damping'.
I'm off to the dez tomorrow for a ride and test. Honestly, I'm not very optimistic about this unit from Motosportz, but I will see after tomorrow. Maybe mine needs some help?
 
Just received my GPR dampener today and it also has what I would call play when moving the dampener back and forth but only at the extreme limits so I don't think it will matter when installed because the bike won't see those limits from side to side swapping.

The small amount of oil doesn't sound like a good thing. I'd give motosportz a call they seam decent and should take care of it.
 
Sorry you had some issues. The IMS tank is an issue because, as they advertise the tanks vary in size 9%, thats a lot. Some you have enough room to stick a finger in between the clamp and the frame clamp. Some are super tight like yours. I think we discussed this before you got it. As you can see we made the frame clamp as small as possible, it can't really be any smaller. there are endless threads here about this. If you look at where your tank mount bolts ends up in the slot your tank is shoved all the way forward. As for the label and the reversed markings I thought we weeded all those labels out, I guess not, will send a new one. the small amount of oil you see by the damper arm is assembly lube and will stop after first wash or so. These have been 100% reliable since we changed the main seal design a few years ago. I mean i have not seen ONE leak or need repair in over 2 years. If it does leak I will fix or send you another one. The red collar will slide down the pin so you don't need the zip tie. Will update the instructions. Sorry you are not 100% satisfied with it. I will do what i can to make you feel better about it and will take it back if you are not 100% happy.

Dampers are often times not real EZ to install. The clamp is always an issue because of the tank and all the stuff going on in this area. Look at threads on any site about installing any manufacturers dampers and you often see I and to grind this and move that. I'm not trying to make excuses, that area is full of stuff, most of it moving and piled with aftermarket stuff like tanks that are all different sizes and shapes, different bar mounts, bars, clamps, lots of stuff. We tried to make ours as compact and out of the way as we could.

Feel free to contact me directly and I will help you with this. Hope you end up liking it.

thanks,
Kelly
Motosportz
 
No apologies necessary Kelly, you can't please everyone, but props to you for doing all you can to support your product. The IMS thing is out of your control. Once I got the tank in a good enough position and got all the Mz parts figured out, the install went fine. Updating your instructions will be a good help for damper newbie installers like myself. Glad to know the oil I saw wasn't anything to worry about.

As for use-- I went riding yesterday in a mix of nasty tight rock canyons, sand dunes and everything in between. I saw no oil leaking. Being able to adjust on the fly was awesome and the damper seemed to be doing its job just fine. I am stoked to try it out in next weeks open desert race and really put it through its paces! Thanks again Mz
 
Back
Top