-
Hi everyone,
As you all know, Coffee (Dean) passed away a couple of years ago. I am Dean's ex-wife's husband and happen to have spent my career in tech. Over the years, I occasionally helped Dean with various tech issues.
When he passed, I worked with his kids to gather the necessary credentials to keep this site running. Since then (and for however long they worked with Coffee), Woodschick and Dirtdame have been maintaining the site and covering the costs. Without their hard work and financial support, CafeHusky would have been lost.
Over the past couple of weeks, I’ve been working to migrate the site to a free cloud compute instance so that Woodschick and Dirtdame no longer have to fund it. At the same time, I’ve updated the site to a current version of XenForo (the discussion software it runs on). The previous version was outdated and no longer supported.
Unfortunately, the new software version doesn’t support importing the old site’s styles, so for now, you’ll see the XenForo default style. This may change over time.
Coffee didn’t document the work he did on the site, so I’ve been digging through the old setup to understand how everything was running. There may still be things I’ve missed. One known issue is that email functionality is not yet working on the new site, but I hope to resolve this over time.
Thanks for your patience and support!
You should upgrade or use an alternative browser.
Broken drain bolt
- Thread starter Buchshot1
- Start date
Trenchcoat85
Husqvarna
Pro Class
Exactly. If t he whole head broke off, complete with the flange, there should be no pressure holding it in place, so you should be able to get it to unscrew easy enough by poking the uneven surface with a screw driver to rotate it. Otherwise, you can drill a hole in it and tap in an easy out to back it off.Pictures.... so we know what we're dealing with.
Trenchcoat85
Husqvarna
Pro Class
1. look at the very bottom of your xlite motor. You may have ("may") another drain bolt at the very bottom of your motor, pointing down to the ground- which takes an 8mm allen. Use that if your oil return plug doesn't leak; then plug the nipple with J-B weld, plug the hose too (or just re-plumb it like a TC)
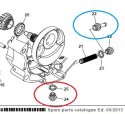
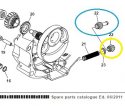
The first parts image is 2014, the 2nd parts image is 2012. The red circle is what we're looking for. This part does NOT appear in the service manuals and may not be on earlier xlites. BTW, did your plug look like the blue circled one or the yellow? (yellow: don't have to do anything)
 .
.
2. gotta get the current drain bolt out because you only have one? okay, gather up some supplies: new plug, chisel or punch, good hammer (2lb drill hammer would be good), Vise Grips maybe, butane torch (best- small flame) or propane torch, aerosol can of Dust-Off (you can get cheap $1 small cans at some dollar stores, else expect to pay $5 for dust-off or $10+ for liquid refrigerant... which is what this stuff is), fire extinguisher, eye protection (refrigerant and metal pieces)

Here's the procedure (order a new drain plug first!):
lay the bike on it's right side probably. clean around the area (carb cleaner, brake cleaner). practice moving tools in and out of the immediate area of repair just to get a feel for things.
First thing to do: with the chisel/punch, make an indent in the side of the drain plug very close to the engine, but probably not on the flange. (straight in radially- this is a lip we're gonna use to put the the chisel/punch in to hit the plug around COUNTER-CLOCKWISE). Now take the refrigerant and spray the liquid on the plug ONLY. (btw, you have to hold Dust-Off upside down to get liquid to come out). get it cold (ice may form). While you're waiting for the steel to cold-soak, take your torch, on low flame, and make slow circles around the aluminum case surrounding the plug. Don't touch the plug with the heat. Get the case about 200° (spit will boil) but don't go overboard. Now, put the chisel in the indent tangentially, and hit the plug around to loosen. Firm strikes, but we're not try to remove metal... you might need to aim the chisel in slightly.
Hopefully it'll loosen with a couple of strikes. Use the vise grips after it moves a bit.
BTW, someone else got confused with this method and thought we were "shocking", annealing, or quenching the metal (heating and then rapidly cooling). We're not- we are heating one aluminum part and cooling another steel part... so this is a different animal.
Thanx to Bill at BMP for this procedure.
good luck.
Trenchcoat85
Husqvarna
Pro Class
This image shows both drain plugs on later xlites; skid plate removed.

here is a picture of the $5 dust off I got at Walmart.

here is my soft steel POS drain plug (I thought it was aluminum when I first boogered it up, because it was so soft).

Trenchcoat85
Husqvarna
Pro Class
mine is like the 2nd yellow one. the bolt is aluminium,(checked with magnet). about the only surface left is the flange.
Was not aware of a different engine(xlite). guess I will give these a shot.
Did you check for the existence of the "red" drain plug also, at the very bottom of your motor?
If indeed you only have a single yellow one (so you have to remove it) there should be plenty of meat on it.
On other xlites, only TCs have the yellow style.
Your engine is an xlite.
Trenchcoat85
Husqvarna
Pro Class
Go slow, be patient, be smart.
Good luck.
Trenchcoat85
Husqvarna
Pro Class
I dont have the red one. The drain plug had a hollowed out head. only one side of the hex remains
hollowed out head? like dished-for weight reduction? or was it the stock style bolt with a hose nipple on it (that someone cut off). Sounds almost like an aftermarket thingy. Is this a used bike and the first oil change for a new owner?
Being an aluminum drain bolt is not a huge problem. it will conduct the heat (cold) better... but you'll have less time to mess around. I might cool the bolt, heat the surrounding area of the case and then give the bolt another shot of refrigerant before starting.
don't forget to order a new one first- it does no good to get the bad one out now if you got nothing to put in there. and right now, you can put oil in it (if needed) and still ride. Hell, you could always suck the oil out of it, change the filter, add oil... and you'd be good to go. Thousands of marine engines use this technique with no problems at all.
Keep your goal in mind: fresh oil for the engine. But if things go wrong here tying to repair it, your bike could be out of action for months.
clean up the area (for fire and smoke purposes really) and take a few GOOD photos for us.
Trenchcoat85
Husqvarna
Pro Class
...supposed to ride this weekend. so not touching till after.
smart. have fun; keep us posted if/when you decide to tackle it.
Trenchcoat85
Husqvarna
Pro Class
Burgo
Husqvarna
A Class
Okay. I have 2 potential solutions or work-arounds:
1. look at the very bottom of your xlite motor. You may have ("may") another drain bolt at the very bottom of your motor, pointing down to the ground- which takes an 8mm allen. Use that if your oil return plug doesn't leak; then plug the nipple with J-B weld, plug the hose too (or just re-plumb it like a TC)
The first parts image is 2014, the 2nd parts image is 2012. The red circle is what we're looking for. This part does NOT appear in the service manuals and may not be on earlier xlites. BTW, did your plug look like the blue circled one or the yellow? (yellow: don't have to do anything)
View attachment 87939 .View attachment 87942
2. gotta get the current drain bolt out because you only have one? okay, gather up some supplies: new plug, chisel or punch, good hammer (2lb drill hammer would be good), Vise Grips maybe, butane torch (best- small flame) or propane torch, aerosol can of Dust-Off (you can get cheap $1 small cans at some dollar stores, else expect to pay $5 for dust-off or $10+ for liquid refrigerant... which is what this stuff is), fire extinguisher, eye protection (refrigerant and metal pieces)
View attachment 87941
Here's the procedure (order a new drain plug first!):
lay the bike on it's right side probably. clean around the area (carb cleaner, brake cleaner). practice moving tools in and out of the immediate area of repair just to get a feel for things.
First thing to do: with the chisel/punch, make an indent in the side of the drain plug very close to the engine, but probably not on the flange. (straight in radially- this is a lip we're gonna use to put the the chisel/punch in to hit the plug around COUNTER-CLOCKWISE). Now take the refrigerant and spray the liquid on the plug ONLY. (btw, you have to hold Dust-Off upside down to get liquid to come out). get it cold (ice may form). While you're waiting for the steel to cold-soak, take your torch, on low flame, and make slow circles around the aluminum case surrounding the plug. Don't touch the plug with the heat. Get the case about 200° (spit will boil) but don't go overboard. Now, put the chisel in the indent tangentially, and hit the plug around to loosen. Firm strikes, but we're not try to remove metal... you might need to aim the chisel in slightly.
Hopefully it'll loosen with a couple of strikes. Use the vise grips after it moves a bit.
BTW, someone else got confused with this method and thought we were "shocking", annealing, or quenching the metal (heating and then rapidly cooling). We're not- we are heating one aluminum part and cooling another steel part... so this is a different animal.
Thanx to Bill at BMP for this procedure.
good luck.
Ooooh, good to see this thread.
I have exactly the same problem on my 2013 TE310R. The bike has both rear and bottom drain, but I've been in the habit of removing both on Oil changes to clean the steel filter that sits inside the sump at the rear oil inlet.
I'll order a new plug and take photo's as I have a go at the method posted by Trenchcoat85. Thanks mate!
Trenchcoat85
Husqvarna
Pro Class
Ooooh, good to see this thread.
I have exactly the same problem on my 2013 TE310R. The bike has both rear and bottom drain, but I've been in the habit of removing both on Oil changes to clean the steel filter that sits inside the sump at the rear oil inlet.
I'll order a new plug and take photo's as I have a go at the method posted by Trenchcoat85. Thanks mate!
my pleasure.
But I would advise using only the bottom drain bolt (with the magnet) for a couple of reasons. First, two weeks ago, I just cleaned my screen on the oil return bolt for the 2nd time since I got the bike (Oct 2014, 7000+ miles. yeah, more than 11,000Km). There was nothing on the screen. super clean. This was my 14th or 15th oil change IIRC.
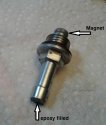
The second reason is that even though I had only removed the oil return hose a couple of times before, it was deteriorating and delaminating. So much so that I filled the barb up with J-B Weld (an automotive epoxy here in the US) and reinstalled the hose (but basically getting rid of the liquid return; later I will convert to the TC style where the liquid oil from blow-by goes back to the head). I did not want a hose failure to destroy my engine. At the same time I added a small rare-earth magnet to the screen side of the bolt... but really, this isn't going to do much of anything.
Note: I had never been really worried about the exposure of the stock hose to damage from the outside- it's pretty protected. I was, however, shocked at the condition of the oil hose itself. BTW, I have about 350hours of riding time on the bike, which I estimate 98% of is dirt.
hose damage

modified oil return bolt

Burgo
Husqvarna
A Class
my pleasure.
But I would advise of using only the bottom drain bolt (with the magnet) for a couple of reasons. First, two weeks ago, I just cleaned my screen on the oil return bolt for the 2nd time since I got the bike (Oct 2014, 7000miles. yeah, more than 11,000Km). There was nothing on the screen. super clean.
The second reason is that even though I had only removed the oil return hose once before, it was deteriorating and delaminating- so much so that I filled the barb up with J-B Weld (an automotive epoxy here in the US) and reinstalled the hose (but basically getting rid of the liquid return; later I will convert to the TC style where the liquid goes back to the head). I did not want a hose failure to destroy my engine. At the same time I added a small rare-earth magnet to the screen side of the bolt... but really, this isn't going to do much of anything.
View attachment 88446
View attachment 88445
Yep, my hose is losing it's outer braiding as well.
And I agree, each time i've removed the filter it's been pretty clean
The 2013 TE310 has a magnet on the bottom sump plug, so that probably does the trick for 99% of debris.
Will fix and leave alone then.
Cheers mate
Trenchcoat85
Husqvarna
Pro Class
They stuff I added above didn't change that much.
Trenchcoat85
Husqvarna
Pro Class
I acquired the drain plug quite a while ago, but have pretty much given up on the project. The threads of the plug and the magnet both stick up too high to catch anything I believe. As far as I could tell there was no interference though (gears, crank, skid plate etc). "Someday" I'll go back to the original thread and update it.
Hell, who knows? maybe someday I'll cut down the after-market drain bolt and put another magnet on it.


![20180415_122026[1].jpg](/data/attachments/88/88004-6bdaee1032ef187d85d2634cbbddca59.jpg?hash=a9ruEDLvGH)