• Husqvarna Motorcycles Made In Sweden - About 1988 and older

  • Hi everyone,

    As you all know, Coffee (Dean) passed away a couple of years ago. I am Dean's ex-wife's husband and happen to have spent my career in tech. Over the years, I occasionally helped Dean with various tech issues.

    When he passed, I worked with his kids to gather the necessary credentials to keep this site running. Since then (and for however long they worked with Coffee), Woodschick and Dirtdame have been maintaining the site and covering the costs. Without their hard work and financial support, CafeHusky would have been lost.

    Over the past couple of weeks, I’ve been working to migrate the site to a free cloud compute instance so that Woodschick and Dirtdame no longer have to fund it. At the same time, I’ve updated the site to a current version of XenForo (the discussion software it runs on). The previous version was outdated and no longer supported.

    Unfortunately, the new software version doesn’t support importing the old site’s styles, so for now, you’ll see the XenForo default style. This may change over time.

    Coffee didn’t document the work he did on the site, so I’ve been digging through the old setup to understand how everything was running. There may still be things I’ve missed. One known issue is that email functionality is not yet working on the new site, but I hope to resolve this over time.

    Thanks for your patience and support!

!976 WR360 Restoration

Zburd

Husqvarna
C Class
As many threads have posted before me, I started this project as a "freshening up" rather than a semi complete restoration. Once I got started, I found it hard to stop.

As of now, I have started on the obvious, and what I could start on Immediately... Cosmetics.

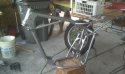
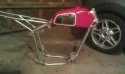
Sand blasted the frame, hardware, tank, and handlebars. Powder coated the frame with a GM silver, not too metallic, and a close match.

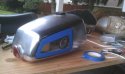
The tank I baked in my oven, and used banner red. Its going to be a rider so I didn't see the point in shelling out the bucks to get a spot on paint job for the tank.

I will be splitting the case in a couple of weeks, as I need to wait for the parts to arrive.

Any pointers or opinions would be greatly appreciated.
 

Attachments

  • IMAG0112.jpg
    IMAG0112.jpg
    99 KB · Views: 146
  • IMAG0120.jpg
    IMAG0120.jpg
    127.2 KB · Views: 142
  • IMAG0121.jpg
    IMAG0121.jpg
    80.9 KB · Views: 148
  • IMAG0124.jpg
    IMAG0124.jpg
    96.3 KB · Views: 160
  • IMAG0125.jpg
    IMAG0125.jpg
    88.4 KB · Views: 160
Don't mean to spoil the fun, but I think "banner red" is a Krylon spray can paint. Nice color match, but it won't stand up to fuel spills..
 
Don't mean to spoil the fun, but I think "banner red" is a Krylon spray can paint. Nice color match, but it won't stand up to fuel spills..

What would you suggest for a fuel resistant paint?
 
Look'n good, My cousin Tim, rest his soul, rode one of those back in the day. His room was plastered with Husky articles/posters and the reason I started riding Huskys. I'm doing the same with my 86auto. I figured I would save the money on exspensive paint and powder, because it just won't last if you plan on really riding it. I used Nasson Fulthane supposed to be fuel and chemical resistant $25 a pint and won't stain either. Your local Dupont automotive paint suplier should be able to mix up about any color you want.
 
Yea im relatively new to these old Huskys, but have recently found myself obsessed. I plan on riding the thing so Im not too worried, but I also don't want the paint dripping off after my first ride. Ill have to check that out soon. Thanks for the input.
 
I used PPG Omni urethane epoxy, base coat/clear coat. 1993 BMW, Code:274, Color: Mugello Red is a perfect match.
I had a local paint supply shop mix it up for me. Here's how mine looks now, almost done!

77 Husqvarna 250CR.jpg
 
I found by using very fine steel wool with WD-40, you can get those Akront rims to look like new. When you put the transmission together, be careful to put all washers back into case as show on the exploded diagrams. There is supposed to be a washer under the shifting barrel and on top of the shifting shaft prior to assembly of the right half of the case. Also, make sure the transmission is in 4th gear and you can see two teeth of the stepfeeder gear under the shifting barrel, and one tooth on the bottom of the stepfeeder gear. I have been told if you don't do this the bike will be stuck in 6th gear and you can't get it out of gear. Also the embossed side of the stepfeeder gear is down and the flat side up. Hope this helps you.
 
I found by using very fine steel wool with WD-40, you can get those Akront rims to look like new. When you put the transmission together, be careful to put all washers back into case as show on the exploded diagrams. There is supposed to be a washer under the shifting barrel and on top of the shifting shaft prior to assembly of the right half of the case. Also, make sure the transmission is in 4th gear and you can see two teeth of the stepfeeder gear under the shifting barrel, and one tooth on the bottom of the stepfeeder gear. I have been told if you don't do this the bike will be stuck in 6th gear and you can't get it out of gear. Also the embossed side of the stepfeeder gear is down and the flat side up. Hope this helps you.
Do those transmission rules apply to the primary kick transmissions as well? I have 2 1982 WR engines to assemble soon so kinda important to know
 
Jim,
I'm not sure when Husky went to a "right kick" engine, but yours is definately a "left kicker." I just finished rebuilding a '72 400 CR 5 speed (left kick). I knew it had one less gear than the transmissions I am used to working with so I inquired with two well-respected Husky dealers (George Earl of Up-Tite and Ron Bishop in Escondido) Both experts told me to place the transmission in 3rd with the setup. It worked fine. But on the 6 speed, the trans must be in 4th position with two teeth of the stepfeeder gear showing under the linkroller (see my posting on '78 250 OR restoration for pics) and one tooth of the stepfeeder gear on the bottom side. Both of your motors should be the same as the '78.
Just remember when you split the cases, the guts are most likely going to stay in the right side case so be sure to zip tie any washers to the corresponding shafts.
Blessings,
Jery
 
From what I have seen right kick Husqvarnas did not occur until a few years into Cagiva ownership. Thank you for the transmission info as I do not recall seeing it in the assembly manuals I purchased
 
Here is an updated pic of her...
IMG_3799.jpg


I am having a seriously hard time getting the cylinder off of the case, it seems as though they have seized together. I have tried tapping it with a rubber mallet in an upward motion, and am hesitant to carefully try and pry if off with a flat head driver... I have spend a couple days just trying to get it off. Anybody have any tricks up their sleeves? I obviously want to avoid to damaging it.

Aslo, you can tell that some idiot bent the back of the frame down, as it has some wabbles in it. Im thinking of cutting it, and getting a shop to weld the right angle back in.

I know nothing about the back shocks... They seem to be a bit on the mushy side, and I was wondering if any of you knows what brand they are, and if they can be freshened up????

Does it matter if the brake lever is on the right, or left? It seems to work on either side, but i have seen pictures mostly with it on the left....
 
Have you removed the cylinder studs. If not, double nut each stud and remove them. Once all four studs are out, then try removing the cylinder. If you are not going to split the cases, do it upside down so that junk doesn't fall into the crank case. Most of these shocks can be rebuilt but I'm not familiar with what you have on your bike. You should really dig through the "Technical Forum" for parts diagrams and manuals for this bike.
 
I got the bike back together and it started fourth kick. I was very excited untill i tried to rev it up.... I would bog down, back fire, then bog some more. I took it to a local shop to have them look at it, and after a couple days of them tinkering with it, they told me the ignition was not advancing, and would need to be replaced. Has anybody ever had their ignition not advance????

I got it back in my garage, removed the air filter, muffler packing to make sure it was not clogged, and nothing has changed. I have a new Mikuni 38MM carb, jetted to the correct specs on it. Im really hoping it can be something other than my ignition. Any ideas?
 
I helped a friend who also had a 360 WR with a similar issue. It'd run ok at idle, but when you tried to rev it up, it would not run past a certain rpm (failry low). After fidling a while I grabbed a known good coil off my Maico, installed it on the Husky and ckicked it over. It fired right up and revv;d to the moon. Installed the original coil, problem returned.

Bottom line - our isssue was ab bad coil. I'd recommend finding someone to loan you a known good coil for testing.
 
I got it on Ebay. It was listed as a "Factory Option thru the frame pipe" for a 76 250GP.
It works great! Has a very strong mid range surge and rev's out nicely.
What I had looked very much like a 78 pipe. The 78 pipe has a longer header pipe and a larger diffuser. This one tucks in much better and doesn't have a single dent.
I fabricated a mounting bracket and welded it on the pipe and then used a rubber threaded mount like the airbox uses, near the upper shock mount. I also welded a tab to the frame to mount the silencer.
I blended the transfer ports where the barrel meets the cases, removed the bridges in the intake tract and added a 38mm Mikuni (stock was 36mm Bing).
I'm not sure what made a difference, but in a rolling drag race, it will pull 3 bike lengths on an 83 250XC.
Here's a pic of both sides.

77 Husqvarna 250CR 001.jpg


Copy of 77 Husqvarna 250CR 004.jpg
 
Back
Top