• Husqvarna Motorcycles Made In Sweden - About 1988 and older

  • Hi everyone,

    As you all know, Coffee (Dean) passed away a couple of years ago. I am Dean's ex-wife's husband and happen to have spent my career in tech. Over the years, I occasionally helped Dean with various tech issues.

    When he passed, I worked with his kids to gather the necessary credentials to keep this site running. Since then (and for however long they worked with Coffee), Woodschick and Dirtdame have been maintaining the site and covering the costs. Without their hard work and financial support, CafeHusky would have been lost.

    Over the past couple of weeks, I’ve been working to migrate the site to a free cloud compute instance so that Woodschick and Dirtdame no longer have to fund it. At the same time, I’ve updated the site to a current version of XenForo (the discussion software it runs on). The previous version was outdated and no longer supported.

    Unfortunately, the new software version doesn’t support importing the old site’s styles, so for now, you’ll see the XenForo default style. This may change over time.

    Coffee didn’t document the work he did on the site, so I’ve been digging through the old setup to understand how everything was running. There may still be things I’ve missed. One known issue is that email functionality is not yet working on the new site, but I hope to resolve this over time.

    Thanks for your patience and support!

73 250 WR with Manifold to Cylinder Leak

SRRobirds

Husqvarna
AA Class
Hi All -

Just started my winter's project; a 73 250 WR. For the motor, I wanted to start with a leak down test.

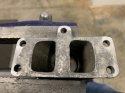
It was obvious after a few pumps that the intake manifold was leaking at the cylinder. I cleaned the metal surfaces and replaced the gaskets and spacer but no joy - still leaks. I then added gasket sealer between the metal and gasket surfaces with no improvement. I'm torqueing the manifold to cylinder allen screws to about 13 Nm.

Have you guys had this issue and if so how did you solve it? Is it possible that the leak is around the bolt threads?

Thanks for any guidance.

Scott
 
Chasing air leaks is difficult - as you are experiencing. To narrow it down, take an old spray bottle (Windex or other) and fill with a small amount of liquid soap and the remainder with water. Spray the mixture around the intake area and see exactly where the bubbles (air leak) are. BTW - how many psi are you pumping it up to?

Are the gaskets new, if so what brand, or are they NOS gaskets? You mentioned gaskets with an 's' - just want to make sure a gasket is on both sides of the spacer. You can also take some 400 grit wet/dry sandpaper on a piece of glass and make sure the aluminum intake is not warped a bit - doesn't take much to clean up and make true.

Never have seen the screws leak - always a first time though - some blue thread locker would take care of that though.

Let us know if you are able to pinpoint the leak.
 
Thanks for the reply. Soap solution is how I found the leak, which seems to be worse at the top center screw. I was shooting for 6 psi, but was only able to get it up to about 4. My "pass" is 6 psi held for ~30 min. - does that seem right to you?

The gaskets are new custom using a die cutter and high quality gasket material (NOS are on order, and I'll try those when they arrive). I used a new gasket on both sides of the spacer, which is NOS.

Good idea about the 400 grit to true up the intake - I'll do that.

Do you typically use a gasket sealer or do you assemble it "dry" (I've assembled this part of over 30 motorcycles dry and have never had a problem, but admittedly only one other was a Husky)?

Thanks again for your help - I'll keep you posted.
 
Sounds like your inlet manifold has a bow in it. This is very common as people tend to overtighten the screws on the outside (easy to get to) rather than the centre. Flatten your manifold face first. I only ever used to use grease on the gaskets. But every now and again I come across a PITA, so end up using a very thin smear of silicone.
 
Sounds like your inlet manifold has a bow in it. This is very common as people tend to overtighten the screws on the outside (easy to get to) rather than the centre. Flatten your manifold face first. I only ever used to use grease on the gaskets. But every now and again I come across a PITA, so end up using a very thin smear of silicone.


Thanks Grouty - I did the leveling idea proposed by Vinskord using 400 grit and could tell it was bowed as you mentioned (attached pics are at the start and middle of the leveling process). NOS gaskets are inbound and I'm hoping that leveling and new gaskets do the trick.
 

Attachments

  • IMG_1882.jpg
    IMG_1882.jpg
    130 KB · Views: 31
  • IMG_1883 - 1.jpg
    IMG_1883 - 1.jpg
    113.5 KB · Views: 31
I've struggled with leaks on most of my rebuilds over the years. Seems to me that 40 to 50 years old aluminum motors slowly change shape from the thermal cycling and over tightening. I'm with grouty, flatten the intake surface with sand paper or as I prefer, use a cloth abrasive as it doesn't tear. When I have an extreme cases of warping that would take a lot of elbow grease to flattened I put the part on the belt sander with a fine grit and go slow.

I've also found leaks in areas that are difficult or impossible to re-surface such as cylinder base on the center cases. When dealing with a location that deals with gasoline most gasket dressing fail not to mention if you have to remove the part the gasket is usually done for. I found Permatex PermaShield works very good on the intake and base gasket to resist the effect of gasoline. The part will disassemble easily without destroying the gasket and the PermaShield cleans up very easily with brake cleaner and a shop rag. It takes a small amount of PermaShield to do the job and I dress both surfaces before assembly.

https://www.permatex.com/products/g...uel-resistant-gasket-dressing-flange-sealant/

6psi for 30 mins sounds good to me however I've had motors run fine that didn't make it to 30mins. You're going to find that the left crankshaft seals on some of these bikes can be difficult to get a seal that will give you 30 mins even when the seal is new. All the years of running and the exposure from sitting for decades can cause the stub-shaft to develop microscopic pitting that wears the seals edge within an hour of running to the point of leaking. So, if I get 10mins at 6psi on a rebuild I run it.

I once read a dirt bike mag review of a new mid to late 70's Husky that the guys couldn't get the jetting right after riding the bike for a few days. They screwed with the jetting for hours before consulting the factory who suggested changing the left crank seal. Jetting problem was solved. Point is, even the new bikes had crank seal problems.

Vinskord makes an excellent recommendation by suggesting blue thread locker on the intake bolts. The center one will leak on your model bike because the bolt hole enters one of the transfer ports.
 
Update -

I leveled the intake manifold and reassembled with new gaskets and sealed threads. I then charged the system and found it wouldn't hold more than 4 - 5 psi. It would hold 4 psi for about 15 min.

I confirmed with soap solution that the pressure system itself, spark plug holes, head / base gasket, intake / exhaust manifolds and right side crank seal were not leaking. I then put a small amount of soap solution in the crank vent tube and found the solution was discharged from the vent tube at 4 - 5 psi. So it seems the left side crank seal is where my issue is.

It doesn't seem like a gross leak since it holds ~4 psi for 15 min. Would you guys split the case and replace the seal if you had that kind of a leak?

Thanks
 
Knowing where the leak was, however slight would kill me. But if it's for fun and not competition, it would probably slide. But I'd be Savin for another piston.
 
Yeah, I agree... After thinking about this for a while, and given it's not even winter yet (so I have plenty of time), I think I'm going to replace the seal. I'm hoping it's tight as a drum by the first vintage AHRMA race next year!

Thanks for your thoughts!
 
I have, and it held 10mmHG for at least 5 min.

I assumed pressure was more important than vacuum just based on the "how-tos" on the web, but maybe you need both? And given I have a pressure problem, I think I'll go ahead and replace the seal.

I'm just hoping I don't end up with a scenario described by Crashaholic where a new seal is destroyed by an almost 50 year old micro pitted crank and I end up in the same place!
 
Haha ! back in the day we would use those Speedi Sleeves on the Toyota 4cly trucks with bad cranks
 
If it's not a new seal, I'd go in and replace it. However, Husky has us put that seal in with the spring and lip facing outward, away from the crank, toward the trans oil. I'm not worried one bit when that seal holds vacuum better than pressure... IF I know that the seal is recent enough to still be pliable.
 
Thanks Picklito - There are no tool marks on the case screws, so I'm assuming its the original (48 year old!) seal. I'm going to replace it..

Actually, I'm committed to splitting the cases now; The countershaft threads split trying to remove the sprocket, so I'll be grinding off the sprocket and replacing the countershaft with the spline design.
 
Actually, I'm committed to splitting the cases now; The countershaft threads split trying to remove the sprocket, so I'll be grinding off the sprocket and replacing the countershaft with the spline design.

Definitely do that! Great upgrade. I did it to my 73 400CR when I rebuilt it.
 
Back
Top