pahusky
Husqvarna
Pro Class
About 1/8'' sheet rubber that I have no idea where it came from…
3/16'' alum. rivets with the matching 3/16'' alum. washers. I did not take the box out to do the mod. I needed to slip the tank and side panels on and off. I was able to drill and put the rivets through from the back side. The washers need to be used on the front or the rivets will pull thru the rubber. After I had each piece held in place where I wanted it, I outlined the box on the rubber and also put on a line up mark. Than I removed the side covers and tank to do the work on the marks. At this point the box could be pulled to make access easier, but I did it with the box in place. There are three different pieces…The sides are trimmed to just touch the inside of the side panels and the middle piece overlaps the side pieces and gets bent slightly forward when the gas tank is installed. The rubber is also trimmed to clear the air boot flange, in case it needs to come apart. It took a little time to get the bottoms trimmed right where the panels insert into the 'V', but it can be done... Best part; Nothing is visible when fully dressed.

In these pictures the bike was pressured washed but not really detailed. But I wanted to show the filter 'as is ' after the Ohio GNCC race. Mostly air borne type of collection, nothing splashed on…After the previous race, without the mod, there was about a 1/4'' of muck stacked on top of the filter. This seemed to work at stopping that...

Yes, the top end is pulled…did not look to bad. Going for piston, ring, etc…
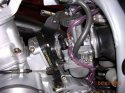
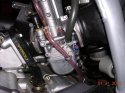
And a few head stays...One cracked, one broke...

3/16'' alum. rivets with the matching 3/16'' alum. washers. I did not take the box out to do the mod. I needed to slip the tank and side panels on and off. I was able to drill and put the rivets through from the back side. The washers need to be used on the front or the rivets will pull thru the rubber. After I had each piece held in place where I wanted it, I outlined the box on the rubber and also put on a line up mark. Than I removed the side covers and tank to do the work on the marks. At this point the box could be pulled to make access easier, but I did it with the box in place. There are three different pieces…The sides are trimmed to just touch the inside of the side panels and the middle piece overlaps the side pieces and gets bent slightly forward when the gas tank is installed. The rubber is also trimmed to clear the air boot flange, in case it needs to come apart. It took a little time to get the bottoms trimmed right where the panels insert into the 'V', but it can be done... Best part; Nothing is visible when fully dressed.
In these pictures the bike was pressured washed but not really detailed. But I wanted to show the filter 'as is ' after the Ohio GNCC race. Mostly air borne type of collection, nothing splashed on…After the previous race, without the mod, there was about a 1/4'' of muck stacked on top of the filter. This seemed to work at stopping that...
Yes, the top end is pulled…did not look to bad. Going for piston, ring, etc…
And a few head stays...One cracked, one broke...
 I'm next, thanx for the advice!


")
")