• Husqvarna Motorcycles Made In Sweden - About 1988 and older

  • Hi everyone,

    As you all know, Coffee (Dean) passed away a couple of years ago. I am Dean's ex-wife's husband and happen to have spent my career in tech. Over the years, I occasionally helped Dean with various tech issues.

    When he passed, I worked with his kids to gather the necessary credentials to keep this site running. Since then (and for however long they worked with Coffee), Woodschick and Dirtdame have been maintaining the site and covering the costs. Without their hard work and financial support, CafeHusky would have been lost.

    Over the past couple of weeks, I’ve been working to migrate the site to a free cloud compute instance so that Woodschick and Dirtdame no longer have to fund it. At the same time, I’ve updated the site to a current version of XenForo (the discussion software it runs on). The previous version was outdated and no longer supported.

    Unfortunately, the new software version doesn’t support importing the old site’s styles, so for now, you’ll see the XenForo default style. This may change over time.

    Coffee didn’t document the work he did on the site, so I’ve been digging through the old setup to understand how everything was running. There may still be things I’ve missed. One known issue is that email functionality is not yet working on the new site, but I hope to resolve this over time.

    Thanks for your patience and support!

1984 AE 500 restore

JWilson

Husqvarna
C Class
20131024_170106.jpg20131024_170124.jpg20131024_170147.jpg20131024_170200.jpg

I just bought my first Husqvarna two days ago.
After doing much research and asking questions, here on cafehusky, I have determined the bike is a 1984 AE500.
I came across it by accident when I was buying two other bikes, a 1984 and 1985 Yamaha XT600.
The guy said he wanted $600, however I told him I would give him $200 and to my surprise, he said yes.

I didn't have much hope for it getting running, however today I electrical taped the broken intake flange, put some light air tool oil in the cylinder, kicked it over to see if the plug would spark. It sparked! So I put the plug back in and filled the carb tube with some gas to get the carb a little wet, kicked it over about 7 times and BOOM, IT LIVES!!!

After reading almost every post that has to do with the 500s here, I feel very confident I can get her back to her former glory!

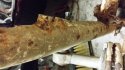
What I plan to do; she needs new front and rear fenders, the frame and swing arm needs to be blasted or sanded down and then powder coated, the rear shocks need rebuilt and springs need powder coating, the engine needs to be soda or bead blasted and then painted. I am going to tear into the motor to see what needs to be done and also try to figure out the auto trans (very weird having an auto :-) ).
I figure if I can keep the total cost of the project (including the purchase price) below $2000, my wife will be happy that I am happy!!! So my budget will be $1800 for the restore.
Does this sound like a reasonable budget or am I dreaming?

I will post some as bought pictures after I am able to clean my garage up (get all the other junk out - the two XT600s and a couple of my other bikes) so I can start dismantling this beauty.

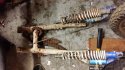
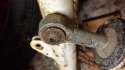
The one question I have is, the front shocks have rust on the chrome areas that the shocks would travel on. Is there any way to fix that by re-chroming, or should new/used ones be purchased?
I am sure there will be a lot of questions as I tear into stuff, so I am going to say thank you in advance for everyone's help!
 
Would forks from a 1986 400 work on my 500?
The CL add says 40MM forks 1986 400. Is $100 a good price?
 
Your Auto should use the same set as an Enduro or WR model & 400's where all enduro's. You usually have to either measure the forks or find out which model the forks are off of. Husky forks are interchangeable from different years & models, but WR forks are different from XC & CR models ones. I'd still measure the
ones your looking at as they could have been swapped some time in the bikes life time.

But before i'd spring for new forks i'd make sure the automatic transmission works, as the parts can be very expensive & hard to find.
Now that you've got it started here the order of repairs i'd do before i'd start buying too much.
1) i'd pull off all the cables clean & relube them, put the proper amount of air in the tires.
2) soak the chain in kero, & pull the wheels off & check the condition of the brakes. Clean & re lube everything & reassemble, Make sure the
brakes work correctly.
3) Then i'd flush out the transmission & then change the fluid.

Once you've gone this far you should be able to safely take the bike out for a easy test ride, don't discount the important of properly work brakes as they
are so so important on the Automatics, as when the motor is not under load it free wheels & you need good brakes to stop it.

After I determined if the transmission works properly, i'd go from there as far as pricing out the rest of the restoration.

I've seen too many guys who spend good money after bad when working on old bikes, you can do alot to bike without spending a ton on it by buying
everything new.

You've got a great woods bike, one of Husky's best.

Husky John
 
welcome to the greatest bike forum of all time... I have one thing to say about you and your new husky. You will forget about those jap bikes the first time you go out riding on your rebuilt 500. Guaranteed !
 
Hi mate, I am in the middle (or more accurately, the closing stages) of restoring the same bike.

One thing I would definitely recommend doing before you contemplate test riding it - take off the left side casing to check the condition of the main clutch springs. It;'s common that these break and if you try to engage the drive before you check the condition of the springs, you might end up causing more damage to the soft alloy casing.

If it all looks OK, like the clutch below, then sure, take it for a ride.....but getting yourself some kind of spring retainer as Michel has shown above will be a very good (cheap) investment.84husky500auto2.jpg
 
People only stop riding auto huskies when they break a clutch and they cant afford to fix it. look inside first as ol mate says, there must be a reason why its parked up.
 
Thank you all for the replies!

I oiled all the cables, soaked the chain and then put it all back together.
I took the side plate off and did not see anything missing or broken, the springs feel tight when I pulled on them with a screw driver.

I fired it up and adjusted the throttle cable so it idled properly (put too much oil in the gas cause it smoked pretty good...)
I engaged the auto drive and twisted the throttle a little and it started to move. The brakes aren't the best that is for sure.
I live in a subdivision so I couldn't take it too fast, however I did get it into second.
I haven't ridden a 2 stroke dirt bike in about 20 years and wow did I get the bug back!!! Last dirt bike I had was a early 80's Can-AM 370 Qualifier. This Husky has a lot more power, however it sure brings back great memories of when I was a teenager!
I am pretty satisfied that she will be a good project with not too much wrong.


I am going to start tearing her down and get the frame, swing arm and rear springs blasted and powder coated.
I have a sand blasting cabinet at home and want to clean up all the smaller parts with that. What media would I use on the engine case and fins, I don't want to use anything too harsh, so what media would be recommended?
Also the front forks, the chrome has come off and has rust pits. Would anyone recommend bringing the to a chrome shop to restore them or getting new to me ones?
One thing I have not seen on the forum is, where can I get a rebuild kit for the rear shocks, preferably in North America?
Also where would I get one of those spring retainers?

I will post pictures as I progress and have a lot more questions I'm sure!
The 2 Yamaha XT 600s have been put on hold and into storage cause this Husky is going to make me smile a lot more when it is done!

Once again, thanks for all the replies, they were very helpful in determining how to proceed.
 
sounds like you have the bug pretty good....
be sure to check out phillip at husqvarnaparts...he has lots of stuff for your year. he isnt the cheapest, but everything i have bought from him has been great quality and correct...he makes a lot of stuff in stainless, like motor mounts and springs...he has lots of ohlins stuff that you can be confident will fit..hes pretty short in emails but very helpful over the phone

Husqvarna-parts.com
 
Download the parts manual from Phillip as it tells how long each particular bolt for what part it holds on. very important after you put all the bolt into a bucket and send them off to plated! get the footpeg springs, chain tensioner spring, brake arm and springs etc plated as well.

buy a bucket of 6mm, 8mm 10mm and a few bigger nylock nuts and throw all the existing ones away. I got the carb, brake arms and engine plates water blasted which brought then up nice. Satin Black etch primer did a great job on the motor and lastly, make sure you put dummy bolts into all the thread holes on the frame before powdercoating it and try to cover the shocker pins at the top as I had to sand mine down as the powder coat was to thick for the bushes to slip over.

also degrease the frame very carefully as the heat will have any grease anywhere melt and run over your frame. check the subframe drain holes....

also make sure you have bolts through the coil mounts as its hard to get an earth if its thick with powder.

you should be able to get a set of WR fork legs from someone here before undertaking the very expensive rechroming trip.

ps Phillip has (real) leakproof fork seals (unheard of on a husky)

enjoy and post plenty of pics, sounds like you've won the lottery there....
 
So I spent yesterday tearing apart the bike and all was good except I could not get the rear shocks off.
The 6mm allen bolt just stripped on both the swing arm bolts. I tried a hammer to knock them out, I tried vise grips to turn the bolt. All to no avail

Can someone give me some ideas on this? I do not have an oxy acetylene torch, only a MIG welder. Pic included so see what it looks like.

I spent a couple hours stripping down the motor and it looks very nice inside. It does look like there was an issue previously that someone fixed because the left case has grooves. I saw them before, however all the springs looked good so I figured it was from before. Pics in the next post.

The cylinder walls look very nice. I think after I get the whole motor torn down, I will measure the ring gap and piston to wall gap to make sure they are good. If they are good (and they look good), I will just hone the cylinder and put a new ring in.
Any issues with this approach? Any thing I need to know first?

I want to change all the bearings, including the crank bearing. Just because I am there and I might as well, as long as they aren't a fortune :-)

The swing arm needle bearings are completely shot and someone tried to weld the kick stand bracket... tried is the key word here. Looks like I will be breaking out the grinder and MIG welder for this one.

I was blasting all my parts that I could fit in my blast cabinet and my compressor quit on me. Looks like the pressure switch. It really sucks because I had just finished my handle bars and was moving on to the rest.
I wanted to get all except the frame and swing arm blasted, and then bring them all over to the powder coater. He said, if he just had to blast the swing arm and frame, he would charge me $200.00 to do all the parts including the lower front shocks. After calling around and speaking to other shops, that is a pretty good deal here. I spoke to a couple body shops and they recommended this guy so hopefully he is good!

I figured I would start looking for some tubes that I could use for my front shocks. I see some on e-bay and craigslist so now I am going to attempt to take the front shocks apart to replace the tubes.

More suggestions on what I should look for or look out for as I progress would be much appreciated!!!
 

Attachments

  • 20131028_212220.jpg
    20131028_212220.jpg
    129.1 KB · Views: 39
  • 20131028_222340.jpg
    20131028_222340.jpg
    86.7 KB · Views: 38
  • 20131028_222357.jpg
    20131028_222357.jpg
    89.1 KB · Views: 41
Frame ready to be taken to the blaster/powder coater!
20131028_212152.jpg

Someone tried to fix the kick stand bracket...
20131028_222422.jpg

Handle bars blasted before my compressor decided to stop working. Time to buy a pressure switch...
20131028_222821.jpg

I think this might just be a hone and rering rebuild with new bearings throughout. The cylinder looks very nice!
20131028_205127.jpg
 
Here are pictures of the springs and case.
I would like to hear opinions on what to do. If the case doesn't leak, does it matter if there is all that scoring? I would think, it would make the case weak and may cause problems down the road?

auto clutch
20131028_204851.jpg

The case
20131028_223305.jpg

Right side
20131028_212125.jpg


Thanks again all!!!
 
Frame ready to be taken to the blaster/powder coater!
View attachment 33048

Someone tried to fix the kick stand bracket...
View attachment 33049

Handle bars blasted before my compressor decided to stop working. Time to buy a pressure switch...
View attachment 33050

I think this might just be a hone and rering rebuild with new bearings throughout. The cylinder looks very nice!
View attachment 33051


Considering the neglect the outside of the bike has been subject to, that cylinder & piston don't look bad at all.....nice one !
 
Here are pictures of the springs and case.
I would like to hear opinions on what to do. If the case doesn't leak, does it matter if there is all that scoring? I would think, it would make the case weak and may cause problems down the road?

auto clutch
View attachment 33052

The case
View attachment 33053

Right side
View attachment 33054


Thanks again all!!!


Wow the inside of your casing looks identical to mine - this indicates that they have had some busted springs trapped in there, just like mine. All the more reason to make yourself a copy of one of the various spring retainers to prevent that happening again. I've not had mine running yet but it sounds like that it's hit & miss with regards to the potential of the springs breaking on you - naturally caring for the bike by changing the fluid after each serious ride is a great idea, but if the springs are not the greatest quality, then they will break, sometime, sooner or later.....and that's when you'll be very greatful you've got your spring retainer in place
 
Back
Top