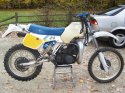
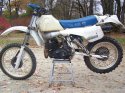
I got this 1984 250WR less than a mile from my house and my wife made the mistake of telling me about it. It started right up and ran well, however I checked the compression and found only 100psi so I pulled the cylinder and found about .010 clearance between the cylinder and piston. Further inspection showed both bad wheel and swingarm bearings. The DLS arms were missing off the front brake plate and the intake manifold had a rot tear in the rubber flange. I got this in the fall of 2007 and decided to do a nice rider restoration on it. Rather than powdercoat the frame, I decided to strip it down to metal because of the crappy paint that wore off. This year having gotten intense pressure to reduce the pack, I decided to use Rust Oleum Appliance Epoxy on the frame rather than the PPG Concept I purchased to do several frames. After testing a sample and allowing it to cure fully, I was impressed with the finish quality of the Rust Oleum. The frame was shot with it in April just previous to me having to move to Georgia for a temporary assignment. On the triple clamps I used Rust Oleum engine primer and semi gloss black engine paint. Again I was pleased with the finished. After allowing to cure, I did a light polish with fine steel wool. That produced a finish very closely resembling Husqvarna engine finish
-
Hi everyone,
As you all know, Coffee (Dean) passed away a couple of years ago. I am Dean's ex-wife's husband and happen to have spent my career in tech. Over the years, I occasionally helped Dean with various tech issues.
When he passed, I worked with his kids to gather the necessary credentials to keep this site running. Since then (and for however long they worked with Coffee), Woodschick and Dirtdame have been maintaining the site and covering the costs. Without their hard work and financial support, CafeHusky would have been lost.
Over the past couple of weeks, I’ve been working to migrate the site to a free cloud compute instance so that Woodschick and Dirtdame no longer have to fund it. At the same time, I’ve updated the site to a current version of XenForo (the discussion software it runs on). The previous version was outdated and no longer supported.
Unfortunately, the new software version doesn’t support importing the old site’s styles, so for now, you’ll see the XenForo default style. This may change over time.
Coffee didn’t document the work he did on the site, so I’ve been digging through the old setup to understand how everything was running. There may still be things I’ve missed. One known issue is that email functionality is not yet working on the new site, but I hope to resolve this over time.
Thanks for your patience and support!
- Husqvarna Motorcycles
- Husqvarna Motorcycles - Sweden
- Vintage/Left Kickers
- Vintage Restoration Projects
You are using an out of date browser. It may not display this or other websites correctly.
You should upgrade or use an alternative browser.
You should upgrade or use an alternative browser.
1984 250WR Rider Restoration
- Thread starter jimspac
- Start date
oldbikedude
Husqvarna
Pro Class
That looks like a great start to a fine bike. Is the rust oleum paint rattle can or used in a paint gun?
 , you'll be glad, u took those before pictures, to look back on those with lots of pride later.. I've been trying
That looks like a great start to a fine bike. Is the rust oleum paint rattle can or used in a paint gun?
The Rust Oleum Appliance Epoxy and The Low Gloss Engine paint used here are both rattle can applications. I did buy PPG Concept to use with my HVLP spray guns but decided to try the Rust Oleum Epoxy after seeing how it worked on one of Ruwfo's rider restorations.
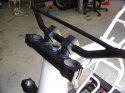
Over the weekend I have managed to weld 8 X 1.25 Flange hex nuts into the ends of the handlebars on this build and on the 1985 400WRX soon to be documented here. This is a Team Husky trick that I picked here about 4 years ago. This is to replace the holding hardware that came with the handguards mounted on these 2 bikes. If you look at the 4th picture in the 1st post you will see the end of the handlebar
Also painted the front motor mount brackets on this build. I had some fun tracing a washer onto a roll of masking tape 16 times to make masking disks to neaten up the grounding capability of the brackets.
Also painted the front motor mount brackets on this build. I had some fun tracing a washer onto a roll of masking tape 16 times to make masking disks to neaten up the grounding capability of the brackets.
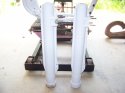
This week I was preparing the front fork components for assembly and found that one of the tubes had chipped and peeled chrome within the travel region while using lacquer thinner to clean the overspray off the tubes for a previous owner's shoddy frame painting.
Luckily I remembered I had a set of forks for a 1985 XC that I was going to use the tubes for the 1986 400WR that had both tubes rusted and pitted. Because of the difference between the 1985 and 1986 tubes I decided to try to replace the 1984 tubes with them. Perfect match!!
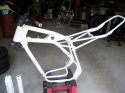
I also welded a harvested kickstand bracket from a CR swingarm onto the swingarm for this build. After blending the weld in and finding a few spots that needed weld touchup, I started preparing the wheels for the rear wheel bearings to be replaced and new EBC brake shoes in both wheels. I found excessive wear in the rear brake shaft so I will be reaming the backing plate for a bronze sleeve bushing. This should help improve the rear brake action.
Luckily I remembered I had a set of forks for a 1985 XC that I was going to use the tubes for the 1986 400WR that had both tubes rusted and pitted. Because of the difference between the 1985 and 1986 tubes I decided to try to replace the 1984 tubes with them. Perfect match!!
I also welded a harvested kickstand bracket from a CR swingarm onto the swingarm for this build. After blending the weld in and finding a few spots that needed weld touchup, I started preparing the wheels for the rear wheel bearings to be replaced and new EBC brake shoes in both wheels. I found excessive wear in the rear brake shaft so I will be reaming the backing plate for a bronze sleeve bushing. This should help improve the rear brake action.
Some further progress this week. I installed the new seals (2) each leg. Got the forks assembled Friday. Pushed the tube to the bottom to center the dampers, then lightly tightened the bottom bolt. Checked for binding, did not feel any, so tightened them good. Filled both legs with ATF 4" from the top of the tube with springs out and forks at full compression. Assembled with springs and found a matching set of fork caps seeing it came to me with mismatched fork caps and a thick washer on top of one spring only. With everything assembled I let them sit for a day standing on top of clean cardboard to check for leaks.
Seeing that the frame got knocked off the service jack by one of the cats this week and sustaining a few nicks in the not quite cured frame, I decided to borrow the wheels from the 1982 250WR rolling frame(senior dormant project) and the swingarm I bought from Ruwfo for the 83 430WR I plan to build. Got the swingarm mounted loose (pivot rod with only nut on one side) and rear wheel mount with axle and nut only..
Biggest holdup was the painting of the Acerbis fenders. I decided to try Rust-Oleum paint for plastic I am impressed with the paint, the holdup was me building paint too fast in sub standard lighting. The right way is to resist getting full coverage on the first coat. Use the first coat as a fog or tack coat. Allow to dry for over an hour or like me spraying in my cooler than workshop basement I let sit for over a day. I redid the rear fender twice and the front 3 times because if you build the 2nd coat too heavy like I did, you will get crackle like paint crazing.


It was a surprise to find after installing the forks in the clamps that it came with CR or XC damping rods. After this amount of time playing with the collection I am really not surprised, just in myself that I never thought to check before, After all it is a WR")
Seeing that the frame got knocked off the service jack by one of the cats this week and sustaining a few nicks in the not quite cured frame, I decided to borrow the wheels from the 1982 250WR rolling frame(senior dormant project) and the swingarm I bought from Ruwfo for the 83 430WR I plan to build. Got the swingarm mounted loose (pivot rod with only nut on one side) and rear wheel mount with axle and nut only..
Biggest holdup was the painting of the Acerbis fenders. I decided to try Rust-Oleum paint for plastic I am impressed with the paint, the holdup was me building paint too fast in sub standard lighting. The right way is to resist getting full coverage on the first coat. Use the first coat as a fog or tack coat. Allow to dry for over an hour or like me spraying in my cooler than workshop basement I let sit for over a day. I redid the rear fender twice and the front 3 times because if you build the 2nd coat too heavy like I did, you will get crackle like paint crazing.
It was a surprise to find after installing the forks in the clamps that it came with CR or XC damping rods. After this amount of time playing with the collection I am really not surprised, just in myself that I never thought to check before, After all it is a WR
One of the problems of doing like tasks on multiple projects, individual issue can get confused between them I welded the kickstand bracket onto the swingarm for this build and the 1978 swingarm for a different project. I mentioned several posts back that I found some defects in the weld. I found today that issue is on the 1978 swingarm, 

not this one
not this one
Now I have to find the time to extract the bottom end for this build from the 1978 ML devopement project. It served well to develope the design for conversion front motor mounts to enable installation of a primary kick engine into the sharp turning 78 ML frames I have. The cylinder was bored about 3 years ago. Because I never know when something can be assembled, I found some large Zip Lock storage bags from a former employer that are large enough to store a complete bottom end. Keeps things from rusting up waiting for an opportunity to assemble. I just need to radius the port edges and find the ring and wrist pin set. Some things got misplaced during the move of components from the basement to my barn workshop 2 years ago