• Husqvarna Motorcycles Made In Sweden - About 1988 and older

  • Hi everyone,

    As you all know, Coffee (Dean) passed away a couple of years ago. I am Dean's ex-wife's husband and happen to have spent my career in tech. Over the years, I occasionally helped Dean with various tech issues.

    When he passed, I worked with his kids to gather the necessary credentials to keep this site running. Since then (and for however long they worked with Coffee), Woodschick and Dirtdame have been maintaining the site and covering the costs. Without their hard work and financial support, CafeHusky would have been lost.

    Over the past couple of weeks, I’ve been working to migrate the site to a free cloud compute instance so that Woodschick and Dirtdame no longer have to fund it. At the same time, I’ve updated the site to a current version of XenForo (the discussion software it runs on). The previous version was outdated and no longer supported.

    Unfortunately, the new software version doesn’t support importing the old site’s styles, so for now, you’ll see the XenForo default style. This may change over time.

    Coffee didn’t document the work he did on the site, so I’ve been digging through the old setup to understand how everything was running. There may still be things I’ve missed. One known issue is that email functionality is not yet working on the new site, but I hope to resolve this over time.

    Thanks for your patience and support!

1979 Husqvarna 250 wr overhaul

vandev

Husqvarna
AA Class
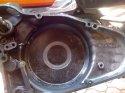
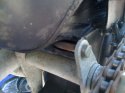
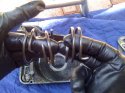
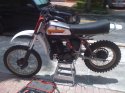
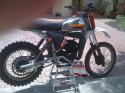
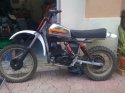
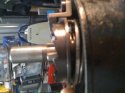
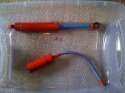
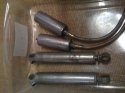
Hey Guy's first post great site.. I bought a project bike..or should I say I didn't look careful enough and now have a complete overhaul as it looks. The guy who said he rebuilt the bike did a horrible job. Missing parts, screws, wrong screws, wrong parts, forks are almost locked up and rear shocks are completely gone. The kick start spring was broken in three places as I removed that today. Looks like I am sending front forks to Racetec and rear shocks to Ohlin's to be rebuilt. Forks will be getting gold valves, new springs and seals. They will let me know how the tubes are. Should I go to 40's or is it really not that much of a difference? When I pulled the transmission cover I found this ground out circle on the cover and makes me a bit nervous of what caused this. Maybe someone can chime in. When I get a new spring for the kick start I will see if it kicks over. If not looks like I will be sending that out as well. Well, any advice will be greatly appreciated... Haven't had a dirt bike since high school so a bit rusty. Anyway, will take any and all criticism.

Thanks Chris
 

Attachments

  • photo11.JPG
    photo11.JPG
    135 KB · Views: 149
  • photo12.JPG
    photo12.JPG
    94.3 KB · Views: 151
  • photo13.JPG
    photo13.JPG
    139.9 KB · Views: 152
  • photo14.JPG
    photo14.JPG
    136.6 KB · Views: 153
  • photo15.JPG
    photo15.JPG
    143.5 KB · Views: 155
  • photo16.JPG
    photo16.JPG
    129.5 KB · Views: 155
Welcome to the group, we love pictures before and after!!
I would use the cases as is if you are not taking the motor apart, but I would get another set of cases otherwise.
There should be a steel insert in the case where its broken, like the other side.
Most guys go for the 40's because the stock 35's are prone to bending. I have race tech 35's on my 77, but they are not as long as yours, they work pretty good.
The 40's will aslo improve your steering a bit, because of the bigger tubes and the triple clamps are stronger. The front wheel doesn't flex as much.
I would suggest if you go with the 40's, ride it awhile before you do the race tech mods, you may not feel you need them.
Otherwise, the bike doesn't look like it will be to hard to restore. Just takes time and money!!

Thanks Ron, I appreciate the advice. It's been awhile since i was running in the dirt. High School to be exact.. I grew up in California and now live in Florida. There is a pretty big vintage race club here so it will be easy to slowly get back up to speed. I think i may go for the 40's as it's only about $100.00 more out of pocket to pick up some off ebay. Thanks.I will post all before and after of what i am doing.

Chris
 
Hey, Can anyone tell me what year 40mm front forks and tree's i can use? Is it only 80-81 or can i go higher......

Thanks Chris
 
They will all bolt on, through 84 I believe. You may have to get an axle and spacer. I used a complete 84 front end on my 79.
 
Hey, i just was checking the chain, sprockets front and back and noticed the drive sprocket has allot of play.. I figure that is not a good sign and not normal... I now understand parting out more than ever...:rolleyes:
 
I need so help with the kickstart spring preload. I got a new spring but for the life of me, cant get it set right. If I set it like the book shows you, it only engages at the bottom of the stroke. If I set it to engage like in the book 2-3cm, it is always engaged unless you push the kick starter back to the top. Spent all day yesterday and this morning..very frustrating for something so simple. I think it may be caused by the spring end as the book says put the long end in the case. Booth ends of my spring are the same length. Do I need to trim or cut the one end so the gear is level? Any help would be great.

Thanks All, Chris
 

Attachments

  • photo.JPG
    photo.JPG
    122.6 KB · Views: 38
Hi Chris,
Very difficult to explain and I couldn't make sense from the manual either.
Pay close attention to the ramps on the gear and the hold down clamp on the "cover side".
The ramps allow the gear to slide out to the hold down clamp, when between the ramps.
When you install the gear you have to allow for some preload on the spring, but at the same time verify the position of the ramps.
Then while holding the assembly, install the kicker to prevent it from unwinding.
Once the kicker is installed, as you rotate the kicker back, the ramps allow the gear to extend and mesh with the "engine side" gear.
When the gear is positioned correctly, it will be moved outward when the kicker is about 3/4" from the bumper stop on the case and will be engaging the engine side gear.
If the kicker doesn't return properly, hold the shaft (so it doesn't unwind) and move the kicker on the splines counter-clockwise to increase preload on the spring. If you have to much preload, you will hear a clicking sound in the engine, when you turn the engine over.
Ron


Thanks again Ron, I think on day 2 i did what you explained but was either to short or two long. I still believe i need to trim down the spring as it makes the clamp crooked.. It looks like a 1/16 i need to trim. What do you think?

Thanks Chris
 
Hi Chris,
I'm trying to do this visual from memory. I can't think of where the spring end could be getting in the way?
What makes the clamp crooked? That's the hold down clamp with two screws right? You may be winding it up to tight. Try re-clocking the gear to reduce the preload. It fits on the shaft in four quadrants.
Ron
HEy Ron, Look at my 7th reply in this thread. I posted a picture . If you look on the right side you can see the spring top hitting the clamp that is secured by the circlip. You can see that it pushes the gear on top . You can see it right beneath the hold down clamp. This is why i am having problems setting the stupid thing.

Chris
 
I need so help with the kickstart spring preload. I got a new spring but for the life of me, cant get it set right. If I set it like the book shows you, it only engages at the bottom of the stroke. If I set it to engage like in the book 2-3cm, it is always engaged unless you push the kick starter back to the top. Spent all day yesterday and this morning..very frustrating for something so simple. I think it may be caused by the spring end as the book says put the long end in the case. Booth ends of my spring are the same length. Do I need to trim or cut the one end so the gear is level? Any help would be great.

Thanks All, Chris

Hi Chris,
Yes, I can see how the spring end would drag on the gear and prevent it from moving in and out properly.
Since it is a new spring, I would grind the protruding end off, just slightly above the retainer plate.
Also, make sure the spring end goes in the second hole in the retainer plate as you find the spring end, rotating the retainer plate clockwise.
Ron
Hey Ron , that's the other thing. The book shows 2 holes in the retainer plate. I only have one.

chris
 
I imagine the engineers put it there for a reason, but I don't know why. It will only increase the spring preload, slightly.
Hang in there, you'll get working.
Ron
 
Well, Finally got it to kick over..took about 20 kicks but she fired up. Pulled apart the carb and reeds and blasted them with intake cleaner... Well, thats all i had on hand. Seems to be leaking up at the chamber connection at the head. I noticed some black soot when i got the bike so i assumed it was leaking there. she sound's good....a little smoke.... not really at all for a 2 stroke though. The carb needs a new intake manifold as the rubber is cracked a bit on it. I also noticed the clutch does not engage... Any idea's as to what could cause? The clutch lever is pulling as i can see the lever on the case move a inch or so. I also have a sprocket wobble that i need to find out what is going on . Anyway, she sound good though....

Thanks Chris
 
Plates on old huskys are notorious for "sticking" together when left for a while. find a hill and roll and plop in gear and then drive around with the clutch pulled in. After a bit, it will swirl the oil in between the plates. As long as steel and fiber are stuck they will drive the basket and hence the bike. If stubborn stuck (this happens) lay on right side after turning off gas and then remove the clutch cover carefully and gently seperate the plates while holding in clutch.
 
Plates on old huskys are notorious for "sticking" together when left for a while. find a hill and roll and plop in gear and then drive around with the clutch pulled in. After a bit, it will swirl the oil in between the plates. As long as steel and fiber are stuck they will drive the basket and hence the bike. If stubborn stuck (this happens) lay on right side after turning off gas and then remove the clutch cover carefully and gently seperate the plates while holding in clutch.


Thanks Joe, I will give it a try... And thanks as i live in florida and hense...no hills...

Thanks Again, Chris
 
Update... Well I finally got to getting my back suspension in order. I pulled the shocks and are going to send them out to Steve at Vintage Ohlin's for a complete rebuild. He told me to send without refinish and paint but I new the guy i got them from probably just painted over them to sell the bike. Well, he did. He painted right over the rust. I thought i would post how i stripped these in a few hours and de rusted them as well. I will give them a sand over tomorrow and prime them. I am ordering the paint from Phil and vintage parts tomorrow. Once i get them painted will send out this week to Steve. I was able to get the springs off by hand so i think i will need new springs. I just put the top of the shock on the bench and pushed down with one hand and released the bottom spring retainer with my other. Will update this week for the sanding, prime and paint. Fun stuff. I think i am going to have the spring retainers powder coated or anodized. Will check tomorrow. Ok i sanded them with 320 and prepped them one more time with rust remover.Pic number 7

Chris
 

Attachments

  • shock_1.JPG
    shock_1.JPG
    145.5 KB · Views: 42
  • shock_2.JPG
    shock_2.JPG
    139.9 KB · Views: 41
  • shock_3.JPG
    shock_3.JPG
    127.8 KB · Views: 44
  • shock_4.JPG
    shock_4.JPG
    180.6 KB · Views: 43
  • shock_5.JPG
    shock_5.JPG
    130 KB · Views: 40
  • shock_6.JPG
    shock_6.JPG
    116.2 KB · Views: 44
  • shock_7.JPG
    shock_7.JPG
    132.8 KB · Views: 39
Back
Top