• Husqvarna Motorcycles Made In Sweden - About 1988 and older

  • Hi everyone,

    As you all know, Coffee (Dean) passed away a couple of years ago. I am Dean's ex-wife's husband and happen to have spent my career in tech. Over the years, I occasionally helped Dean with various tech issues.

    When he passed, I worked with his kids to gather the necessary credentials to keep this site running. Since then (and for however long they worked with Coffee), Woodschick and Dirtdame have been maintaining the site and covering the costs. Without their hard work and financial support, CafeHusky would have been lost.

    Over the past couple of weeks, I’ve been working to migrate the site to a free cloud compute instance so that Woodschick and Dirtdame no longer have to fund it. At the same time, I’ve updated the site to a current version of XenForo (the discussion software it runs on). The previous version was outdated and no longer supported.

    Unfortunately, the new software version doesn’t support importing the old site’s styles, so for now, you’ll see the XenForo default style. This may change over time.

    Coffee didn’t document the work he did on the site, so I’ve been digging through the old setup to understand how everything was running. There may still be things I’ve missed. One known issue is that email functionality is not yet working on the new site, but I hope to resolve this over time.

    Thanks for your patience and support!

1975 ML CR 360 GP

Billd

Husqvarna
AA Class
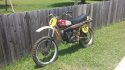
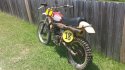
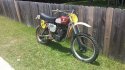
Been looking for a Husky or something my age for a while and found this 3 miles from my house....to good to pass up!! Wife's not too happy, specially when I told her I got it for 2 1/2 softball bats!! lol
Everything is there and nothing broken, just a bit of rust and hard rubber from no use. The motor turns over and the cylinder looks fine with no scratches or anything and has ok compression, (piston is a 81.92). The aft cylinder bolt hole will need to be helicoiled as its stripped, The gear's seem to shift fine but I'm sure the clutch plates need a going over or new. The oil that came out of the crankcase liked old and grey, but no chunks of metal, just what I would consider normal metal shavings on the drain magnate. Filled it up with 1.6L of Marval Mystery oil to sorta flush it and at least I have no leaks...guess that's good.
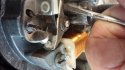
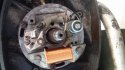
No spark from the Femsa ignition, and the points dont look too good, probably burnt. Should have a fly wheel puller today or tomorrow to get a better look. Any down side of switching to a CDI ignition? Any info on ohm test for the coil or the rest of the ignition. May just luck out and need points....
I'm doing this for a project and plan on riding it, but I am gonna blast and powder coat the frame since thats probably as cheap as paint. For my first Social Security Check in Dec, I will have the tank painted!!

Is there a directory of older Husky restorers or groups by area?...I'm in Pensacola Fl.

Anyway, this site looks like a wealth of info and fun!! Rock on!!
billd
 

Attachments

  • 0623151248a.jpg
    0623151248a.jpg
    185.3 KB · Views: 103
  • 0623151248b.jpg
    0623151248b.jpg
    189 KB · Views: 96
  • 0623151250.jpg
    0623151250.jpg
    192 KB · Views: 94
The FEMSA point ignition is much more reliable over a same vintage Motoplat and the FEMSA was mostly used on the WRs up to maybe 77 or 78. I am relatively sure the GP models had the internal rotor Motoplat. Points you can get from a Bultaco dealer like Hugh's in NY and Hogan's Cycle in Agawam, MA. You can likely get away with a generic 6 volt coil as well
 
Is the a way to ohm out the primary coil or condenser.points need to be replaced.....
I guess for the points to open there must be a lobe on the flywheel cover?
?
 

Attachments

  • 0630151412.jpg
    0630151412.jpg
    101.7 KB · Views: 47
  • 0630151410a.jpg
    0630151410a.jpg
    93.7 KB · Views: 48
Am I missing the right side primary coil?....the maintenance manual shows a coil on each side...... The flywheel has 4 magintec wear marks
 
The point lobe is on the shank of the rotor on the inside. The missing coil is likely the lighting coil, not the primary. Helicoil is the best way to repair threads in magnesium cases. And once again I am sure that ignition does not belong in the GP models
 
Couple of questions.... According to the Husky Workshop manual (TA-33) for my ML engine...standard bore is 82.05. 1st over is 82.55, 2nd over is 83.05
my piston says 81.92. I carefully took my ring off the piston after I got it unstuck (only in the frontside) put it in the cylinder and the rig gap is like .67mm which seem to be within tolerance (.80). When they say lower part of the cylinder bore thats the botton of the cylinder i'm guessing (flip it over....) right. checked it top and bottom anyway and got the same.

guess my question is, what would the stock piston numbers say?

using my harbor fright mic guage it says my bore is 81.95-82.03.....lol guess my engine shrunk!! gonna take it to a machine shop tomorrow with a real gauge and see what a proffessional gets....I drive boats for a living!!lol
On the brightside, it looks like all the porting enhancements were done according to the Husky service bulletins, cause I have pretty new grind marks....I dont think this bike was used that much. I know I'm the 2nd real owner. The guy I bought it from just had it in his garage for 3 month's per the bill of sale and he got it from the guy who bought it new in 1975.
 
Sent my engine to Larry Stahl in GA and it should be there tomorrow. New seals, bearings and see what else is needed. may as well do it right the first time.
I'm looking for the correct year side stand, the one that bolts to the frame (I think the rear motor mounts?) Thnk 75-76 were the only 2 years husky used this style.
Any suggestion on painting the frame, I'm not going to powdercoat it since I want to ride it. What type of primer and topcoat?
How do you get the rear Girlings apart? can they be rebuilt?
 

Attachments

  • 2015-07-11_08h30_57.png
    2015-07-11_08h30_57.png
    175 KB · Views: 28
As I recall the Gas Girlings were not meant to be rebuilt. I have heard some seals are proprietary and not available from a bearing supplier. If you can get them apart you may need to have a cap made and the body threaded to get them back together as I am under the impression the shock is crimped but I could be wrong as I never took a set apart as of yet.

For paint some here use Rustoleum Silver Appliance epoxy in spray can. I have used white on a newer frame and I am very impressed with it. Rustoleum species to use no primer under it.
 
Thanks for the help guys!!. Lottsa knowledge here. Saw a video on YouTube about drilling and refilling shocks for vw's in Europe. They don't seem to waste as much as we do.
Took the shock springs off and pumped them up and down a bunch...seem ok as they dont leak. Paint and back together. Rubber bushings were ok but I would like some new ones as they probably wont hold up to riding.
Need a bunchof other runner bushings, like swing arm elastic ones and fork tops and fender mount ones too.... I think this project is still cheaper than doing a boat and you dont have to mess with fibreglass!!
 
guess my question is, what would the stock piston numbers say?
using my harbor fright mic guage it says my bore is 81.95-82.03

I have a stock piston from a 75 360cr I used to own and it says 81.95 so I guess that was the piston size from the factory.

When you mic the cylinder be sure and do it at the bottom of the bore, this is where the piston clearance is measured. Also its always a good idea to mic the bore side to side as well as front to rear to see how far out of round it is. Sometimes the piston will be within tolerance one direction but not the other.

Just a side note, its very important to follow factory torque specs for the head bolts and nuts. The cylinder liner on these bikes were notorious for moving and the result was seizing. I bought a new 75 360 back in the day and it happened to me while racing. Nice thing was Husky replaced it at no cost. I think there was a service bulletin issued with lower torque specs.
 
You will also find more wear in the mid point of the cylinder as there is less wall near the intake and exhaust ports
 
The thing I noticed about my (76) 360 is it vibrates a lot, so keep an eye on all the bolts.
 
While Larry has your engine apart, have him check the crank for balance. Sometimes the crank flywheels need to be turned concentric to the shafts. This is the time to get rid of most vibration before you even start it up and find it. Seems common with some of the big bores.
 
While Larry has your engine apart, have him check the crank for balance. Sometimes the crank flywheels need to be turned concentric to the shafts. This is the time to get rid of most vibration before you even start it up and find it. Seems common with some of the big bores.
 
I think its a toss up based on positive comments I've read on this site from people that used the news letter color and from looking at the restored Husky pictures on Vintage Husky Restorations. They both look okay to me.

Honestly though, I've never seen an exact match and I believe that the color used today even by professional Husky restorers is not exactly like the OEM color. I used to have a 68 Husky that had 4 inches of the rear fender that was untouched by the elements as it was hidden under the inner fender, it was even still glossy and the rest of the fender and frame paint was shot. That color reminded me of the new Huskys I owned in the 70's. The colors used today are close but not the same and frankly I don't think it matters. When they're assembled vintage Huskys are awesome regardless of the frame color variation.
 
Back
Top