Phoenix
Husqvarna
AA Class
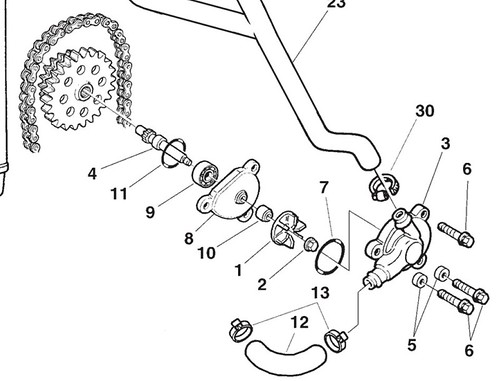
In the process of doing a piston/rings/cam chain job on the umpteen-zillion hour TXC 450, we noticed some wear on the edges of the water pump impeller. Looking closer, there was also wear on the inside of the pump cover. As we went to reinstall the head, my friend and I asked each other...do you remember a nut holding the impeller on the shaft??? My friend took it off, but I remember seeing it just fall apart in his hand.
We came to the conclusion that the impeller was not secured to the shaft and was probably wobbling its way around. The center of the impeller is keyed for the water pump shaft and that flat surface had long since worn away, leaving a nice round hole. So where the heck did the nut go? Was it ever on there at all? I'm kind of leaning towards the latter...there was never actually a nut in holding the impeller on.
Anyway, the impeller needed to be replaced. An impeller was about $20 from halls and the oversized kit was $45. What the heck...let's spring for the good stuff while we're freshening up the bike.
Here's the install...
The kit comes with a new water pump cover. Nothing blingy, but it is slightly different than the stock one.

Front view...

Fortunately, this water pump cover is a lot easier to remove than my '10 TXC 250. No gaskets, just a seal. Unbolt the cover and remove.
Here is a comparison of the two impellers side-by-side. The new one makes the old one look like a 98 pound weakling! I know what you're thinking...liar...there's the nut! We just put it back on as a placeholder with an Ace Hardware nut until the new kit came in.

Side view...

Carefully remove the old impeller. The cams are not in this bike right now to hold everything in place, so I took a firm grip of the impeller and the chain wheel with one hand and removed the bold with the other. With the cams in, you should have nothing to worry about.
New impeller installed. This one has the keyed flat surface in the hole, so it fits on nicely and doesn't make contact with the flat surface behind.

Install the new cover with the O-ring from the old cover (or buy a new one like we did).

Here's a look at the old impeller and the wear marks on the edges of the fins and the interior of the cover.

We came to the conclusion that the impeller was not secured to the shaft and was probably wobbling its way around. The center of the impeller is keyed for the water pump shaft and that flat surface had long since worn away, leaving a nice round hole. So where the heck did the nut go? Was it ever on there at all? I'm kind of leaning towards the latter...there was never actually a nut in holding the impeller on.
Anyway, the impeller needed to be replaced. An impeller was about $20 from halls and the oversized kit was $45. What the heck...let's spring for the good stuff while we're freshening up the bike.
Here's the install...
The kit comes with a new water pump cover. Nothing blingy, but it is slightly different than the stock one.

Front view...

Fortunately, this water pump cover is a lot easier to remove than my '10 TXC 250. No gaskets, just a seal. Unbolt the cover and remove.
Here is a comparison of the two impellers side-by-side. The new one makes the old one look like a 98 pound weakling! I know what you're thinking...liar...there's the nut! We just put it back on as a placeholder with an Ace Hardware nut until the new kit came in.

Side view...

Carefully remove the old impeller. The cams are not in this bike right now to hold everything in place, so I took a firm grip of the impeller and the chain wheel with one hand and removed the bold with the other. With the cams in, you should have nothing to worry about.
New impeller installed. This one has the keyed flat surface in the hole, so it fits on nicely and doesn't make contact with the flat surface behind.

Install the new cover with the O-ring from the old cover (or buy a new one like we did).

Here's a look at the old impeller and the wear marks on the edges of the fins and the interior of the cover.


 ...
...