Been swamped and just got around to installing the 144 kit last night. Very nice kit. Stuffing the 125 piston in the 144 barrel really shows how much is gained which seems like a lot. I knew my jetting was rich but the bike ran real good. After taking it apart it was running far richer than i thought.
125 / 144


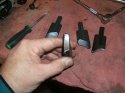
These are for Walt. It looks like the end cuts are exactly the same as the updated replacements for the 125. The only difference is the length overall.


installed

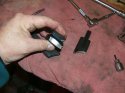
You need to build the assembly before dropping it in...


Drop them in and then install the rod and lever. Make sure you notice the reaces hole for the set screw on the lever, install and rotate tot he positions so the set screw goes in the depression...


Piston goes in arrow forward, ring goes on lettering up. I also install the far side pin clip before installing the piston on the rod.

Also note that there is a locating pin for the ring gap, make sure all is lined up nice before dropping the cylinder on.

Gasket goes red strip side down, can only go on one way due to the collars around the two cylinder studs.

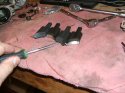
All ready for the cylinder...

Install the bolts and button it up. then reattach the linkage arm and put the cover back on.

Kicking it over at this point slowly to make sure everything rotates well. I alway lube the cylinder a little with 2 stroke oil. Seem like it had a lot more compression. This is going to be fun. Wish the freaking rain would go away.

125 / 144
These are for Walt. It looks like the end cuts are exactly the same as the updated replacements for the 125. The only difference is the length overall.
installed
You need to build the assembly before dropping it in...
Drop them in and then install the rod and lever. Make sure you notice the reaces hole for the set screw on the lever, install and rotate tot he positions so the set screw goes in the depression...
Piston goes in arrow forward, ring goes on lettering up. I also install the far side pin clip before installing the piston on the rod.
Also note that there is a locating pin for the ring gap, make sure all is lined up nice before dropping the cylinder on.
Gasket goes red strip side down, can only go on one way due to the collars around the two cylinder studs.
All ready for the cylinder...
Install the bolts and button it up. then reattach the linkage arm and put the cover back on.
Kicking it over at this point slowly to make sure everything rotates well. I alway lube the cylinder a little with 2 stroke oil. Seem like it had a lot more compression. This is going to be fun. Wish the freaking rain would go away.
 Where's my kit K?!!!
 Bout to go ride some fresh trail we just cut on foot yesterday. Gonna bring the Gopro should be plenty of face slappers.